Steam not opening in Windows 10? Don’t worry! In this post, you will read about possible steps to troubleshoot the issue.

Steam is the digital distribution platform curated by the Valve Corporation. It offers users multiplayer gaming, digital right management, social networking, video streaming services, installation and automatic updating of games accompanied with various community features like cloud saving, friends groups and lists, and in-game voice functionality.
The team of developers behind steam giving their best to ensure that it runs on the user’s system flawlessly. Still, lots of users facing an issue due to which Steam won’t open in Windows 10.
Majority of the uses reported on the web that they started experiencing the issue when they upgraded to latest version of Windows 10 Anniversary update or Creators update. Let’s discuss the scenario shared by one of the steam users on Windows 10. He said, Steam Not Opening in Windows 10:
After updating to latest version of Windows 10 when I tried to run Steam.exe, it connects to the server instantly. Sharply thereafter, a windows dialog box appear telling that “Updating Steam“. Once it is done with “Verifying Steam Package” and “Updating Steam“, Another window appear featuring a Steam icon right before Steam crashes and just passes.
The worst part is that there is no error message provided by the system, no information in the Event view or you can say I have not a single sign what happened exactly.
Fix: Steam Not Opening in Windows 10
I’m sure there might be other users facing the same issue. So to help those users, I decided to cover this post in which I have tried cover all the possible troubleshooting steps to fix the Steam won’t open in Windows 10.
So without further delay why don’t you start reading about them:
1. Reboot
As I always suggest whenever you face any issue in Windows 10 the solution is to reboot the system. 70% of the Windows operating system can be fixed just by doing a quick reboot.
2. Run in the Compatibility mode
In case, you have not tried running the Steam.exe program as administrator in the compatibility; then I recommend you must do that and check if this fixes the issue.
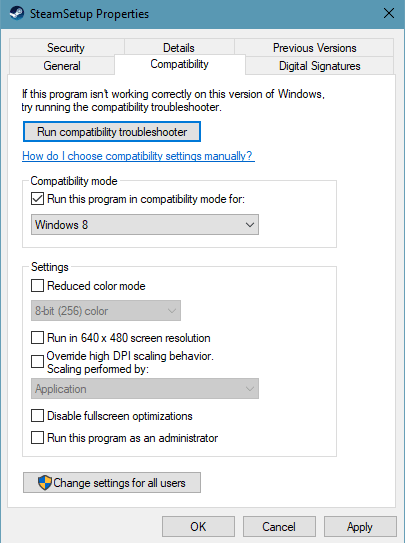
You can do that by making right click on the Steam.exe file and select Properties. Here under “Run this program under compatibility mode for” use the drop and choose windows operating system, then click Apply and OK.
Alternatively, you can click on the Run compatibility troubleshooter.
3. Disable Security Program
To troubleshoot the issue, you can also temporarily disable system security software like Antivirus and run the Steam.exe software. If after doing this if Steam client is working fine, then you can re-enable security program. If still not working head over to next steps.
4. Update Graphics Drivers
If you’re using Nvidia graphic card, then I recommend you to update all your Nvidia drivers.
5. Disable Steam Services and background processes
Also, make sure when you’re run Steam client all the services and background processes related to steam is ended or disabled by you. Sometimes these processes and service are the reason behind the problem.
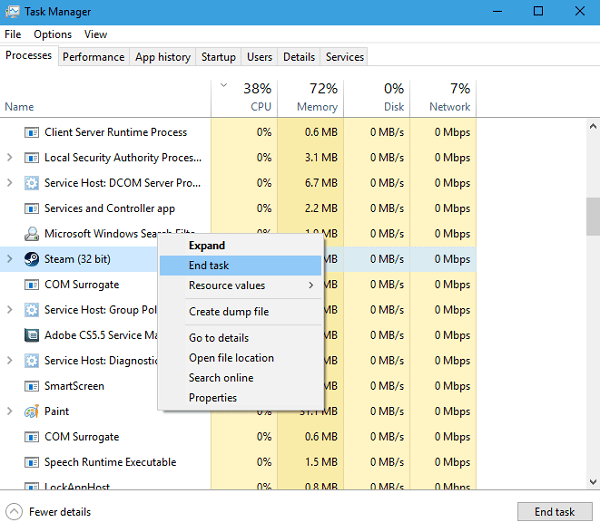
You can look for the services and processes in Task manager. For that, right click on the Windows 10 taskbar and select Task Manager. Here under Processes tab look for any steam service. If available any make right click on it and from the context menu choose End task.
6. Run Steam.exe in Safe Mode
Lots of users reported that they fixed the issue by running Steam.exe in the Safe mode. So I recommend this step to you also. Once you’re in safe mode try to run the application if it works normally reboot into normal mode and try to run the Steam client. If this fails to fix the issue that the steam is not opening in Windows 10, then try the next step.
7. Update Java and Flash
It is also recommended to update Java and Flash with the latest version available for both.
8. Try this Command “steam://flushconfig”
With the help of steam://flushconfig users resolved lots of issues related to Steam. So you can also take help of the same command. When you execute the command, it refreshes the Steam client installation and fixes the Steam not opening in Windows 10 issue.

For that, you need Press WIN + R and paste steam://flushconfig and hit enter.
9. Re-install Steam
One of the recommended solutions is to uninstall and reinstall the Steam program. You can also take help of this solution.
1. First of all, copy all your steamapps (games) folder to some other folder. In case, you don’t want to copy them; later you need to download them again.
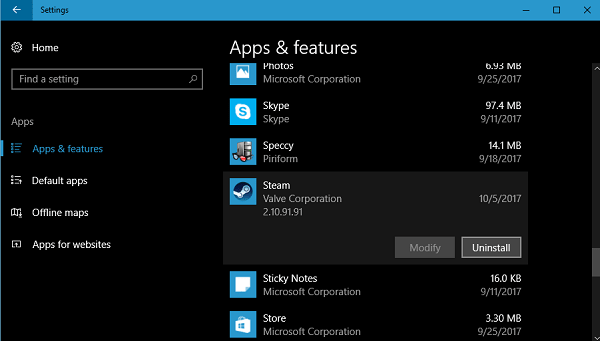
2. To uninstall: Settings -> Apps -> Apps & features. On the right side look for the Steam program and click on the uninstall button.
2. Head over to C:\Program Files (x86) folder and delete the Steam folder.

3. Reboot your system.
4. Download the latest version of the Steam client using this link.
5. Run Steam Installer as administrator.

6. During the installation when “Choose install location” screen appear click on the Browse button. After that navigate to C:\Program Files (x86). Now click on Make new folder button and name it Steam 2 or related.
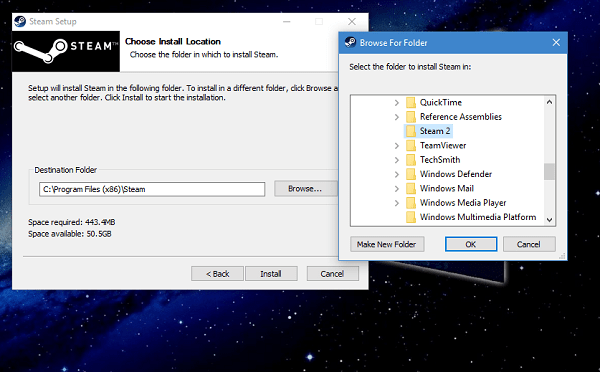
Choose Steam 2 folder to install the setup files and click on the Install button to continue the installation.
Once the installation is completed. Try to run the Steam client, and I’m sure this time it will run without any error.
10. Clean install Windows 10
In case, none of the method suggested above didn’t work for you; then last resort is to perform a fresh installation of Windows 10.
That’s it.
So these are some of the possible solutions which you can use to fix Steam not opening in Windows 10 issue. Try them out and let me know which solution worked well for you.


