Microsoft has officially released Windows 11 with lots of new features and design refreshes. In case, you’re the one waiting for its release and all set to upgrade your PC to Windows 11, then you can do it right away.
Windows 11 is available officially, still, it’s highly possible that you might not get the free upgrade option. It’s because the company’s first priority is to offer Windows 11 upgrades to highly compatible devices.
How to Windows 10 to Windows 11 22H2 without Losing Data for Free
In case, you can’t wait to try Windows 11 on your device, then in this blog post, we will share possible ways with detailed instructions on how to get it.
Before you start, it is vital to find out whether your device is compatible with Windows 11 or not. You can check if Windows 11 is officially compatible with your device hardware using Microsoft’s PC Health Check app. If you pass the compatibility test, then you’re good to go.
In case, your device is not compatible fret not. Still, you can install Windows 11 on older devices.
Upgrade to Windows 11 from Windows 10 using Windows Update
Now that your device is compatible to install Windows 11, then here’s how you can get the update easily:
Launch the Settings app by pressing WIN + I key combination.
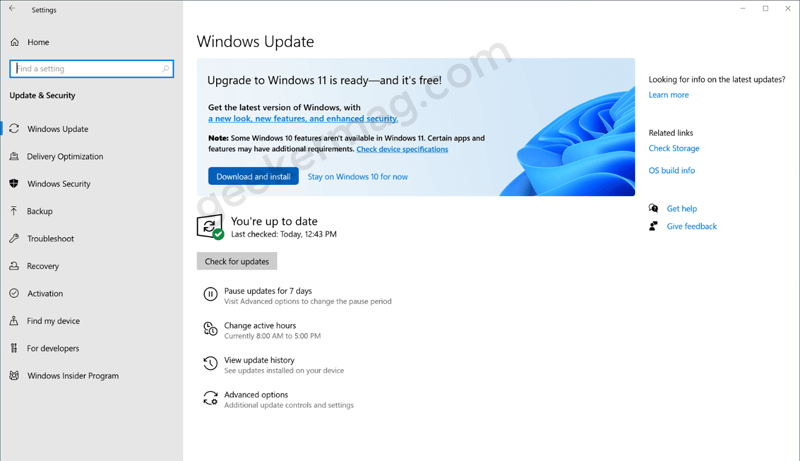
Click on Update & Security and then Windows Update.
On the right side, if there’s an update available with a message that reads “Upgrade to Windows 11 is ready and it’s free“.

It confirms that you’re lucky to get Windows 11 update, click on Download and Install button to complete the upgrade.
The process will take around 30-40 minutes to complete the installation.
In case, the update is not available for you, then don’t worry. According to Microsoft, the majority of the devices will receive Windows 11 updates by mid-2022 and initially compatible devices with receiving the update.
Upgrade to Windows 11 from Windows 10 using Windows 11 Update Assistant
Fortunately, there’s Windows 11 Installation Assistant tool available using which users can fasten up the upgrade process. Here’s how you can do that:
Download Windows 11 Update Assistant using this link and run it. The tool will first automatically start downloading Windows 11.

Once done, you will be asked to restart your device.

After that upgrade process from Windows 10 to Windows 11 will start.

Once the upgrade process completes, you will be shown Windows 11 login screen, enter the password or pin to reach Windows 11 home screen.
As simple as that!
Majority of the users reporting that when they’re trying to upgrade from Windows 10 to Windows 11 using Windows 11 Installation Assistant, the upgrade process fails with error code 0x8007007f
Check out this post: Windows 11 Installation Assistant Error 0x8007007f – How to Fix
Apart from that, you can download an ISO image of Windows 11 from Microsoft, create bootable Windows 11 installation media and perform a clean installation of Windows 11.
After upgrading to Windows 11 if your hard disk space spiked, then you can check this post on How to Reclaim Hard Disk Space After Upgrading to Windows 11


