Some users report that when they’re trying to launch the Camera app in Windows 11, its shows error code 0xa00f4244 instead of opening. The full error message reads:
We can’t find your camera. Check to make sure that it’s connected and installed properly, that it isn’t being blocked by anti-virus software, and that your camera drivers are up to date. If you need it, here’s the error code: 0xA00F4244 <NoCamerasAreAttached> or (0xC00D36D5) (0xC00DABE0)
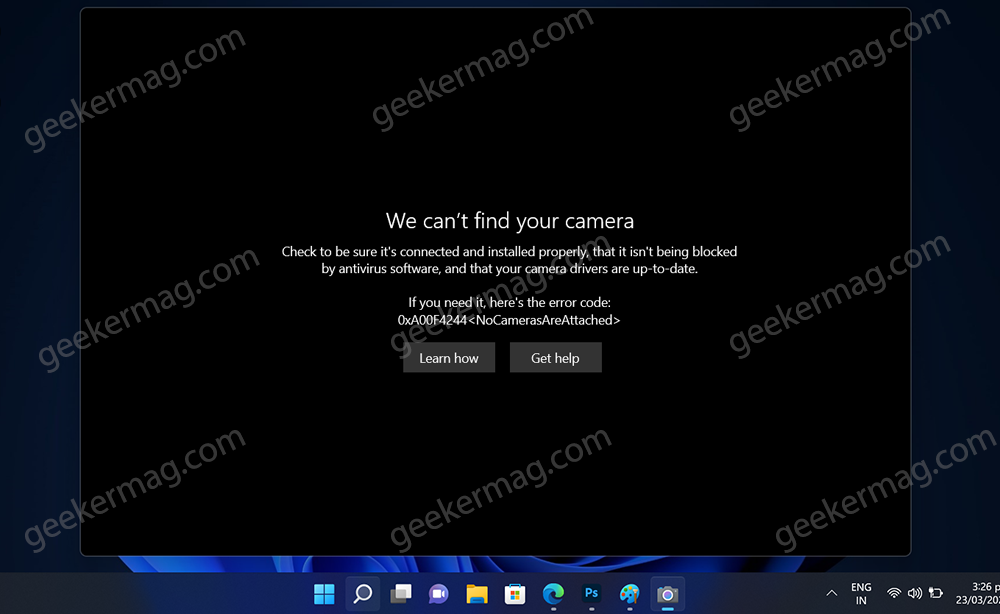
Usually, Camera app error code 0xA00F4244 appears because of faulty hardware if your PC has an integrated camera. In case, you’re using an external webcam, then it’s not connected properly. Apart from that, it’s also possible that camera drivers are outdated.
Camera error is common among all types of Windows 11, recently I started receiving reports from users that they were seeing this error especially after upgrading to Windows 11 from Windows 10 or reinstalling Windows 11.
Fix – We can’t find your camera 0xa00f4244 NoCamerasAreAttached Windows 11
As discussed above, the error message appears but the Camera hardware is faulty, before making a final verdict, we would like to suggest users try the solutions suggested below in this blog post that might fix this camera issue in Windows 11.
So without further delay, let’s get started:
Camera Troubleshoot
Windows 11 offers users a troubleshooting tool for the Camera app. So before doing anything else, use that tool and check if this fixes the issue. Here’s how you can use it:
Click on the Search icon and type Troubleshoot Other problems and when it appears in search results, click to open it.
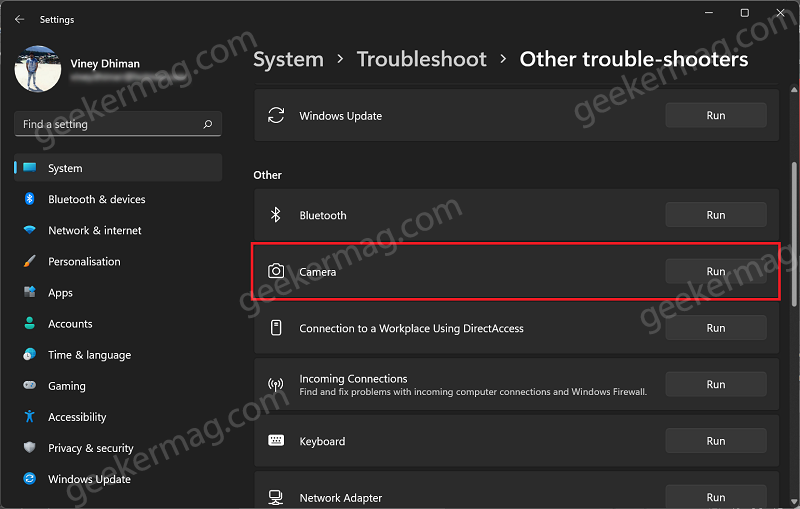
On the Troubleshoot settings page, locate the Camera and then click the Run button next to it. Follow the on-screen instructions and let troubleshooter detect and fix the issue.
If it fails or shows your issue found, then head over to the following method.
Turn-ON/OFF Camera using Physical Button
The majority of the laptops come with a physical button to turn on or off the Camera. In case, it’s OFF, then that could be a reason why you’re seeing a camera error. So first of all, confirm this thing:
Below we’ll share how you can turn on the camera for the majority of PC manufacturers.
- For MSI laptops, Fn + F6
- For ASUS laptops, F10 or Fn + F10
- For HP laptops, there’s a Kill Switch button, you need to slide to the ON position. You can find it on the left or right side of the laptop.
- For Lenovo Laptops, F8 or Fn + F8
You can try these key combos, or you can also search on the internet to find if your device has a particular key combo assigned to turn on or off-camera.
In case, you’re sure that the camera is ON from your end and still an error appears, then head over to the next method.
Check Camera Privacy Settings
Sometimes Camera Privacy settings are turned off and as a result, you see this error message. Confirm if it’s ON. For that,
Click on the Search icon and type “Camera Privacy Settings” and when the same System settings appear in search results, click to open it.
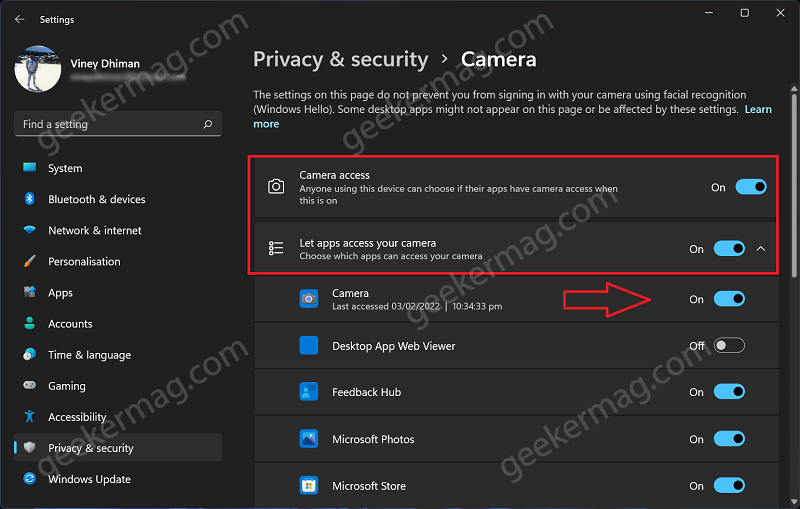
Here, you need to make sure Camera access option is ON. Also confirm that the Let app access your camera is also ON, and Camera entry under it is ON as well.
If all is good here, then head over to the following method.
Reset Camera Settings
Sometimes inappropriate camera settings set by users can trigger the issue. To reset and check if this fixes the issue:
Click on the Search icon and type Manage camera and the same results appear, click to open it.
On the Camera settings page, under Connected camera’s you will get all the cameras connected to your device. It could be an integrated camera or external camera. Select the one.
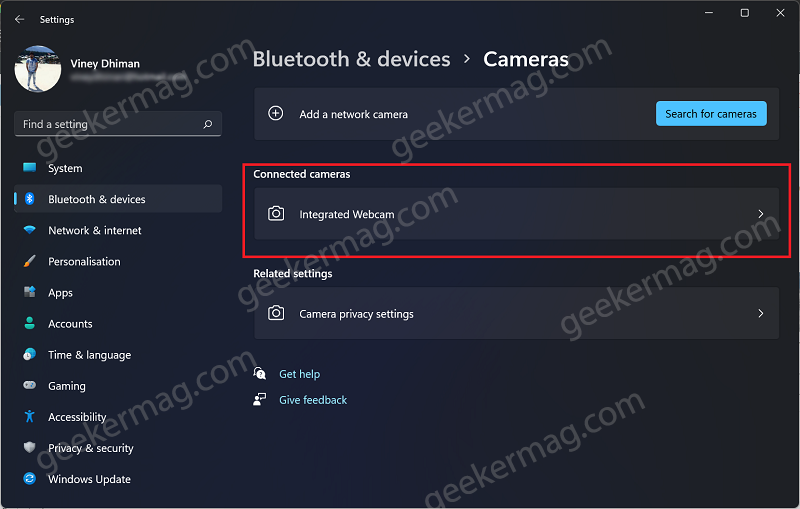
On the next screen, check if a particular camera is working on not. There’s a preview box for it.
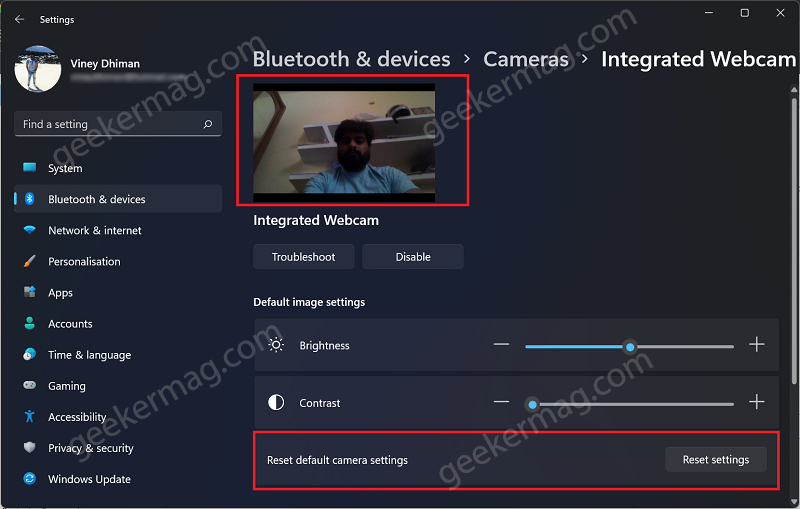
If it’s not working, then head over to Default image settings and locate the Reset default camera settings option. Here, click on the Reset settings button and follow the instructions.
Reset Camera app in Windows 11
Sometimes resetting the Camera app fixes the issue. So you should try this as well. Here’s how you can do that:
Click on the Search icon and type “Add and Remove apps” and when the System setting appears in search results, click to open it.
From the list, locate Camera and then click on the three dots icon and select Advanced options.
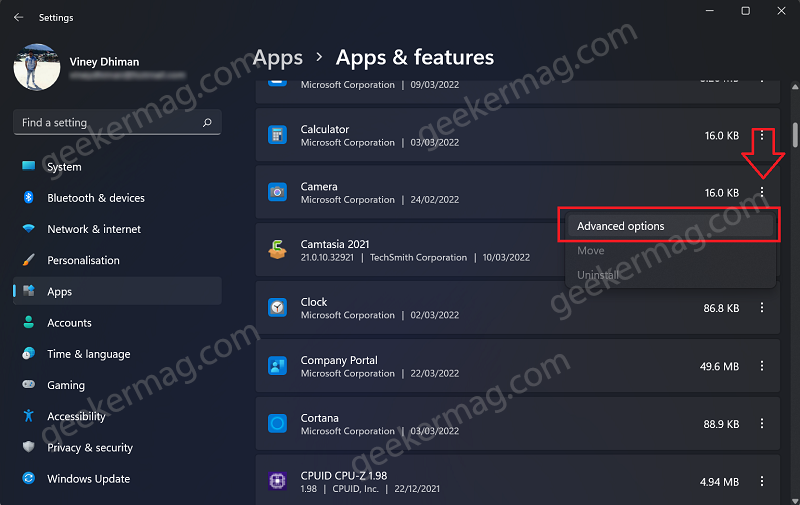
On the next page, click on the Terminate button and then click the Repair button, then click Reset button.
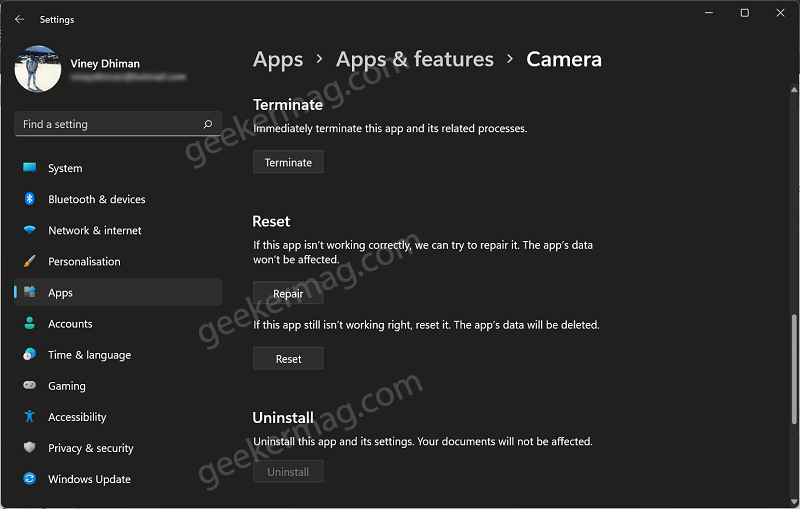
After that reboot your computer and check if this fixes the issue.
Uninstall and Reinstall Camera Drivers
Sometimes Camera drivers are not compatible or get corrupt and as a result, the system fails to detect the camera and throws the error message. In this situation, uninstall the current Camera drivers and download the latest version of drivers from manufacturer’s website.
Press WIN + X key combo and from the WINX menu select Device Manager.
In the Device Manager, locate Camera (if entry is missing, then it’s highly possible that your device lacks drivers or the Camera is faulty).
Double-click on the Cameras and you will find the Camera connected to your PC. Right-click and select Uninstall, if asked for confirmation click Yes.
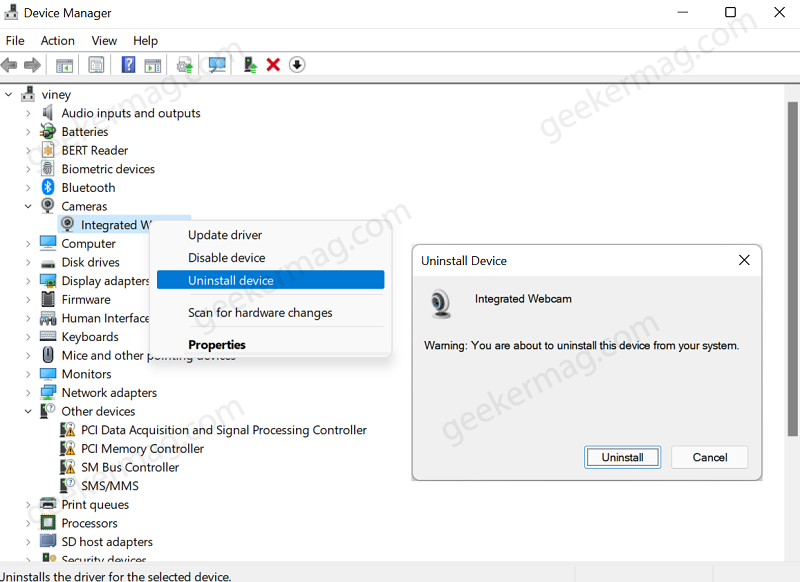
After that, head over to your PC manufacturer’s website and download the latest drivers and install it.
Reboot your computer. Most of the time, doing this fixes the issue. If it also fails to fix the issue, then we’re getting one step close to confirms that the Camera hardware is faulty.
Check Camera Settings in BIOS
We would like to tell you that not all PCs support managing Cameras from BIOS. Usually, this functionality is available in business class PCs and lets users disable or enable the camera or webcam system-wide.
So if your device support this functionality only then this method is applicable to you. You can enter your device into bios and check if it’s available or not.
In my Dell PC it is listed under System configuration > Miscellaneous device > Enable Camera, like show in the screenshot.
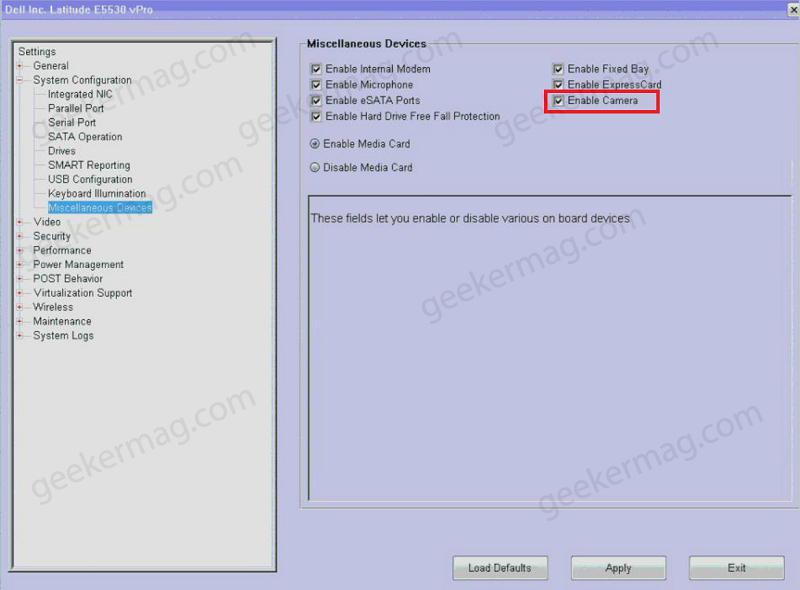
Similarly, you can check for the same option for your device on the website.
Make sure the option is checked if not check it, click Apply, and reboot your computer. After that check if this fixes the issue or not.
Disable Antivirus Problem Temporarily.
If you’re not using any third-party antivirus program, then skip this method. Otherwise, whatever anti-virus program you’re using disable it temporarily and see if the camera works.
After that, check if there are settings related to blocking the access or permission to use the camera. If yes, turn it OFF.
Uninstall Recent Update
In case, Camera was working properly but after installing a particular Windows update it stop working, then its highly possible that there’s some compatibility issue with the content of the update and camera drivers.
In this situation, we recommend you check the windows update history in Windows 11 and uninstall the problematic updates from Windows 11 until the latest update is available.
Check Bluetooth and Camera Settings (New Solution 2022)
Lots of our readers facing this issue suggested that the Bluetooth option was OFF in the Settings app. While other group settings Integrated Camera was disabled. Moving the switch to the ON position helps in fixing the issue for them. So you also try this solution as well
Launch the Settings app by pressing the WIN + I key combination
In the Settings app, select Bluetooth & devices. On the right side, confirm Bluetooth is set to ON. If it was OFF, then make this change and check if this fixes the issue.
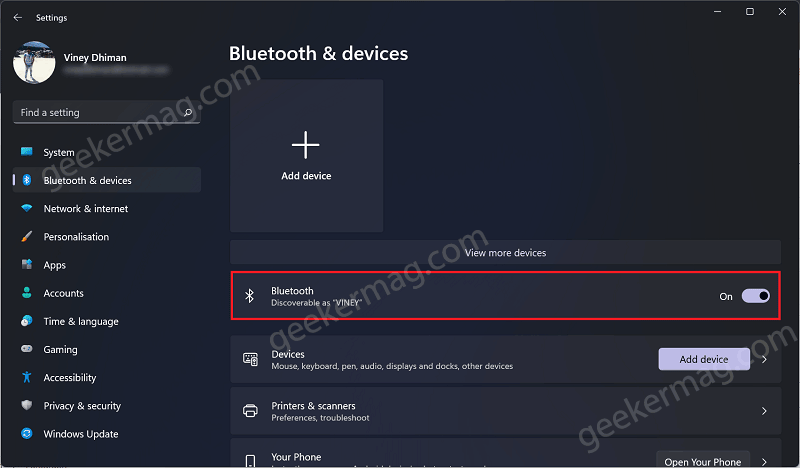
Else, perform an extra step; on the same settings page, click on the Camera option.
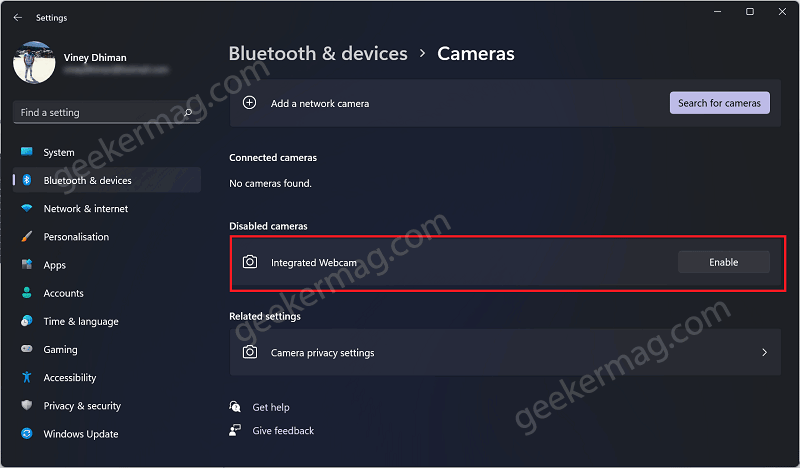
On the Camera settings page, you will find a list of Camera devices connected to your device. Make sure, Camera is enabled.
Last Resorts
If all the methods suggested above fail to fix the Camera issue in Windows 11, then the last resort is to repair upgrade Windows 11 using iso image or reset Windows 11 without keeping data.
If this also fails to fix the issue, then reinstall Windows 11.
In that also fail, then, unfortunately, the Camera is faulty and in this situation, you need to contact the device manufacturer’s hardware engineer for further assistance.
That’s all about this blog post. If any of the solutions help in fixing the issue or you know any other solution that helps you and we missed to cover in this blog post, then don’t hesitate to share with us so that other users can use it.





2 Comments
I found this article very useful. Thank you for the resolution tips.
I’m glad the solutions suggested by us helped you.