While Group Policy updates typically occur automatically at a particular time period, there are scenarios where you might need to force update group policy to ensure that the latest group policies are applied to your PC.
FYI, Group Policy is a feature that allows administrators to define and control various settings for users and computers within a network domain. These settings can include security policies, application settings, and more.
Group Policy Editor is available in Windows Enterprise and Pro editions. In case, you’re running Windows Windows 11/10 Home edition, then learn how to install it in Windows 11 and Windows 10 Home editions.
Now that you’re aware of What is Group Policies in Windows OS, Let’s learn how to refresh group policies manually
Fortunately, the process of updating group policies is super easy, you just need to execute a single command and you’re done. The process hardly takes less than 30 seconds.
How to Force Update Group Policy from Server Windows 11/10
Below in this blog post, I’m going to cover step-by-step instructions on how to force group policy updates from Microsoft servers on Windows 11 or Windows 10 manually. Here’s how you can do that:
Click on the Search icon and type CMD, when Command Prompt appears in the search results, click on Run as administrator.
When the UAC dialog box appears, click Yes to continue.
In the Command Prompt window, you need to execute these commands depending on Computer and User settings.
For Computer Settings, type or copy-paste this: gpupdate /force and hit enter. The system will initiate a Group Policy update for computer settings. This may take a few moments.

For User Settings: type or copy-paste this: gpupdate /target:user /force and hit enter. (Replace user with username )
Once you initiate the Group Policy update using the appropriate command, the system will start applying the latest policy settings. This process may take some time, depending on the complexity of the policies and the system’s resources.
After updating the Group Policies, if you want to restart your computer, then you need to execute this command: gpupdate /boot
How to Confirm If Group Policy Update is Completed
To confirm that the Group Policy update has been successfully applied, you can perform the following checks:
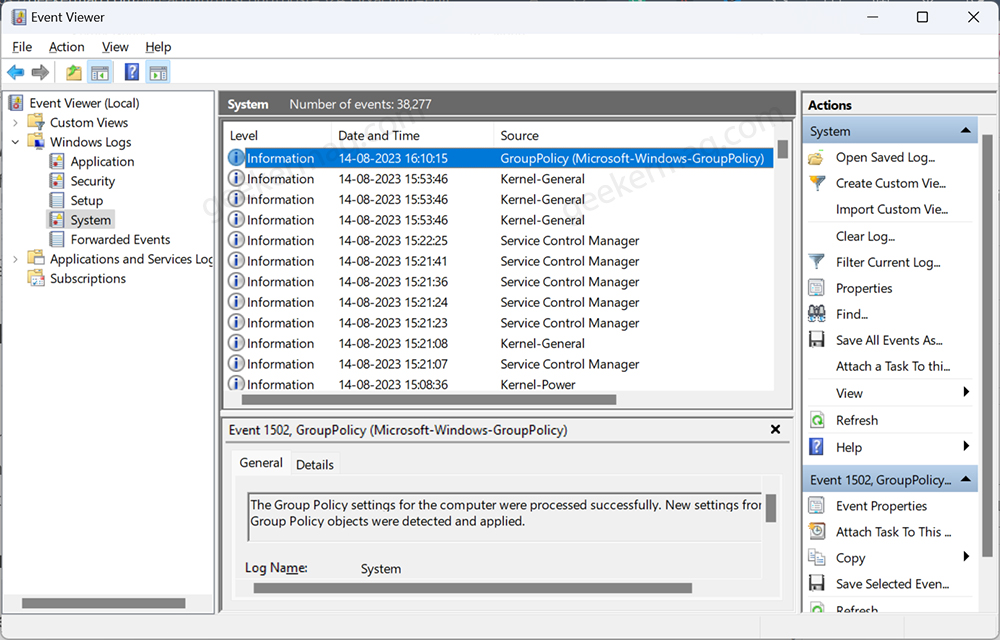
Check Event Viewer: Open the Event Viewer and navigate to the “Windows Logs” > “System” section. Look for events related to Group Policy updates and ensure there are no errors.
Observe Policy Changes: Observe any changes in the system behavior, application access, or other policy-related settings that were updated.
How to Change the Automatic Group Policy Update Interval on Windows PC
By default, Windows periodically refreshes Group Policy settings at intervals of 90 minutes, featuring a random offset ranging from 0 to 30 minutes. However, you can increase or decrease time period intervals manually using Group Policy Editor. Here’s how you can do that:
Using Group Policy Editor
Click on the Search icon and type “gpedit.msc“, when the Group Policy Editor appears in the search results, click to open it.
In the Group Policy Editor, navigate to “Computer Configuration” > “Administrative Templates” > “System” > “Group Policy.”
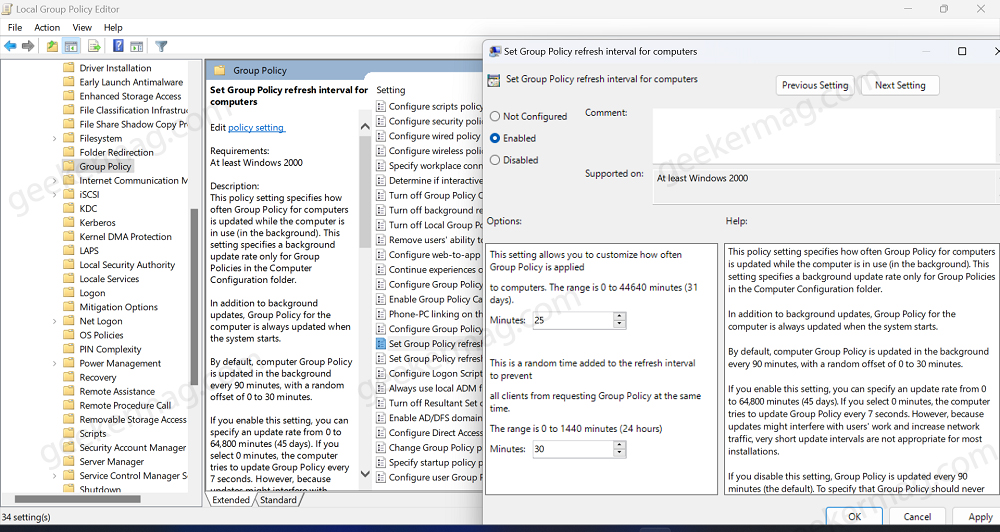
On the right side, locate and double-click “Group Policy refresh interval for computers.” Here, select “Enabled” and set the refresh interval (in minutes) as per your preference.
You can configure the update frequency to any value within the range of 0 to 44,640 minutes, which corresponds to a maximum duration of 31 days.
For example, If you set 0 minutes, PC will try to refresh Group Policy every 7 seconds. However, setting a number that triggers frequent background updates of group policy can computer slow down your computer, then set a reasonable number.
Click “Apply” and then “OK.”
Using Registry Editor
Click on the Search icon and type “regedit“, when the Registry Editor appears in the search results, click to open it.
In the Registry Editor, navigate to HKEY_LOCAL_MACHINE > Software > Policies > Microsoft > Windows > System
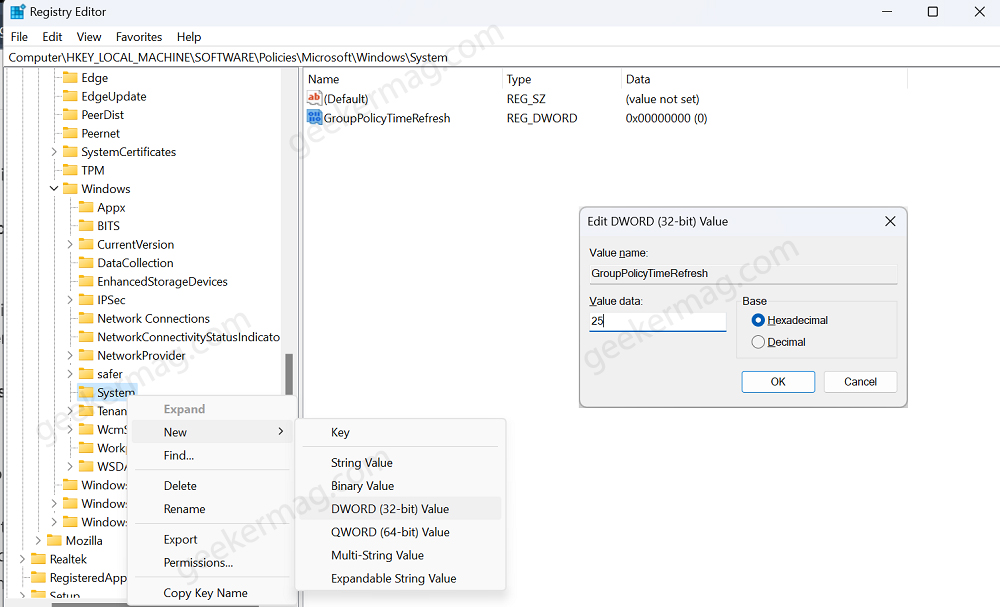
Right-click on System and select New > DWORD (32-Bit) Value, name it GroupPolicyRefreshTime. Double-click on it and set its Value data between 1-30 minutes, depending on your requirements.
For example, if you want to set the time interval to 25 minutes, then set its Value data to 25.
By following the steps outlined in this tutorial, you’ll have the tools to keep your network environment up-to-date with the latest policy configurations. Remember to exercise caution and only use this method when necessary to avoid unnecessary disruptions.
How to Force Update Group Policy (Command) Windows 11/10
Frequently Asked Questions (Faqs)
How Long Does ‘gpupdate /force’ Take?
The duration of “gpupdate /force” varies due to factors like policy complexity and system resources. Typically, it takes a few seconds to minutes. Temporary disruptions may occur as policies are applied.
‘gupdate /force’ command stuck on updating the policy?
If the “gpupdate /force” command becomes stuck during policy updates, then try to restart your computer, and check if your PC is connected to the internet, Make sure, the command prompts run with admin rights.
What does ‘gpupdate /force’ command do?
The ‘gpupdate /force’ command immediately applies the latest Group Policy settings on a Windows computer, ensuring timely implementation of policy changes.

