In recent times, Google’s shift to Manifest V3 has caused quite a stir in the browsing community. This change has placed heavy restrictions on privacy-focused extensions like uBlock Origin, making it harder for users to block ads and trackers. As a result, many people are looking for a better alternative, and Firefox has emerged as the go-to choice.
If you’re planning to make the switch but don’t want to lose your bookmarks, passwords, history, or saved data—don’t worry! In this guide, I’ll walk you through a simple step-by-step process to transfer all your data from Chrome to Firefox effortlessly.
📌 Why Move from Chrome to Firefox?
Before we dive into the steps, here’s why Firefox is a solid alternative:
- Better Privacy – Firefox doesn’t track you like Chrome does.
- Supports Powerful Extensions – No restrictions like Manifest V3.
- More Customization – Tweaks and themes to personalize your experience.
- Open-Source & Independent – Not controlled by a tech giant like Google.
🎥 Watch the Video Tutorial
To make it even easier, I’ve created a step-by-step YouTube video showing the entire process. Check it out below:
Now, let’s jump into the step-by-step guide! 🚀
Step 1: Download and Install Firefox
- Go to the official Firefox download page.
- Click the Download button and save the setup file.
- Run the installer and follow the on-screen instructions.
- Once the installation is complete, Firefox will launch automatically.
Step 2: Import Your Data from Chrome
Firefox makes it super easy to import bookmarks, saved passwords, history, and other browsing data from Chrome.
- Open Firefox and click the three-line menu in the upper-right corner.
- Select Settings from the dropdown.
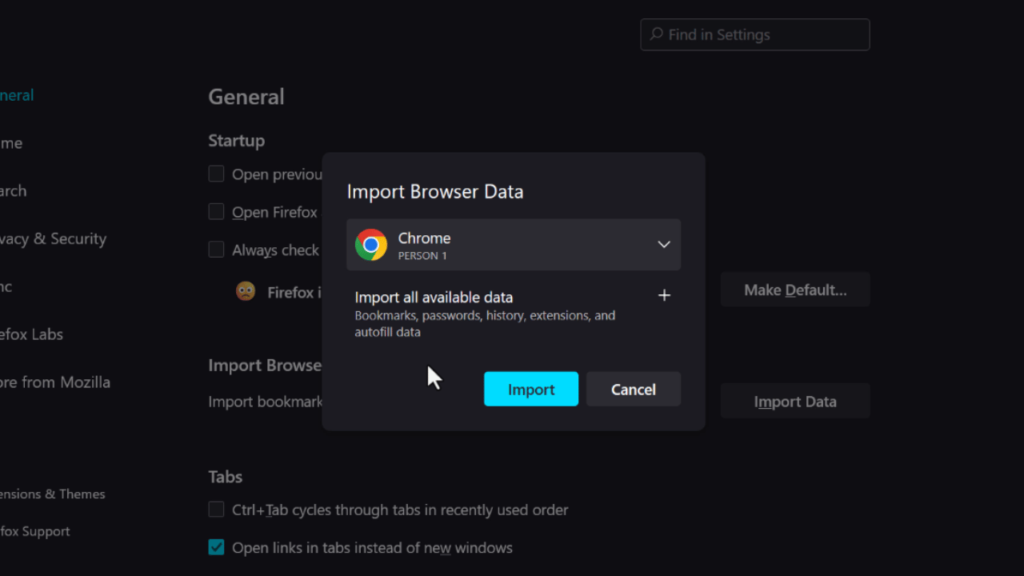
- Scroll down to Import Browser Data and click the Import button.
- A new window will pop up. From the dropdown menu, select Google Chrome as the source.
- By default, Firefox will import everything (bookmarks, passwords, history, and autofill data). If you only want specific data, click the Plus icon and choose what you want.
- Click Import, and the process will start. It should only take a few seconds!
Once it’s done, you’ll see a message confirming that your data has been imported successfully. 🎉
Step 3: Verify Your Data in Firefox
Now that your data has been transferred, let’s make sure everything is in place:
✅ Bookmarks – Check your Firefox toolbar for your imported bookmarks. ✅ Passwords – Open Firefox’s Password Manager to see your saved credentials. ✅ Extensions – Head to the Add-ons page and install any missing extensions.
Everything should now be set up just the way you had it in Chrome! 🚀
Final Thoughts
Switching from Chrome to Firefox is a smart move if you value privacy, flexibility, and unrestricted access to ad blockers like uBlock Origin. With this guide, you can migrate all your important browsing data in just a few minutes!


