Subscribe to Updates

    Get the latest creative news from FooBar about art, design and business.

    What's Hot

    How to Remove Discover Bing button in Microsoft Edge (Stable)

    March 26, 2023

    Fix – Windows Security Showing Blank Screen in Windows 11 | 10

    March 26, 2023

    How to Disable Bing Chat Button in Windows 11 Search Box

    March 25, 2023
    What's Hot

    How to Remove Discover Bing button in Microsoft Edge (Stable)

    March 26, 2023

    Fix – Windows Security Showing Blank Screen in Windows 11 | 10

    March 26, 2023

    How to Disable Bing Chat Button in Windows 11 Search Box

    March 25, 2023
    Facebook Twitter Instagram
    GeekerMag
    • Home
    • Windows
      1. Windows 11
      2. Windows 10
      3. View All

      Fix – Windows Security Showing Blank Screen in Windows 11 | 10

      March 26, 2023

      How to Disable Bing Chat Button in Windows 11 Search Box

      March 25, 2023

      The Advantages of Using a VPN on Your Windows 11 Device

      March 21, 2023

      How to Enable Option to Receive Windows 11 Feature Updates Quickly

      March 21, 2023

      How to Disable New ‘Bing Search Bar’ on Windows 10 Desktop

      March 17, 2023

      How to Stop Internet Explorer Open/Redirect to Microsoft Edge in Windows 10

      March 6, 2023

      How to Download & Install Intel Unison on Windows 10 PC (Workaround)

      February 21, 2023

      Fix – Microsoft Store Error Code 0xC002001B in Windows 10 While Installing Apps

      May 21, 2022

      How to Remove Discover Bing button in Microsoft Edge (Stable)

      March 26, 2023

      Fix – Windows Security Showing Blank Screen in Windows 11 | 10

      March 26, 2023

      How to Disable Bing Chat Button in Windows 11 Search Box

      March 25, 2023

      Disable Rounded Corner Browser Window UI in Microsoft Edge

      March 24, 2023
    • Browser
      1. Microsoft Edge
      2. Google Chrome
      3. Firefox
      4. View All

      How to Remove Discover Bing button in Microsoft Edge (Stable)

      March 26, 2023

      Disable Rounded Corner Browser Window UI in Microsoft Edge

      March 24, 2023

      Use Show Basic Toolbar in Edge to Cleanup Toolbar & Titlebar

      March 17, 2023

      How to Uninstall Microsoft Edge from Windows 11/10 in 2023

      March 13, 2023

      How to Use New Bing Chat Mode in Google Chrome

      March 15, 2023

      How to Disable Windows 10 Upgrade Prompt in Google Chrome – 2023 Guide

      February 2, 2023

      Stop Chrome, Edge Spell Check feature from leaking Passwords

      September 20, 2022

      How to Take Full Page Screenshot in Chrome without Extension

      May 5, 2022

      How to Automatically Reject All Cookies Banner on Sites in Firefox

      December 23, 2022

      How to Install Firefox v100 in Windows 7

      April 9, 2022

      How to Enable Close Tab Warning in Firefox 94

      October 27, 2021

      How to Restore Missing View Image Info Option in Firefox

      September 2, 2021

      How to Remove Discover Bing button in Microsoft Edge (Stable)

      March 26, 2023

      Fix – Windows Security Showing Blank Screen in Windows 11 | 10

      March 26, 2023

      How to Disable Bing Chat Button in Windows 11 Search Box

      March 25, 2023

      Disable Rounded Corner Browser Window UI in Microsoft Edge

      March 24, 2023
    • Gaming

      5 Cool Puzzle and Brain Teaser Games

      November 24, 2022

      4 Alternatives to Microsoft Solitaire You Should Try 

      June 29, 2022

      5 Best Equipment to Stream Your Game Live [Logitech, Tonor & so on..]

      April 6, 2022

      Twitch Set to Offer Income Incentives to Help Level the Playing Field

      March 9, 2022

      How to Stream Xbox One Games to a Windows 11 & 10 PC

      October 25, 2021
    • Best Of

      How to Create Stunning Visuals for Instagram in 2023

      March 23, 2023

      How to Teach your Child to Program in Python

      January 30, 2023

      What Should You Look at Before Choosing Automatic Captioning Software?

      April 20, 2022

      10 Best Windows 11 Laptop to Buy in 2022

      March 16, 2022

      5 Best Logo Maker Sites to Create a Logo in 2022

      January 9, 2022
    • How to

      Upgrading from Windows 7 to Windows 10: How to Keep Your Data Safe‍

      March 20, 2023

      How to Make Coding Fun

      May 25, 2022

      How to Add Captions and Subtitles to Your YouTube Video

      April 25, 2022

      How to Enable or Disable New Gmail 2022 User Interface

      March 5, 2022

      Fix – Stop Edge from Hijacking/Opening PDF Files – (Workaround)

      February 21, 2022
    GeekerMag
    Home»Windows 11»How to Create a System Restore Point in Windows 11
    Windows 11

    How to Create a System Restore Point in Windows 11

    By Viney DhimanDecember 14, 2021Updated:December 15, 2021No Comments5 Mins Read
    Share
    Facebook Twitter LinkedIn Pinterest Email

    PC Repair - Easy way to Repair Windows 11 & Windows 10 PC
    Driver Updater - Update Drivers Automatically.

    Recommended for Fixing Issues and Updating Drives on Windows PC. Trusted by Millions

    No matter, you want to install the latest update, have plans to modify registries, implement a workaround to fix an issue, then System Restore is one of the recovery features in Windows 11 worth trying.

    System restore is a nifty feature that comes preinstalled in Windows OS and is available in Windows 11 as well. It helps in creating a backup of important files and settings in Windows OS when your computer is in a fixed state called a Restore point or System Restore point.

    In case, installation failure or data corruption occurs, then System Restore will help you return back to the state of the computer when it was working properly. In short, it helps in repairing the Windows environment without reinstalling Windows 11.

    Contents show
    How to Create a System Restore Point in Windows 11
    Enable System Restore feature in Windows 11
    Use Restore point to Restore Windows 11 PC to Earlier date
    How to Delete Restore point in Windows 11

    How to Create a System Restore Point in Windows 11

    Out of the box, System restore feature is disabled in Windows 11. If you want to use it in the future, then you have to create a System Restore point first.

    Enable System Restore feature in Windows 11

    Before doing that, it is very important to know if the System Restore feature is ON. If it’s OFF, then you won’t be able to create a System Restore point. So first confirm that. Here’s how you can do that:

    Click on the Search icon on the taskbar, and then search Create a restore point, when it appears in search results, click to open it.

    In the System Properties window, you need to switch to the System Protection tab. Here, under the Protection Settings see whether the protection is OFF or ON.

    If it’s OFF, then it means that the System Restore feature is turned OFF. Apart from that, you will find that Create option is grayed out.

    And you will have to enable the System Restore feature for the drive whose protection is off. Select the drive from the list, and then click on Configure. 
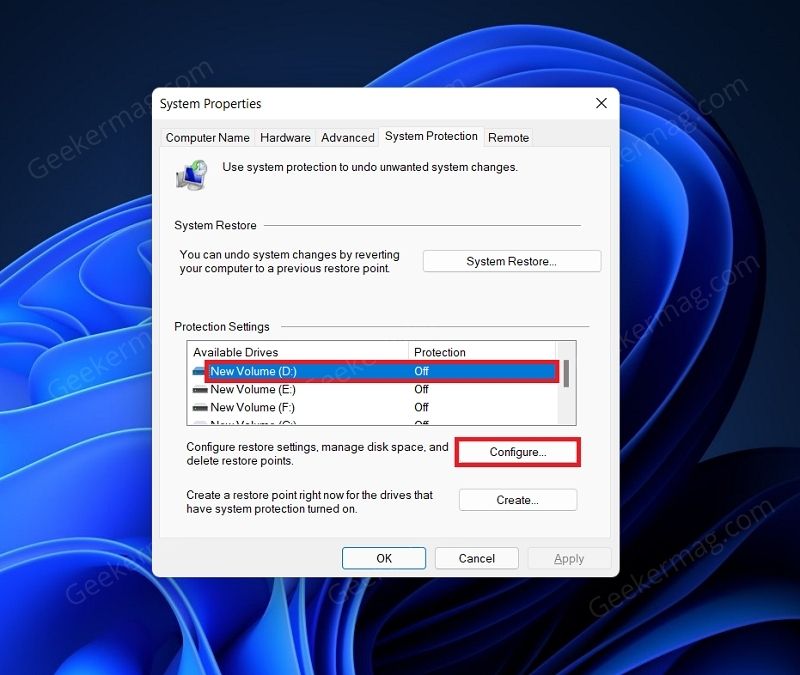
    System Properties

    Under the Restore Settings, select Turn on system protection. You can also increase the storage for the system restore by sliding the slider next to the Max usage. 
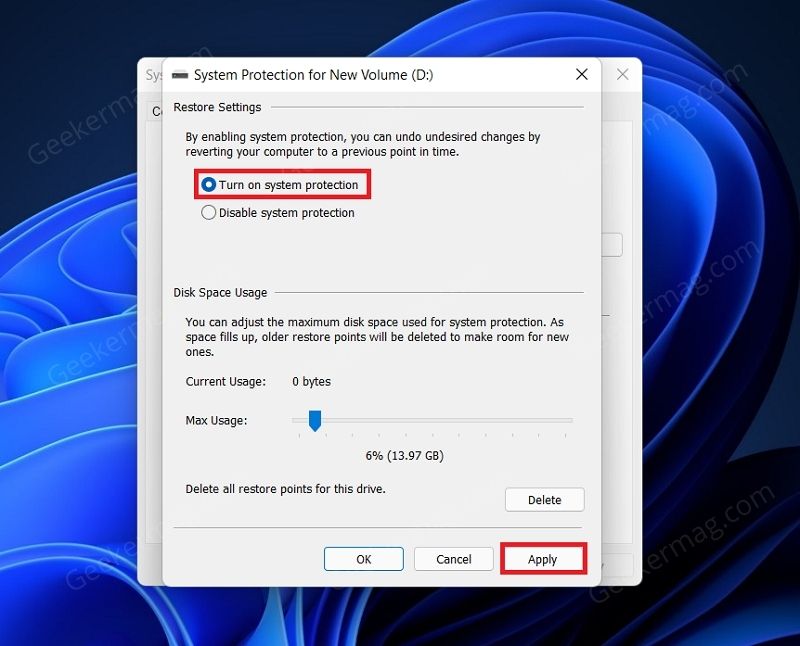
    Restore Settings

    Once done, click on the Apply to enable the System Restore feature.

    After you have enabled the System Restore feature, you can continue with creating a restore point in Windows 11.

    To do so, open the System Protection tab in the System Properties. You can do so by searching for Create a restore point in the Start Menu and then opening the relevant search result.
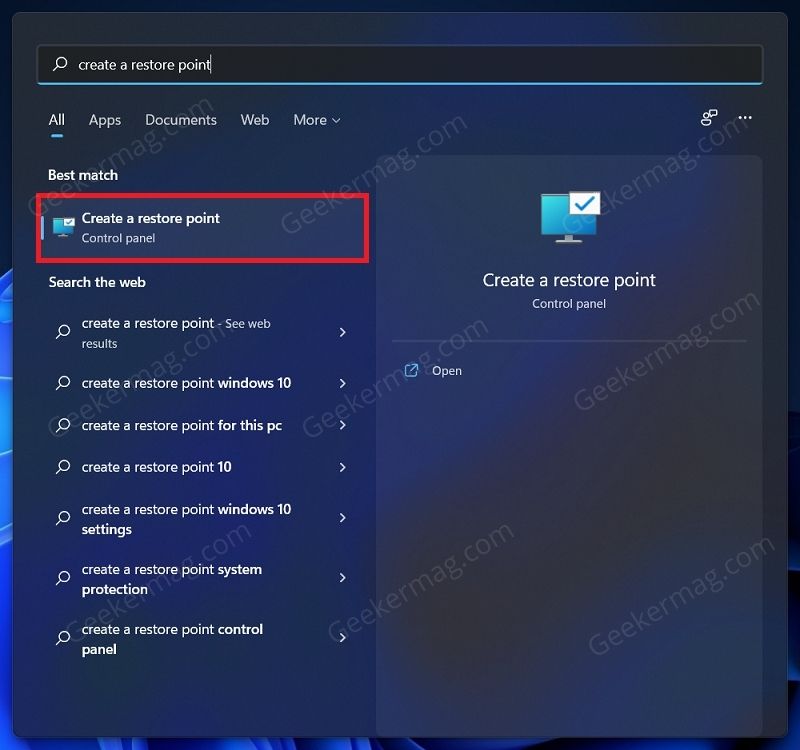
    Create A Restore Point

    Select the drive for which you want to create the restore point. Ensure the Protection status is on. If it is off, then you can follow the steps above to do it. After selecting the drive, click on the Create button.
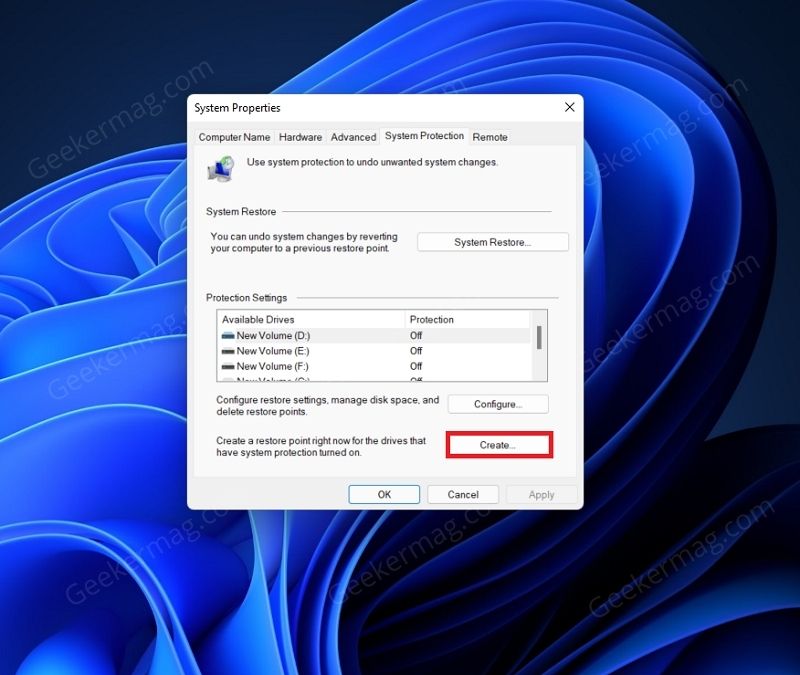
    System Restore

    In the next window, you will be asked to enter the name of the restore point you are creating. Click on the Create button to create the restore point. Once the restore point has been created, you will get a message saying “The restore point was created successfully” message.
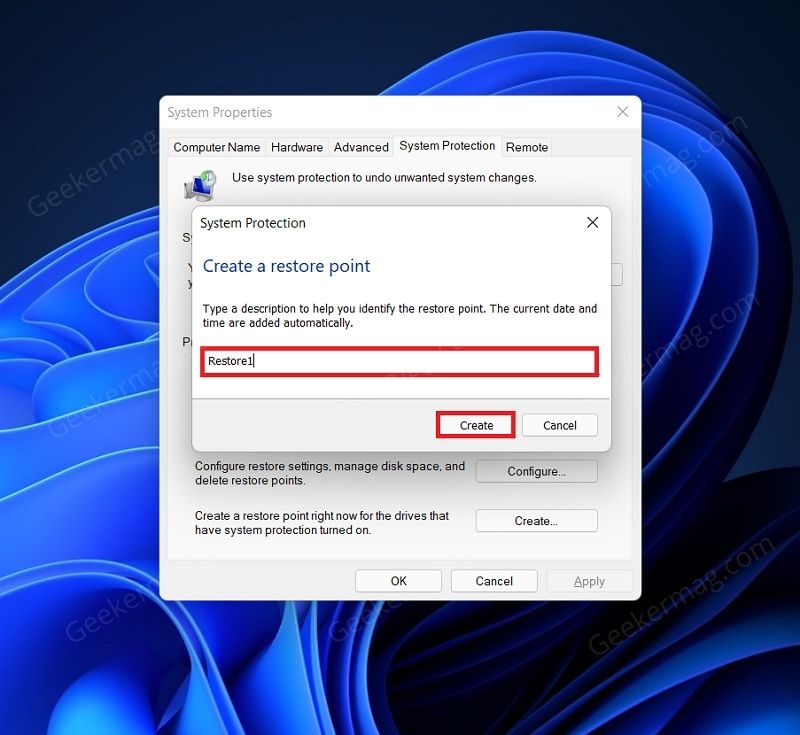
    System Protection

    System protection dialog will appear and start creating a restore point. Once the process completes, you will get a message i.e. The restore point was created successfully.
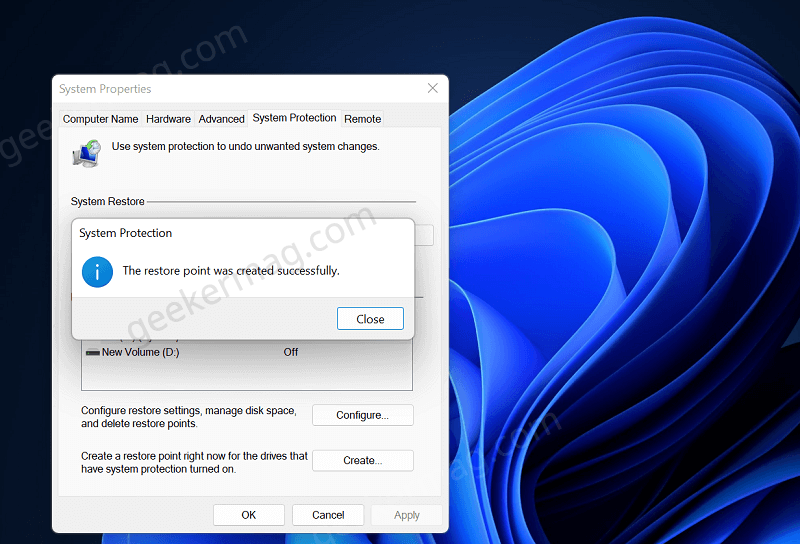
    The restore point was created successfully

    Click on the Close button to close the dialog box. And you’re done.

    Use Restore point to Restore Windows 11 PC to Earlier date

    At any point, you feel that your system is not working properly, then you can restore your computer to an earlier state when it was working properly using a restore point, then here’s how you can do that:

    Note – The system restore is a time taking process so do it only if other recovery methods fails to fix the issue.

    Click on the Search icon and type “Create a System restore“, when the same results appear, click to open it.

    In the System Properties window, switch to System Protection > System Restore.

    Instantly, Restore system files and settings window will appear with two options, Recommended restore (we recommend you to go for this) and Choose a different restore point (go for this method, if you know that there’s a better system point available).

    restore files

    Select the preferred options and click Next.

    In the next screen, you will get full detail about the restore point and additional information.

    Confirm your restore point in windows 11

    At last, click on the Finish button. Instantly a dialog will appear with a message i.e. “Once started, System Restore cannot be interrupted. Do you want to continue?” Click Yes or NO. depending on your choice.

    Note – You can click on the Scan for affected files if you want to know what files and drivers are affected. It will scan and show you the list. The same will be deleted from your device and replaced with good ones.

    Once started, System Restore cannot be interrupted. Do you want to continue

    Now the system will create a restore point of the current system state, then the system will reboot automatically and start the restore process.

    Once confirmed system restore process will start. Now, wait, until the process completes.

    How to Delete Restore point in Windows 11

    Having a restore point is always a good choice, but in any situation you want to delete the restore point in Windows 11, then here’s how you can do that:

    In the System Properties window, switch to System Protection > Configure.
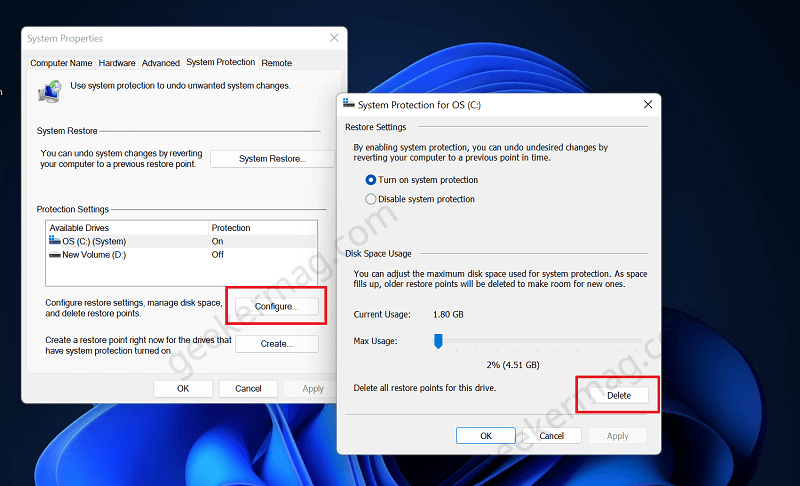
    Delete Restore point in Windows 11

    On the next screen, click on the Delete button. Click Apply and OK, wherever required. You’re done.

    We have explained very well everything about how you can enable, create, restore and delete restore points in Windows 11. In case, you need additional information and assistance, then feel free to us contact in the comment.

    Donate on Paypal or Buy us a coffee or Join Patreon if you find the information shared in this blog post useful. Mention ‘Coffee’ in the Subject. So that I can thank you.

    Create restore point in windows 11 delete restore point in windows 11 enable restore point feature in windows 11
    Share. Facebook Twitter Pinterest LinkedIn Tumblr Email
    Viney Dhiman
    • Website
    • Facebook
    • Twitter
    • Instagram
    • LinkedIn

    Himachali, Mechanical Engineer, Snooker Lover, Avid drinker of Scotch, Traveler, and Webmaster.

    Related Posts

    Fix – Windows Security Showing Blank Screen in Windows 11 | 10

    March 26, 2023

    How to Disable Bing Chat Button in Windows 11 Search Box

    March 25, 2023

    The Advantages of Using a VPN on Your Windows 11 Device

    March 21, 2023

    How to Enable Option to Receive Windows 11 Feature Updates Quickly

    March 21, 2023
    Add A Comment

    Leave A Reply Cancel Reply

    This site uses Akismet to reduce spam. Learn how your comment data is processed.

    Recommended Video on YouTube
    Recommended to Windows Users
    • PC Repair – Easy way to Repair Windows 11 & Windows 10 PC
    • Driver Updater – Update Drivers Automatically. Trusted by Millions.
    Our Picks

    Fix – Windows Security Showing Blank Screen in Windows 11 | 10

    March 26, 2023

    How to Disable Bing Chat Button in Windows 11 Search Box

    March 25, 2023

    The Advantages of Using a VPN on Your Windows 11 Device

    March 21, 2023

    How to Enable Option to Receive Windows 11 Feature Updates Quickly

    March 21, 2023

    Need Premium Tech Support?

    If you're unable to fix the issue on your Windows 11 or Windows 10, we can fix it for you.

    Need Support?

    Please do not hesitate to Contact me on Twitter or Join Facebook Group if you want assistance with issue related to Windows 11, Windows 10, and Edge browser. I will try my best to assist you ASAP. (Follow me first and then PM your issue on Twitter)

    Help Us Grow!

    Donate on Paypal or Buy us a coffee or Join Patreon if you find the information shared in this blog post useful. Mention ‘Coffee’ in the Subject. So that I can thank you

    Facebook Twitter YouTube
    • About
    • Contact
    • Privacy Policy
    • TOC
    © 2023 All Rights Reserved | GeekerMag

    Type above and press Enter to search. Press Esc to cancel.