Windows 11 brings an array of exciting features and improvements, including a revamped Camera app designed to enhance your multimedia experience.
However, like any application, the Windows Camera app (that comes preinstalled) is not immune to errors. One such frustrating error that users encounter is the “0xA00F429F” error, which prevents the Camera app from functioning correctly.
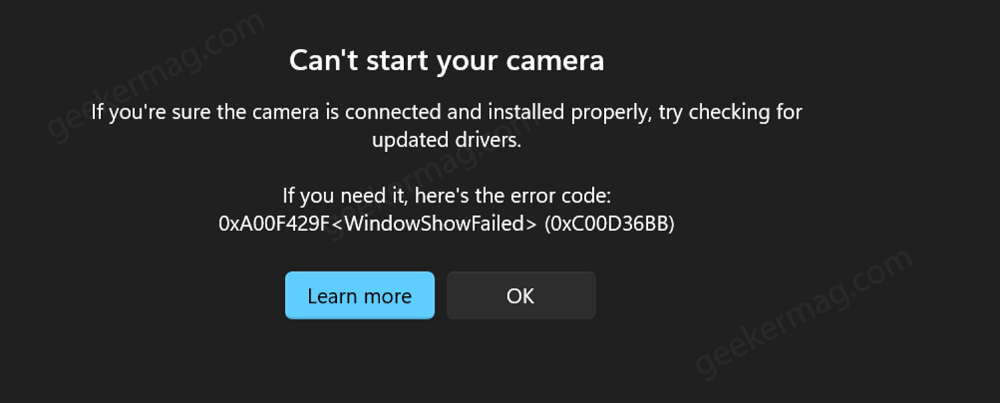
What actually happens is when affected users open the Camera app, instead of opening, it shows an error message that reads:
Can’t start your camera. If you’re sure camera is connected and installed properly, try checking for updated drivers.
If you need it, here’s the error code 0xA00F429F<WindowShowFailed>(0xC00D36BB) or (0x887A0004)
The 0xA00F429F error is a common problem that can be caused due to various factors, including outdated or corrupt camera drivers, incorrect privacy settings, and malware infections.
You may love to read about Camera App’s 0xA00F429F Error in Windows 11. If you own Surface Pro X and see MediaCaptureFailedEvent “0xA00F4271 (0x80004005)” Error.
If your webcam stops working after upgrading to Windows 11, then check this post: Fix – Webcam not working after upgrading to Windows 11
Fix – Can’t Start Camera Error Code 0xA00F429F WindowsShowFailed Windows 11/10
If you landed on this blog post, then it’s possible that you’re seeing the same error message when opening the camera app. Below in this blog post, we will walk you through the steps on how to fix the 0xA00F429F error in Windows 11.
Using Physical Buttons on Different Laptop Brands
If you are experiencing a camera error on your laptop, the first thing to check is whether the camera is turned on or off using the physical button. Here are the methods to turn on the camera for different PC manufacturers:
- MSI Laptops: Press the “Fn” key and the “F6” key simultaneously to turn on the camera.
- ASUS Laptops: You can turn on the camera by pressing either the “F10” key or “Fn + F10” together.
- HP Laptops: Look for the Kill Switch button on the left or right side of the laptop. Slide it to the ON position to activate the camera.
- Lenovo Laptops: To turn on the camera, press the “F8” key or use the combination “Fn + F8“.
Make sure to try these steps to ensure the camera is enabled before troubleshooting further camera issues.
Update, Uninstall, and Reinstall Camera Drivers
You need to ensure that the Camera device is up to date for proper functioning. You can follow the instructions discussed here: How to Update Drivers for Windows 11.
The blog post has instructions on how to update, delete, and reinstall drivers on Windows PCs.
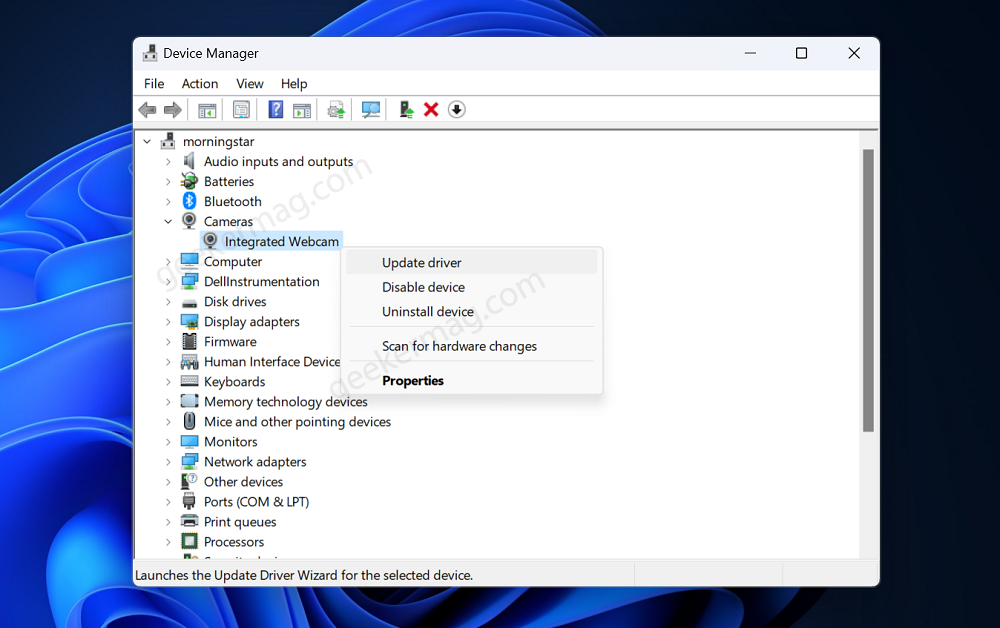
Alternatively, you can head over to the manufacturer’s website and download the latest Camera driver for your Windows PC or use OutByte Driver Updater.
Check Windows 11 privacy settings
Another possible cause of the 0xA00F429F error is incorrect privacy settings. To check your privacy settings, follow these steps:
Open the Settings app in Windows 11. For that, click on the Start button and select Settings from the start menu.
Switch to Privacy & Security on the left.
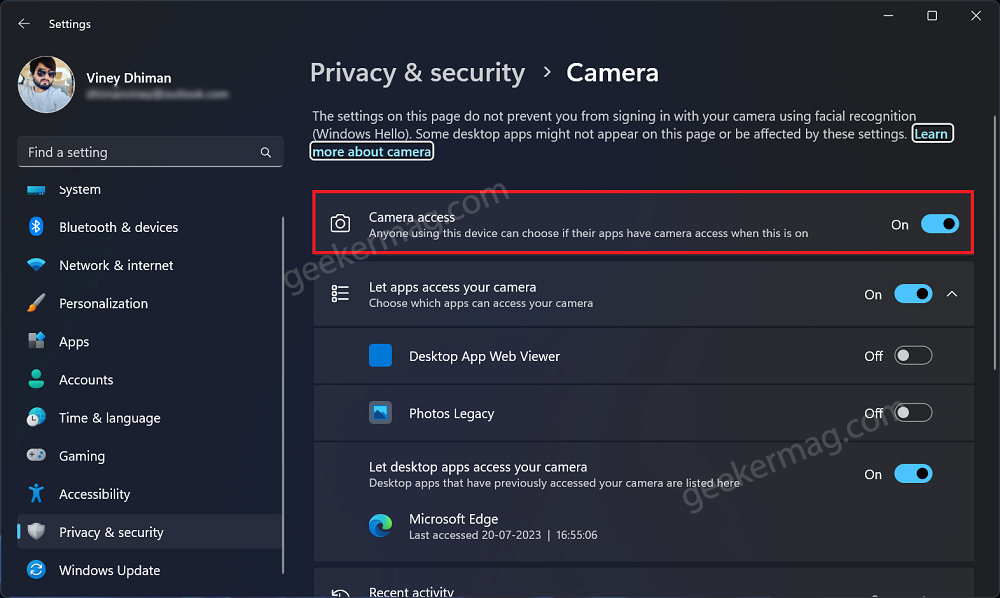
On the right side, scroll down until you reach to App permissions section and click on the Camera.
Make sure that the Camera Access setting is turned ON.
Run the Camera troubleshooter
Windows 11 includes a built-in troubleshooter that can help you fix problems with the Camera app. To run the troubleshooter, follow the instructions discussed below:
Click on the Search icon and type Troubleshoot other problems. When the same setting appears in the search results, click to open it.
Scroll down to Camera Troubleshooter and then click on the Run button.
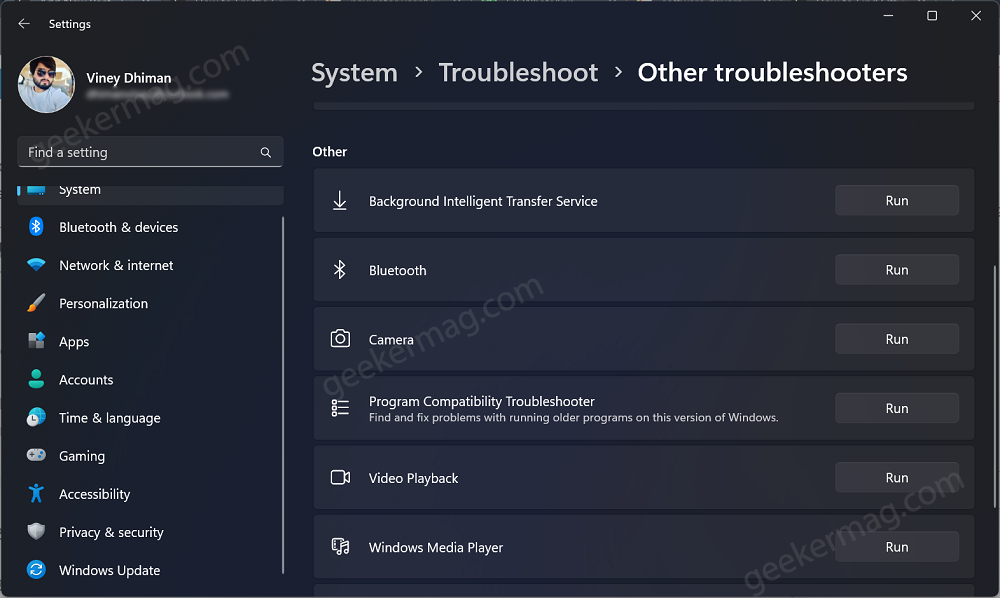
Follow the on-screen instructions and let the troubleshooter find and resolve the issue.
Reset the Camera app
If the above steps do not fix the problem, you can try resetting the Camera app. To reset the Camera app, follow these steps:
Click on the Search icon and type Camera, when the same app appears in search results, click to open it.
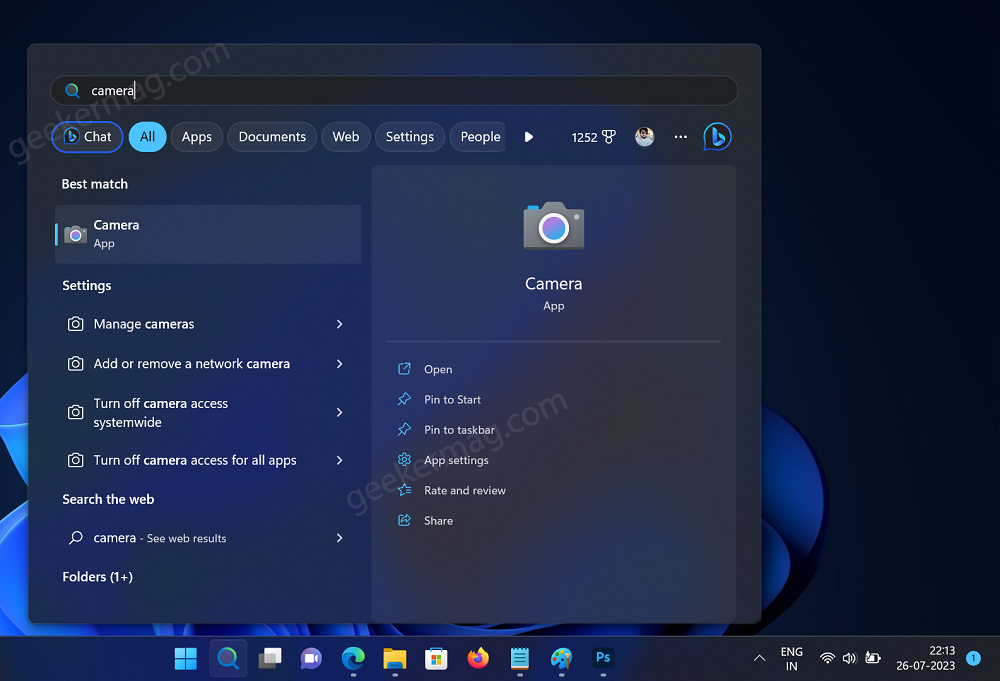
Click on the App settings option available on the menu.
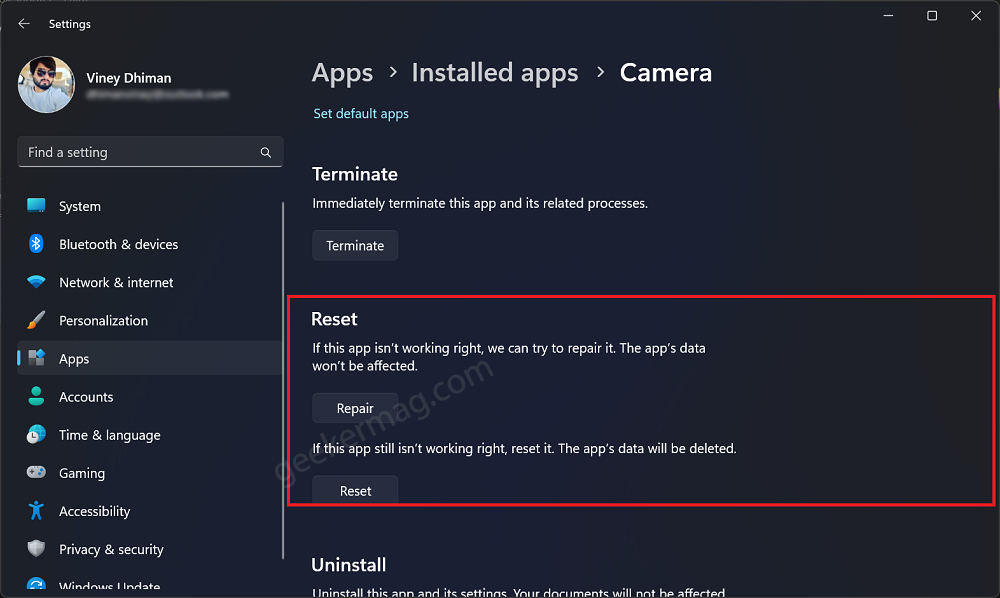
In the App settings page, scroll down to the Reset section, then click on the Reset button.
Use Registry hack
Click on the Search icon and type regedit, when the Registry editor appears in the search results, click to open it.
In the Registry Editor, go to the following key: Computer\HKEY_LOCAL_MACHINE\SOFTWARE\WOW6432Node\Microsoft\Windows Media Foundation\Platform
Once you are at the correct key, right-click on an empty area and select New > DWORD (32-bit) Value.
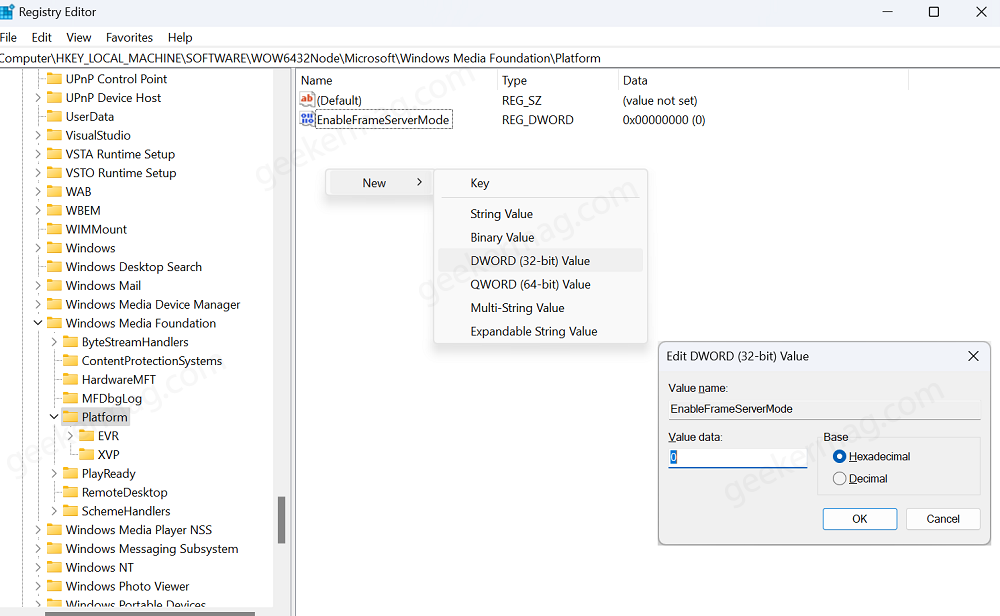
A new DWORD value will be created, and you should name it “EnableFrameServerMode.” Double-click on it and set its Value data to 0.
Ensure that the “Base” is set to “Hexadecimal.”
Click on “OK” to save the changes.
Close the Registry Editor. To apply the changes.
When the “EnableFrameServerMode” DWORD value is set to “0” (with the Base value set to Hexadecimal), it effectively disables the Frame ServerMode for cameras. The Frame ServerMode is a feature in Windows that allows multiple applications to access a camera simultaneously.
By disabling this feature, only one application at a time can access the camera, which might be necessary to resolve certain camera-related issues or conflicts.
After that, open the camera app and check if this fixes the issue or not.
Disable the Camera Shields feature in the Antivirus Program
Some third-party antivirus software packages have features like “camera shields” that can block access to the camera. If you are using one of these packages, then try to disable this feature to fix the issue:.
The steps to disable the camera shields or similar features will vary depending on the antivirus software package you are using. However, in general, you will need to open the antivirus software settings and find the section that deals with camera protection. Once you have found this section, you should be able to disable the camera shields.
Reinstall the Camera app
If resetting the Camera app does not fix the problem, you can try reinstalling the Camera app. To reinstall the Camera app, follow these steps:
Uninstall the Camera app
Press the Windows key on your keyboard to open the Start menu.
Type “PowerShell” in the search bar. Right-click on “Windows PowerShell” from the search results and select “Run as administrator” from the context menu.
If the UAC dialog box appears, click “Yes” to continue with administrative privileges.
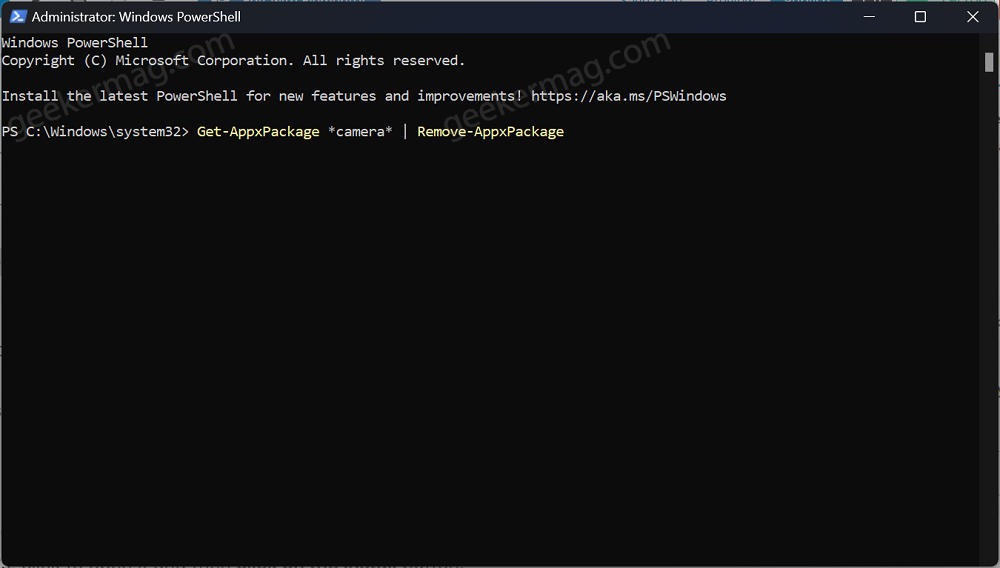
In the PowerShell window, paste the following command and press Enter:
Get-AppxPackage *camera* | Remove-AppxPackageThis command will uninstall the Camera app from your system.
Reinstall the Camera app from the Microsoft Store
Open the Microsoft Store app on your Windows 11 PC.
Click on the Search icon and type Camera, when the same app from Microsoft appears in search results, click to open it and then click on the Install button.
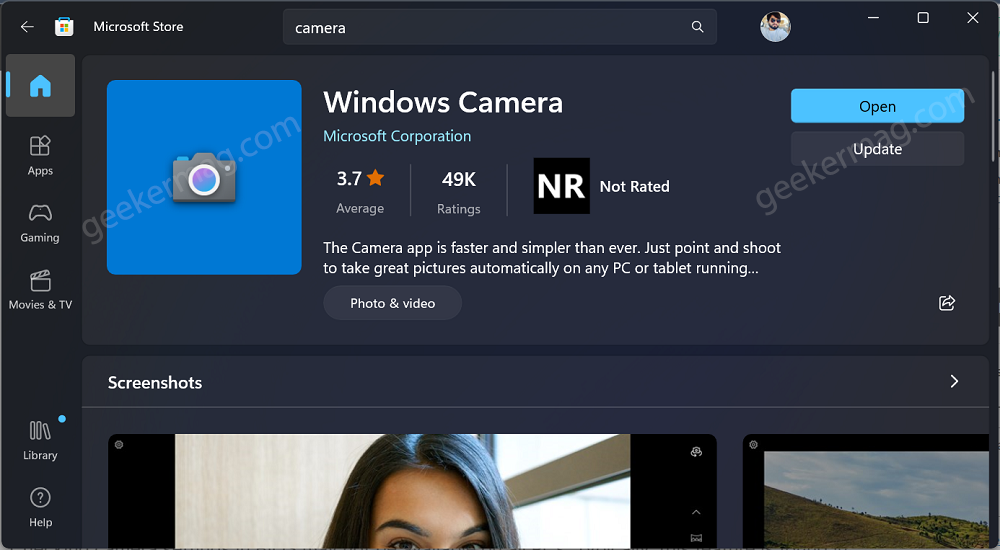
Once the installation is complete, you should have the Camera app back on your computer.
Please note that performing these steps will remove and reinstall the Camera app. If you have any important data or settings associated with the Camera app, make sure to back them up before proceeding.
Turn ON the Camera from the BIOS
Checking camera settings in BIOS may not be available on all PCs. Typically, this feature is found in business-class PCs running Windows 10, allowing users to enable or disable the camera or webcam system-wide.
If your device supports this functionality, you can follow these steps:
You can enter your device into bios and check if it’s available or not.
Navigate to the appropriate section, which might be labeled as “System Configuration” or “Miscellaneous Devices.” Check if there is an option to “Enable Camera.”
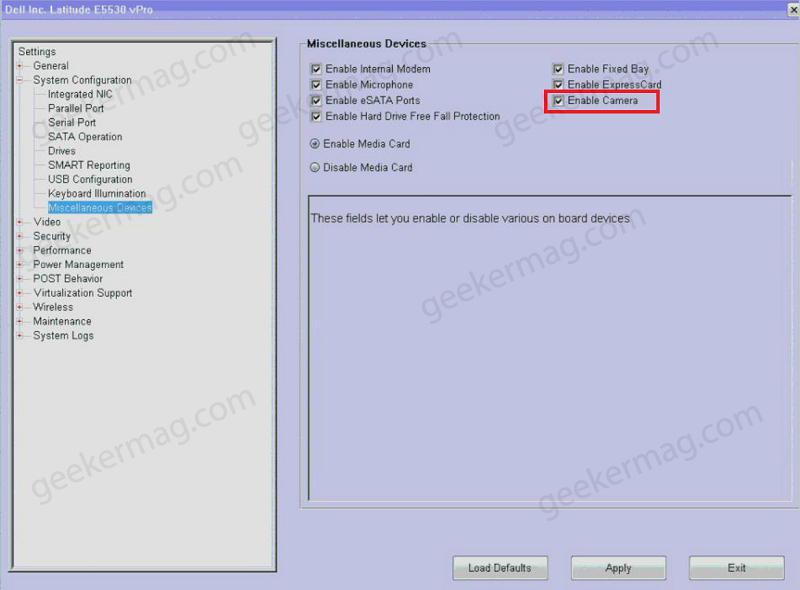
Enable it by checking the box. Save the changes by clicking “Apply” and then exit the BIOS.
Restart your computer to apply the changes.
Please note that this method applies to Dell PCs in the example provided. If you are using a different brand, refer to their official website or documentation for specific instructions on accessing camera settings in the BIOS.
Keep in mind that not all PCs support camera management through BIOS, so this option may not be available on your device.
Scan your computer for malware
Finally, if you have tried all of the above steps and the problem persists, you can scan your computer for malware. Malware can sometimes cause problems with the Camera app. To scan your computer for malware, you can use a free antivirus program like Malwarebytes.
Conclusion
These are the steps on how to fix the 0xA00F429F error in Windows 11. If you have followed all of the steps and the problem still persists, you can contact Microsoft support for help.
I hope this blog post was helpful. Please let me know if you have any questions.


