To Pair Windows PC with a Smartphone using Intel Unison users need to be running Windows 11 and PCs should be powered by 12th and 13th-generation Intel Evo chips.
There are lots of users who want to install the Intel Unison app on a Windows 10 PC. And if you landed on this video, then you’re one out of them for sure, right?
Officially it’s impossible to install Intel Unison on Windows 10 PC but there’s a quick workaround to make that thing happen. And below in this blog post, I will show you how to do that.
How to Install Intel Unison on Windows 10 PC
Before you start following the procedure discussed below, I would like to tell you that, the steps covered are highly technical, and include various files modification. If you’re not comfortable with this, then I suggest you stop here.
If you made up to this line, then I presume that you’re ok with customization. So let’s what you need to do:
Open your default web browser. I suggest you use Firefox because Microsoft Edge and Chrome will not let you download the files required for the workaround.
Copy the Intel Unison Microsoft Store link from here.
Head over to this website: https://store.rg-adguard.net/, and in the space provided paste the Intel Unison store link. This will produce various links related to the app.
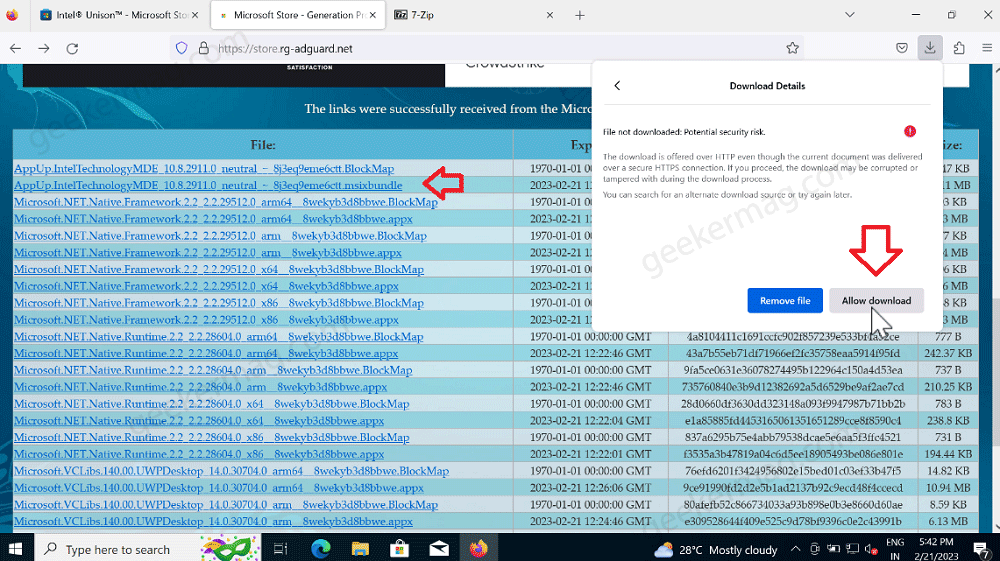
You need to click on “AppUp.IntelTechnologyMDE_10.8.2911.0_neutral_~_8j3eq9eme6ctt.msixbundle“. This will start downloading the Intel Unison MSIXBUNDLE. You need to Allow Download.
Next, download the File Archiving tool. For this tutorial, I’m using 7-zip. You can download it from here.
Right-click on the Intel Unison MSIXBUNDLE, extract the file, and then open the same folder.
After that, locate the WebPhonePackaging file, then extract the file, and open the same folder.
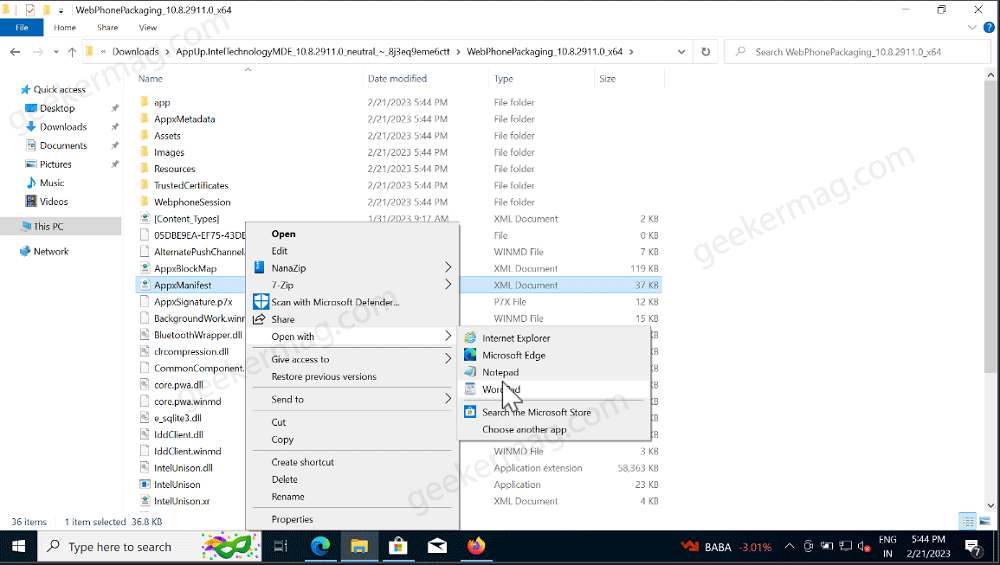
Locate and Open the AppManifest file with Notepad.
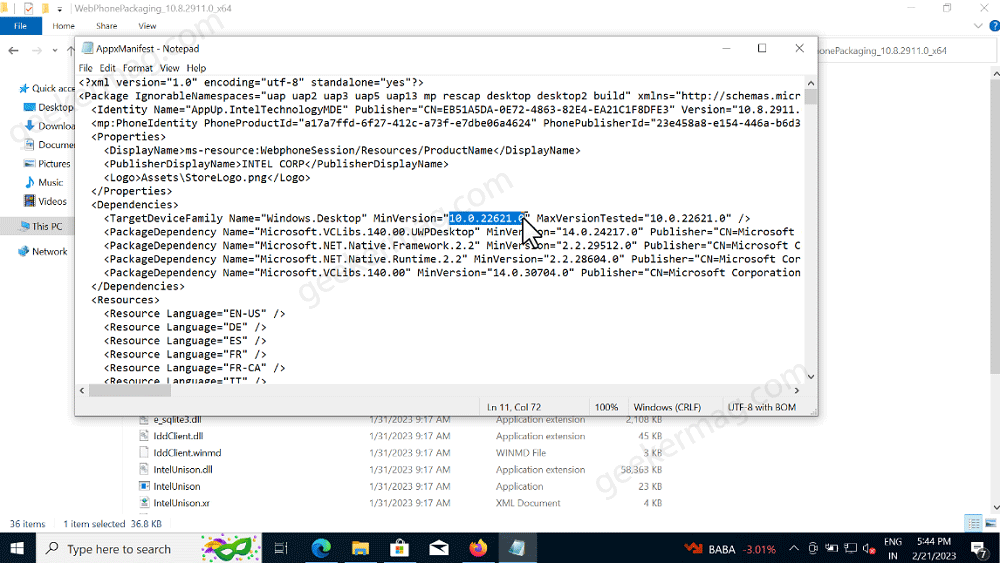
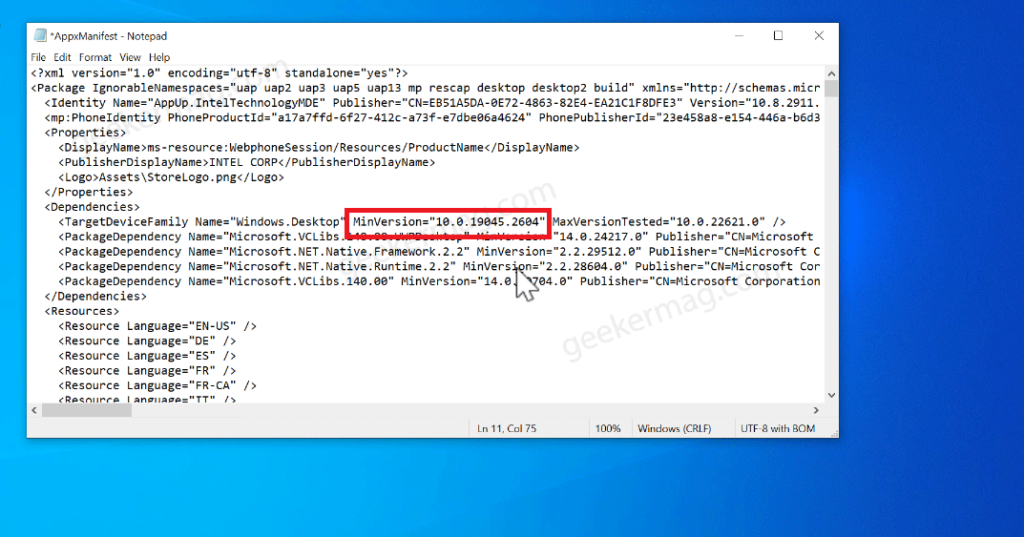
In the file that you have opened, locate “TargetDeviceFamily” and here, you need to replace the MinVersion with the current build of Windows 10 running on the PC.
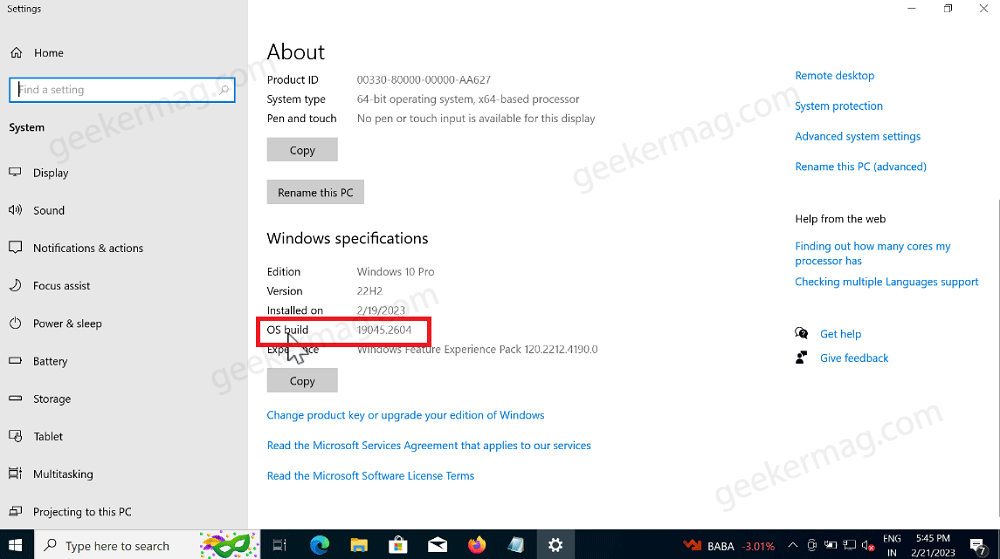
To find the current build, you need to type About your PC in the search and when the same setting appears in the search results, click to open it.
In the About settings page, you need to scroll down to Windows Specification and copy the build. Now add the build number after “10.0. build number.” The final version should look like this: 10.0.19045.2604
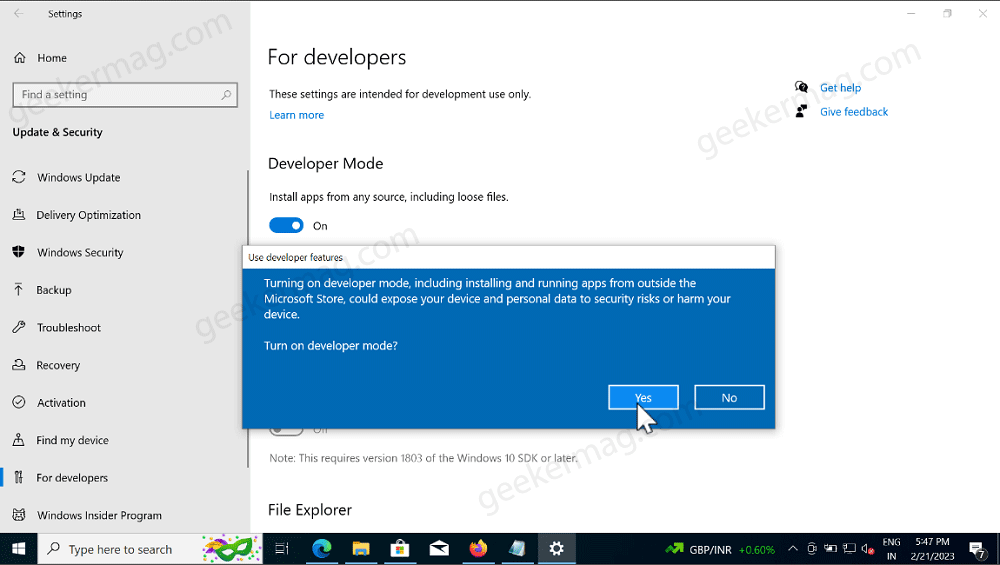
After that, you need to open Developer mode in Windows 10. For that, open Settings > Windows Update & Security > For Developers. Here Turn on Developer mode. If it asks for confirmation, click Yes.
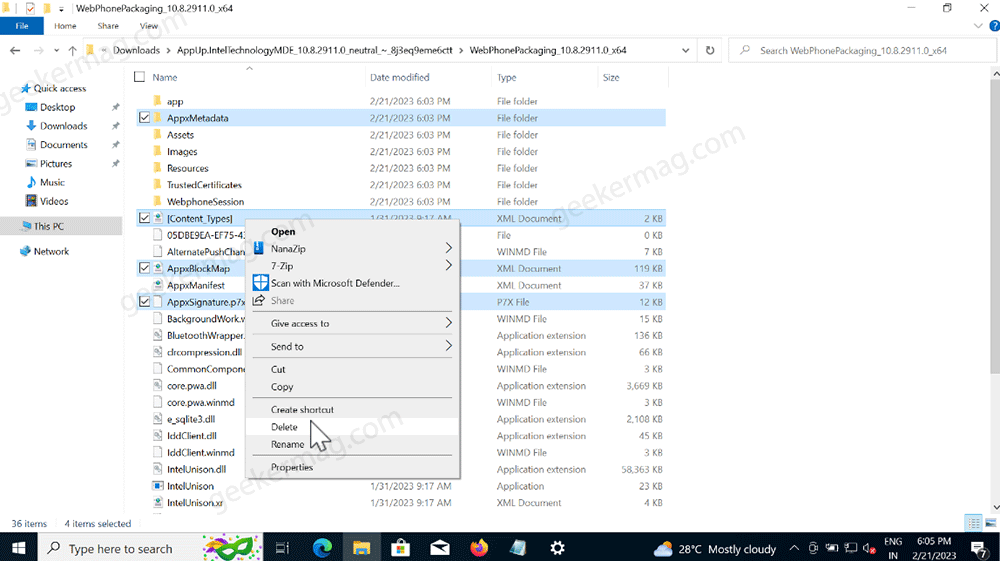
Now open the WebPhonePackaging file and delete these files: AppxMetadata, Content_Types, AppxBlockMap, and AppxSignature.p7x.
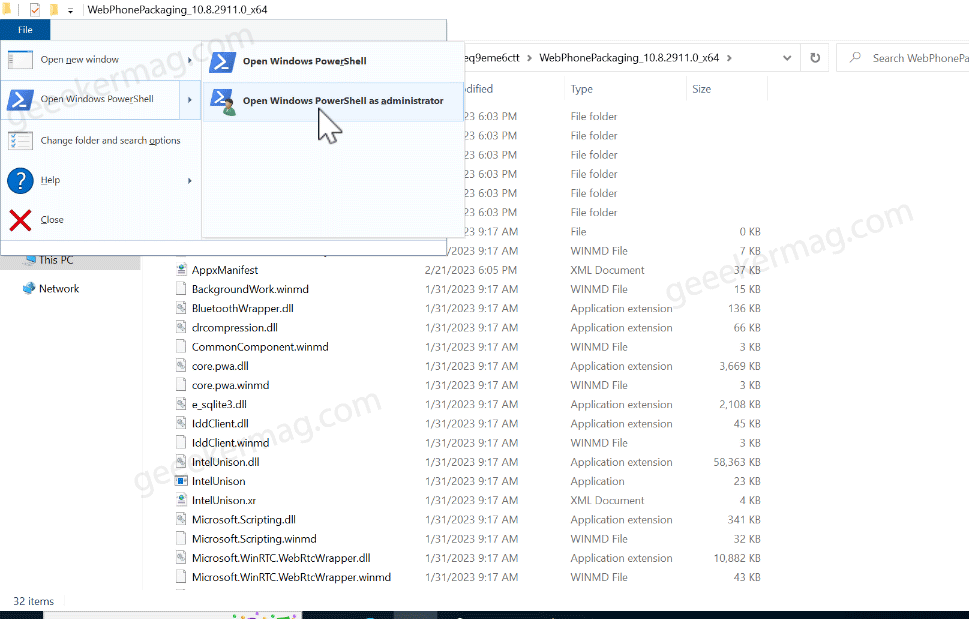
In the same folder, click on File > Open Windows Powershell > Open Windows Powershell as administrator.
When the UAC dialog box appears, click Yes to continue.
In the Windows PowerShell, you need to execute this command: Add -AppxPackage -Register AppxManifest.xml.
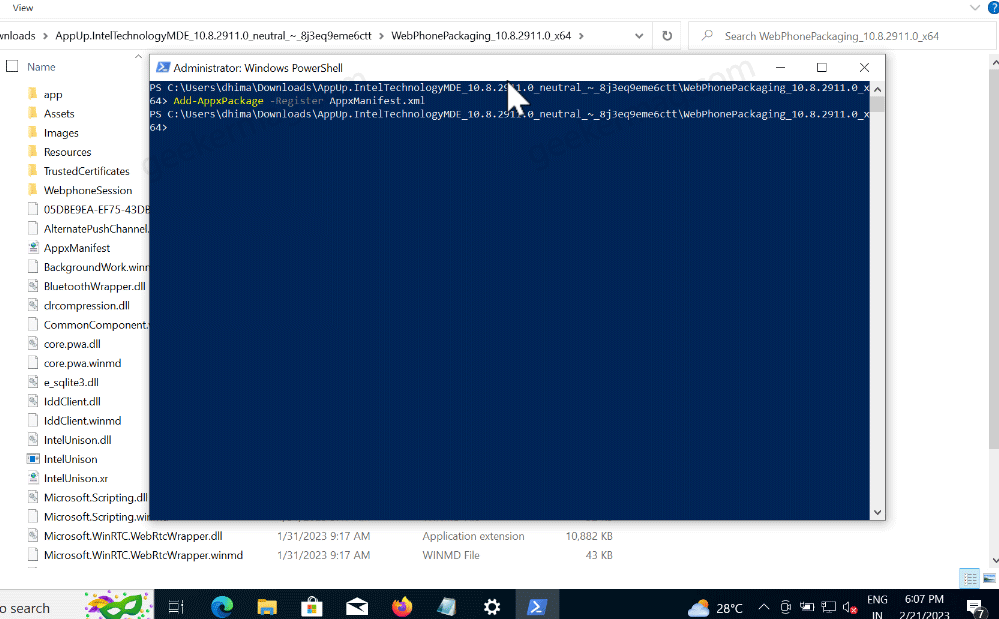
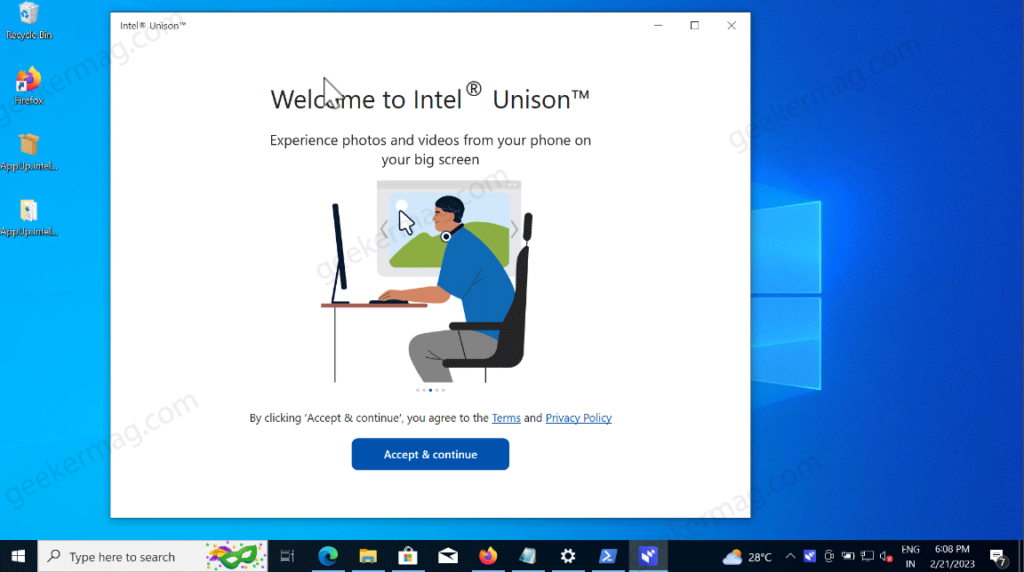
Once deployment is completed, and the pointer moves to the next line confirm that you have successfully installed the Intel Unison on Windows 10 PC.
Now, you need to download and install the Intel Unison app on your smartphone and follow the on-screen instructions to pair the devices.
On your phone, you need to launch Intel Unison app, and open code scanner, and scan the code on the Intel Unison on Windows 10 PC.
Check out this video for instructions on how to pair Windows 10 PC and Android or iOS devices.
I hope you find this tutorial on how to install the Intel Unison app on Windows 10 without Microsoft Store on Unsupported PCs. Are you going to use this workaround? If you have any queries feel free to ask in the comments.



12 Comments
In the PowerShell section, the command is Add-AppxPackage -Register AppxManifest.xml rather than Add-AppxPackage -Register AppxManifest.xml (there is no space between the Add and -AppxPackage).
Otherwise, great and useful guide.
Thank you
Thank you for such a beautiful guide.
its not open. When i clicked it for open and instantly its closed. please help me out.
It says “App not supported in this PC. This app cannot be run on this PC.”
It says “App not supported in this PC. This app cannot be run on this PC.”
It says “App not supported in this PC. This app cannot be run on this PC.” Please help me out
Does not work
Add-AppxPackage : Cannot find path ‘C:\WINDOWS\system32\AppxManifest.xml’ because it does not exist.
At line:1 char:1
+ Add-AppxPackage -Register AppxManifest.xml
+ ~~~~~~~~~~~~~~~~~~~~~~~~~~~~~~~~~~~~~~~~~~
+ CategoryInfo : ObjectNotFound: (C:\WINDOWS\system32\AppxManifest.xml:String) [Add-AppxPackage], ItemNot
FoundException
+ FullyQualifiedErrorId : PathNotFound,Microsoft.Windows.Appx.PackageManager.Commands.AddAppxPackageCommand
I cant fo this in PowerShell. This what it said.
_x64> Add-AppxPackage -Register AppxManifest.xml
Add-AppxPackage : Deployment failed with HRESULT: 0x80073CF3, Package failed updates, dependency or conflict validation
.
Windows cannot install package AppUp.IntelTechnologyMDE_10.10.3783.0_x64__8j3eq9eme6ctt because this package depends on
a framework that could not be found. Provide the framework “Microsoft.NET.Native.Framework.2.2” published by “CN=Micro
soft Corporation, O=Microsoft Corporation, L=Redmond, S=Washington, C=US”, with neutral or x64 processor architecture a
nd minimum version 2.2.29512.0, along with this package to install. The frameworks with name “Microsoft.NET.Native.Fram
ework.2.2” currently installed are:
Windows cannot install package AppUp.IntelTechnologyMDE_10.10.3783.0_x64__8j3eq9eme6ctt because this package depends on
a framework that could not be found. Provide the framework “Microsoft.NET.Native.Framework.2.2” published by “CN=Micro
soft Corporation, O=Microsoft Corporation, L=Redmond, S=Washington, C=US”, with neutral or x64 processor architecture a
nd minimum version 2.2.29512.0, along with this package to install. The frameworks with name “Microsoft.NET.Native.Fram
ework.2.2” currently installed are: {Microsoft.NET.Native.Framework.2.2_2.2.27011.0_x64__8wekyb3d8bbwe Microsoft.NET.Na
tive.Framework.2.2_2.2.27405.0_x64__8wekyb3d8bbwe Microsoft.NET.Native.Framework.2.2_2.2.27912.0_x86__8wekyb3d8bbwe Mic
rosoft.NET.Native.Framework.2.2_2.2.27912.0_x64__8wekyb3d8bbwe}
NOTE: For additional information, look for [ActivityId] 1a3daa16-4bf5-0000-30f2-5d1af54bd901 in the Event Log or use th
e command line Get-AppPackageLog -ActivityID 1a3daa16-4bf5-0000-30f2-5d1af54bd901
At line:1 char:1
+ Add-AppxPackage -Register AppxManifest.xml
+ ~~~~~~~~~~~~~~~~~~~~~~~~~~~~~~~~~~~~~~~~~~
+ CategoryInfo : WriteError: (C:\Users\olehm\…ppxManifest.xml:String) [Add-AppxPackage], IOException
+ FullyQualifiedErrorId : DeploymentError,Microsoft.Windows.Appx.PackageManager.Commands.AddAppxPackageCommand
Unfortunately this does not seem to work on Windows 10 LTSC 2021.
The installation works after the procedure described above, but when the program starts then it closes after a couple of seconds.
The event log says the following:
“The server AppUp.IntelTechnologyMDE_20.14.5716.0_x64__8j3eq9eme6ctt!App did not register with DCOM within the required timeout.”
It’s true. The application closes unexpectedly. Hopefully there will be some update to the execution procedure of this app.
YEs, it does not work at my Windows 10 IoT Enterprise LTSC, Version 21H2, OS build 19044.3803, as well. The program starts the Intel logo then closes after.