Windows 11 has been released with a plethora of exciting features and improvements. For gamers, an optimized operating system can make a significant difference in performance and overall gaming experience.
While Windows 11 already boasts solid gaming capabilities, there are hidden settings and optimizations that can further enhance gaming performance. By tweaking the various settings, you can unleash your PC’s full potential and create a smoother, more immersive gaming experience.
How to Optimize Windows 11 for Gaming Performance in 2023
In this blog post, we will explore various methods to optimize Windows 11 for gaming and enhance overall system performance in 2023. So without further delay, let’s start with the first optimization method in our list:
Disable Two Features (Microsoft Recommendations)
In terms of gaming performance, Windows 11 fails to offer better performance in comparison to Windows 10. According to Microsoft, it’s happening because of two security features; Virtual Machine Platform and Memory Integrity that are enabled out of the box in Windows 11;
If you prefer gaming performance over security, then disabling these two features will make a big difference. Follow the below steps:
Disable Virtual Machine Platform
Click on the Search icon and type Turn Windows Feature ON or OFF, when it appears in search results, click to open it.
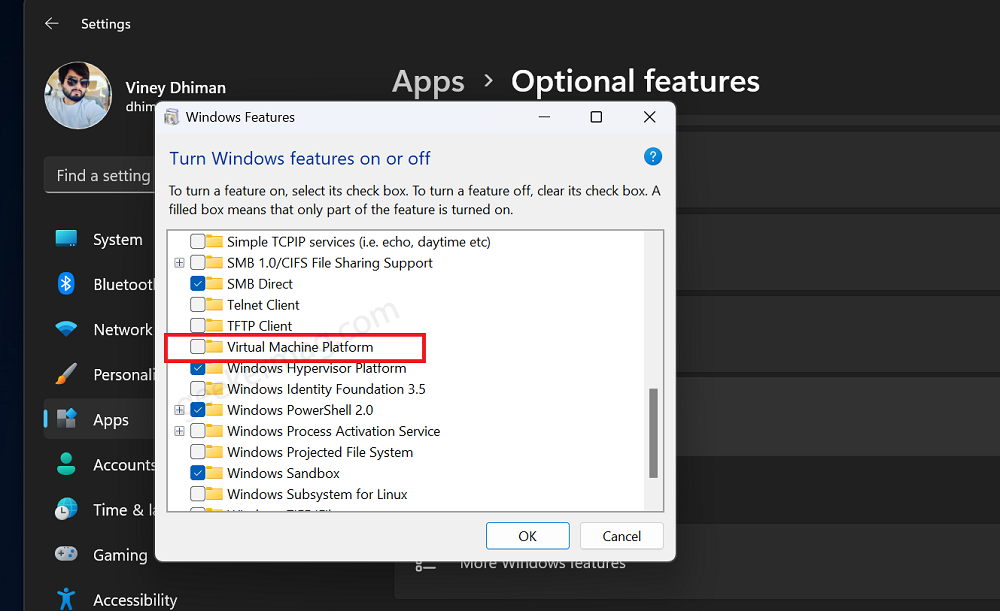
Here, locate “Virtual Machine Platform,” uncheck for it, and click OK.
Restart your computer, if required.
Disable Memority Integrity
Click on the Search icon and type Core Isolation, when it appears in search results, click to open it.
The Core Isolation setting page will open, here you need to toggle off Memory Integrity. If the UAC dialog box appears, click Yes to continue.
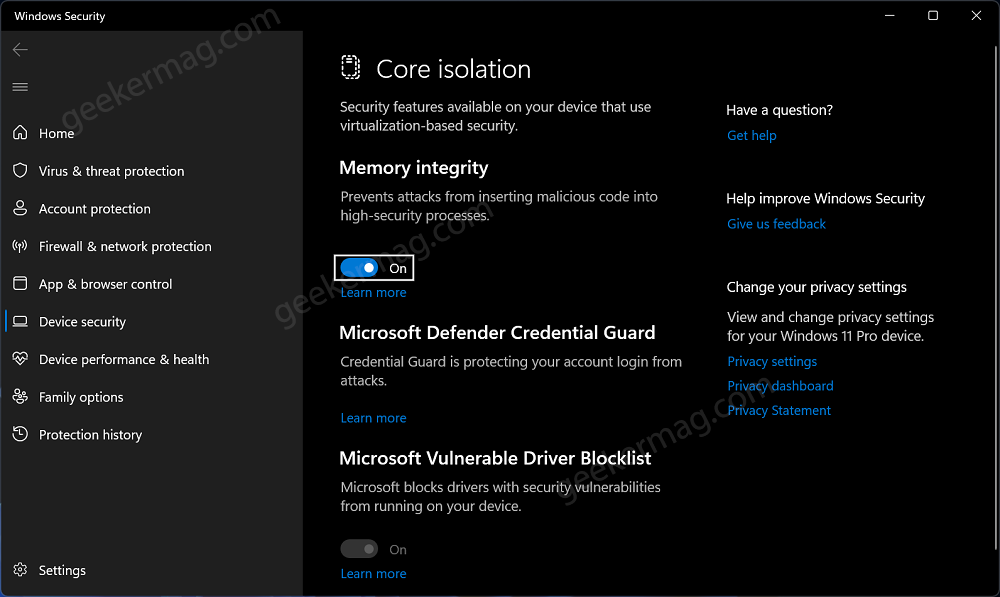
You need to restart your computer to apply the changes.
Update Your Graphics Drivers
The first step towards optimizing your Windows 11 for gaming is to ensure you have the latest graphics drivers installed. Graphics drivers play a crucial role in rendering images and videos on your screen. Keeping them up-to-date ensures you have access to the latest bug fixes, optimizations, and performance improvements specific to your GPU.
To update your graphics drivers, follow these steps:
- Identify your GPU manufacturer (NVIDIA, AMD, or Intel).
- Visit the official website of the manufacturer.
- Download the latest drivers for your specific GPU model.
- Install the drivers and follow the on-screen instructions.
You can check this blog post for a detailed list of Manufacturer websites from where you can download drivers for your PC: Download Drivers From Manufacturer Websites
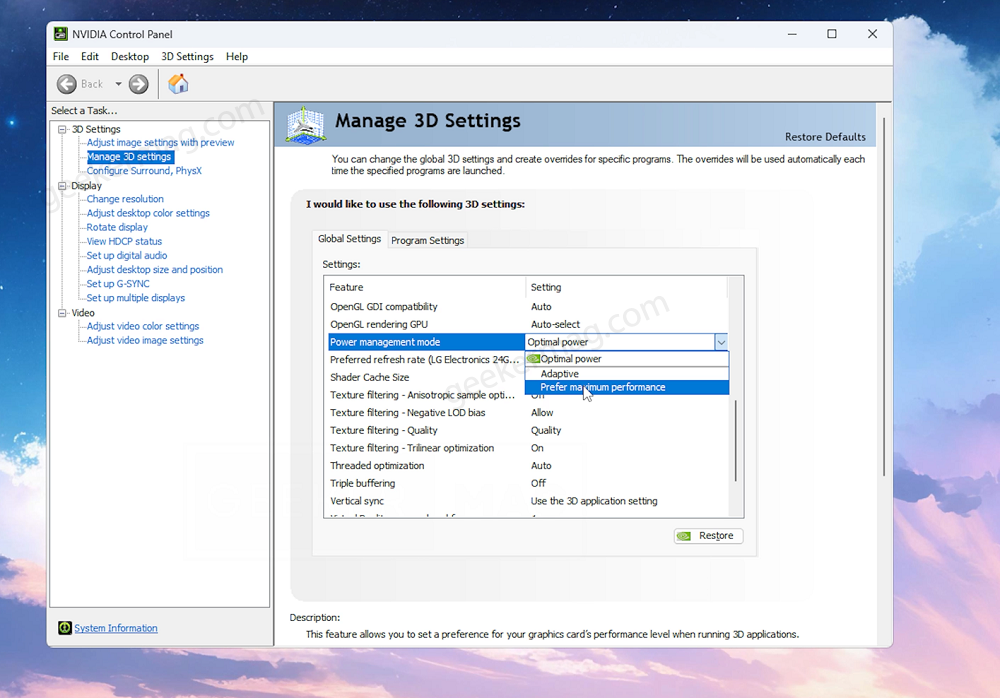
If you’re using NVIDIA GPU, then launch NVIDIA Control Panel and then go to Manage 3D Settings > Global Settings > Power management mode, and set it to Prefer Maximum Performance.
Similarly, you can use GPU Management tools from AMD and Intel.
Enable Game Mode
Windows 11 comes with a built-in Game Mode that prioritizes system resources for gaming applications. When enabled, Game Mode allocates more CPU and GPU power to your games, reducing background processes’ interference.
To enable Game Mode, click on the search icon and type ‘turn on Game mode,’ when the same system setting appears in the search results, click to open it.

The game mode settings page will open, here Toggle on “Use Game Mode“, and you’re done.
Optimize Power Settings
Configuring the right power settings can significantly impact your gaming performance. By default, Windows often sets your power plan to “Balanced,” which may limit your system’s performance to save energy.
To optimize power settings for gaming, here’s what you need to do:
Click on the Search icon and type Power Plan, when this system setting “Optimize your device based on Power use and consumption” appear in the search results, click to open it.
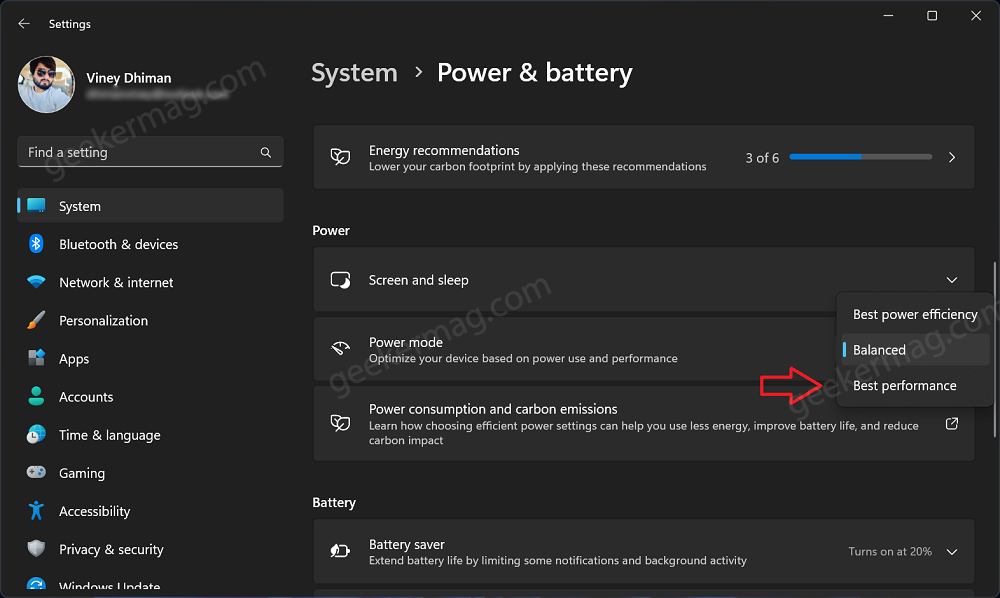
The Power & battery setting page will open. Under the Power section, set the Power mode to Best Performance.
Adjust Visual Effects
Windows 11 has numerous visual effects that enhance the user experience. However, disabling or minimizing some of these effects can allocate more resources to gaming.
Here’s how to adjust the visual effect:
Click on the Search icon and type Adjust Performance, when this system setting “Adjust the Appearance and Performance of Windows” appears in the search results, click to open it.
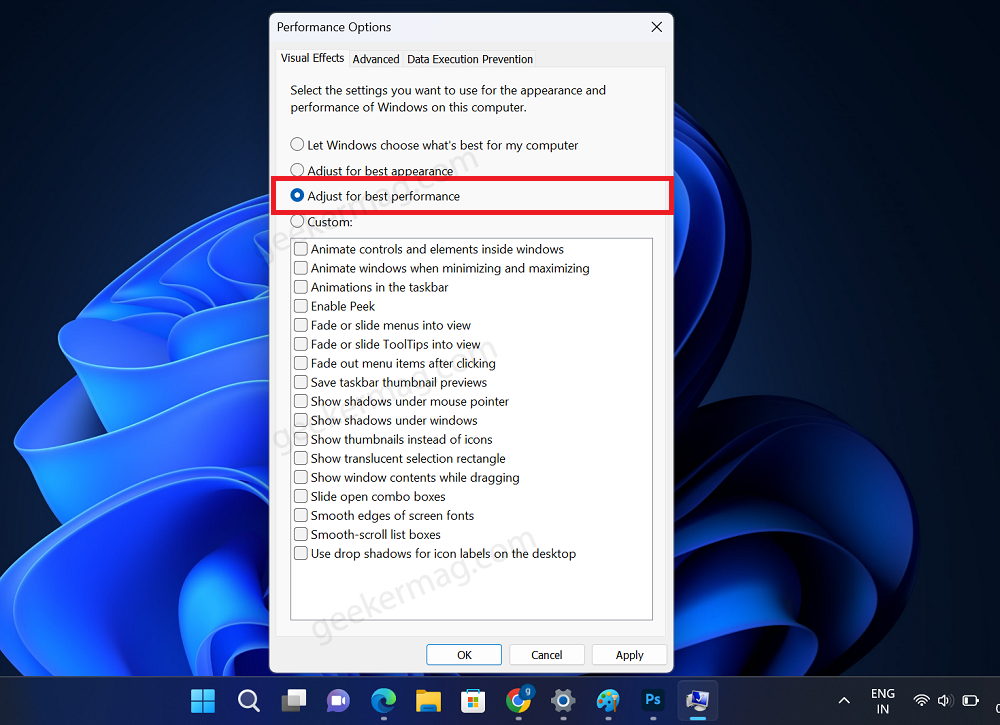
The Performance Options window will open, here choose “Adjust for best performance” or manually disable selected effects.
Click Apply and OK. We recommend you restart your computer to apply the changes.
Enable Variable Refresh Rate
Variable Refresh Rate (VRR) is a feature that synchronizes your monitor’s refresh rate with your GPU’s frame rate, reducing screen tearing and stuttering during gameplay.
Ensure your monitor supports VRR and it is connected to your GPU via DisplayPort or HDMI (with FreeSync support). Else, you will not find the same option
Here’s how you can enable Variable Refresh Rate in Windows 11:
Launch the Settings app by pressing WIN + I key combinations.
In the Settings app, go to System > Display.
Scroll down and click on “Graphics.“
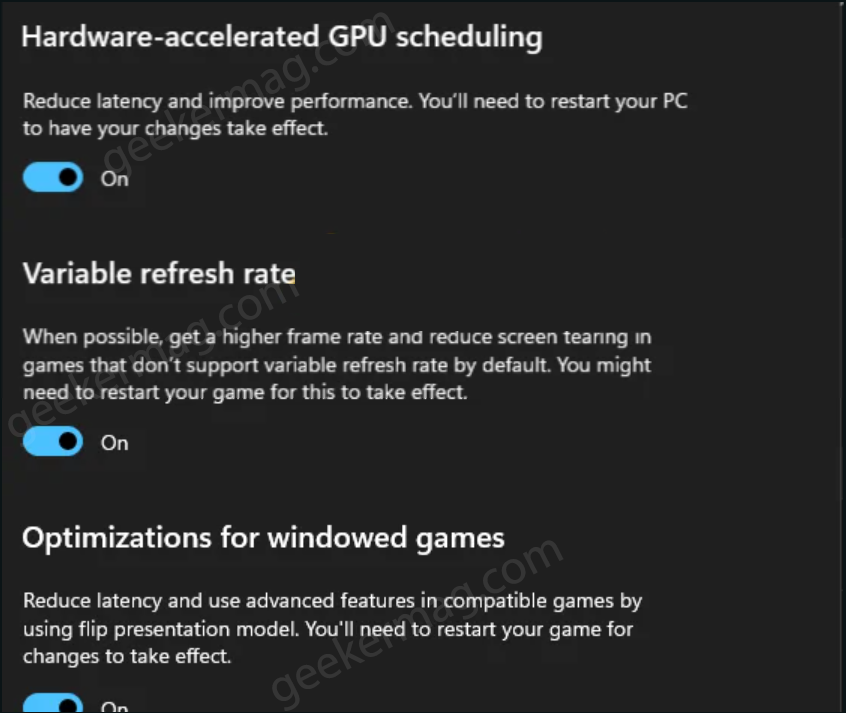
On the Graphics settings page, you need to scroll down to the Advanced Graphic settings section. Here Toggle ON option for Variable Refresh Rate.
I recommend you restart your computer for a better experience.
Disable Background Apps
Background apps consume system resources and may negatively impact gaming performance. If you want to disable the particular app, then you can achieve this app settings page.
Alternatively, you can check Background app activity on Windows 11 Battery Settings page.
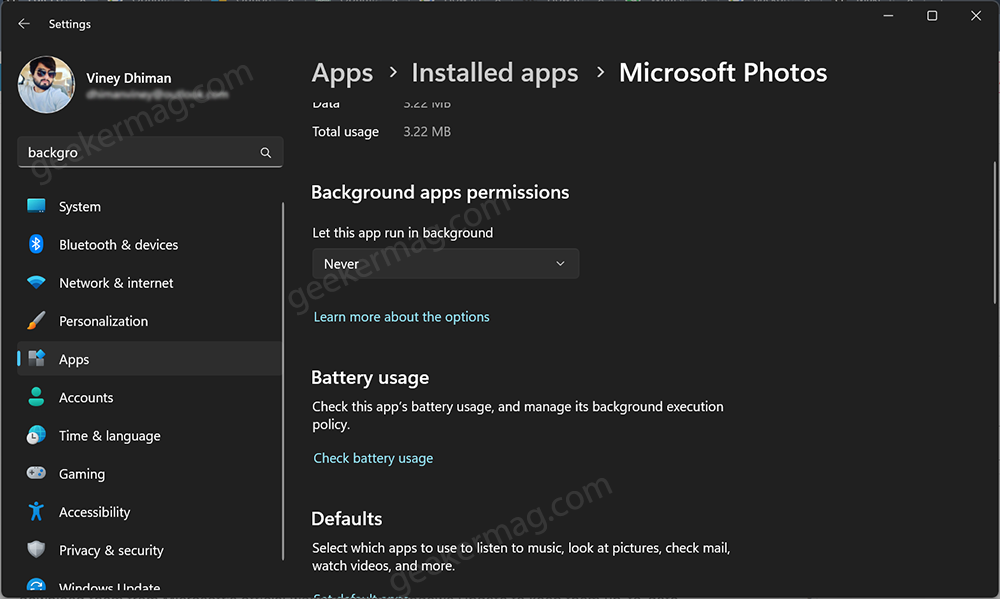
We have both things in detail in this blog post on How to disable unnecessary background apps in Windows 11.
Install DirectX and .NET Framework Updates
DirectX and .NET Framework are essential components for gaming on Windows. Ensure you have the latest versions installed to benefit from bug fixes and performance enhancements.
Usually, Microsoft delivers the latest updates for these softwares via Windows Update. Alternatively, you can download them from Microsoft’s official website (DirextX and .NET Framework)
Enable HDR & Auto HDR
Enabling Auto HDR is another effective way to optimize your gaming experience on Windows 11. Auto HDR is a feature that automatically converts standard dynamic range (SDR) content into high dynamic range (HDR), enhancing the visual quality and color depth in supported games.
Here’s how to enable Auto HDR in Windows 11:
Click on the Search icon and type HDR Settings, when the same system setting appears in the search results, click to open it.
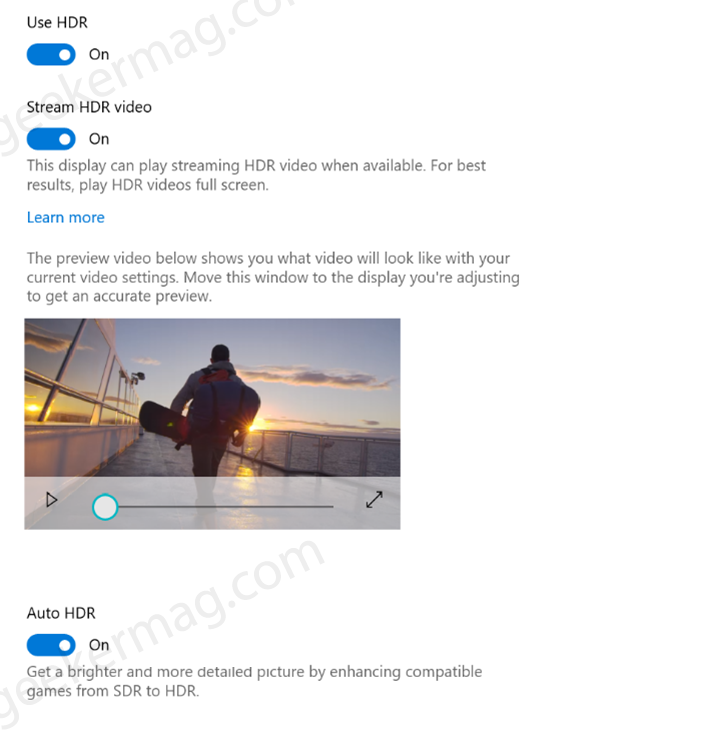
On this page, scroll down a little and Toggle ON the ‘Use HDR‘ option. If the Auto HDR option is listed, then turn it ON as well.
If the HDR option is missing, then it’s possible that your monitor doesn’t support HDR.
Here’s how you can confirm this. Under Display capabilities, if Use HDR is Supported, then you will find the option. If it’s Unsupported, you will not find the option.
Enable Hardware-accelerated GPU Scheduling
Hardware Accelerated GPU Scheduling when enabled boosts videos and gaming performance using system GPU by decreasing latency.

If you own a PC whose GPU supports hardware acceleration coupled with graphic drivers with support of WDDM 2.7 or above, then you can enable this feature.
Check this blog post to learn, How to Enable Hardware-accelerated GPU Scheduling in Windows 11
Enable Optimization for Windowed Games:
Windows 11 includes a feature called “Optimize for Windowed Games” that can improve the gaming experience when playing games in windowed mode. To enable this feature here’s what you need to do:
Launch the Settings app by pressing WIN + I key combinations.
In the Settings app switch to System > Display. Scroll down and select Graphics under Related settings.
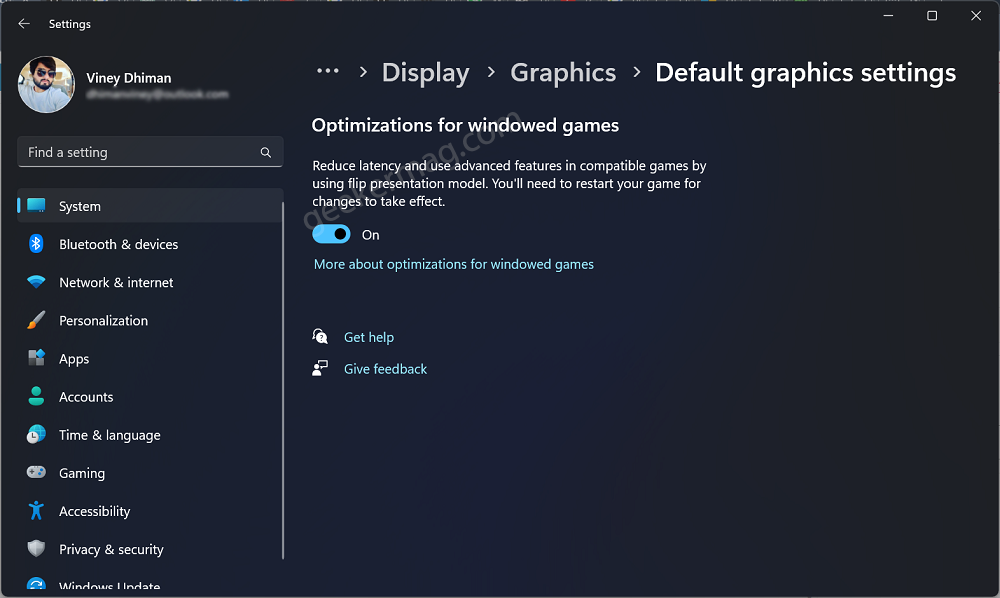
On this page, click on “Change default graphic setting.” And then on the next page, Toggle on “Optimize for Windowed Games.“
Make sure to restart your computer to apply the changes.
Turn OFF Enhance Pointer Precision
Enhanced Pointer Precision, also known as mouse acceleration, can be counterproductive during gaming, as it may result in inconsistent mouse movements and affect the overall gaming experience.
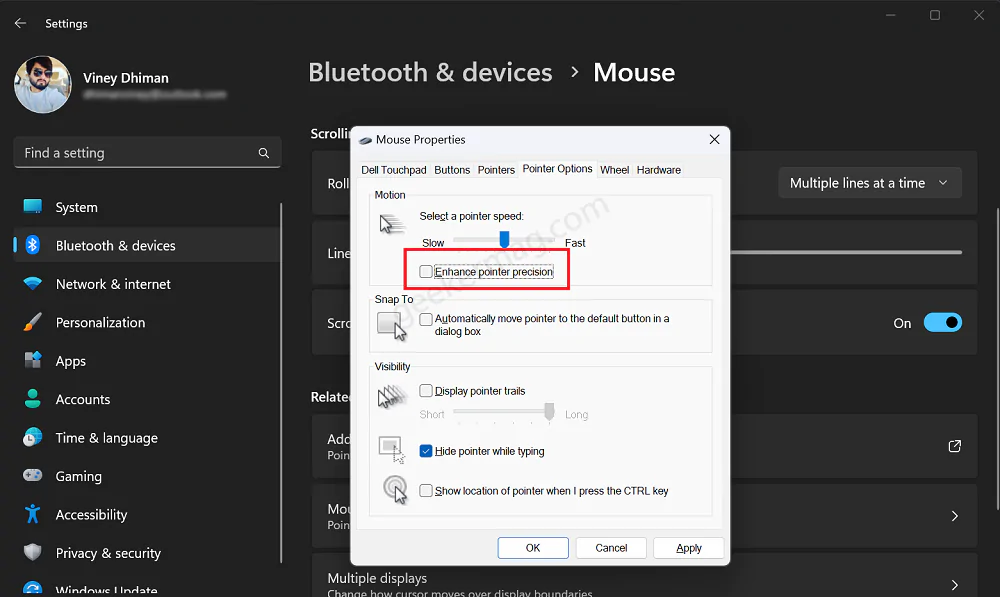
Check this blog post to learn, How to Turn OFF Enhance Pointer Precision
Disable Background Downloads in Steam:
If you are a Steam user, you may have noticed that the Steam client often downloads updates for your games in the background while you’re playing. This can consume valuable bandwidth and system resources, affecting your gaming experience. To prevent background downloads in Steam:
Open the Steam client on your Windows 11 PC
Click on “Steam” in the top-left corner and select Settings.
In the Settings window, switch to “Downloads” from the left sidebar and look for the section titled “Download Restrictions.”
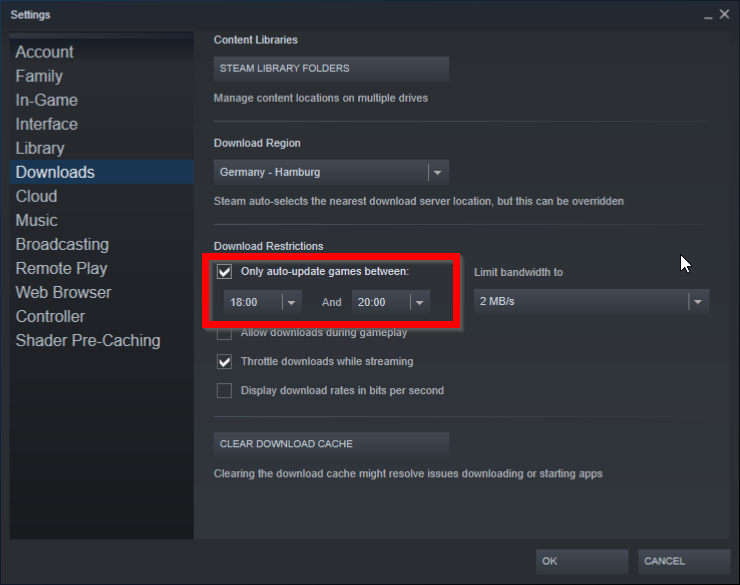
Check the box next to “Only auto-update games between:” and set the desired time range when you’re not likely to be gaming (e.g., overnight or during work hours).
Click “OK” to save the changes.
Disable Unnecessary or Non-Gaming Startup Apps:
Some applications and utilities launch automatically when your system starts, consuming system resources. Disable unnecessary startup programs to free up resources for gaming. Here’s how you can do that:
Use the WIN + I key combination to open the Settings app.
In the Settings app, you need to go to Apps > Startup Apps.
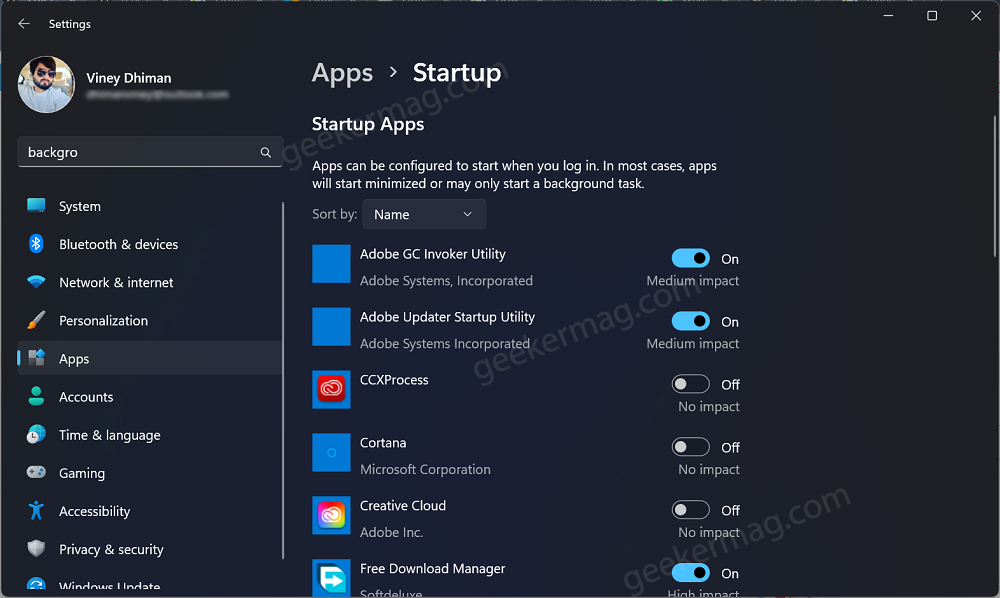
Here, you will get a list of the startup apps, simply toggle off startup apps that are not essential for gaming.
Use Primary Dedicated GPU for Gaming
In some cases, especially with laptops that have both integrated and dedicated GPUs, Windows may assign the integrated GPU as the default graphics processor for a game, which can result in lower gaming performance. To ensure that the game uses the primary dedicated GPU:
Note – To show the steps, I will add Adobe Photoshop because my PC does not have any games installed
Right-click on your desktop and select “Display settings.”
In the Settings app, you need to scroll down and click on “Graphics settings.”
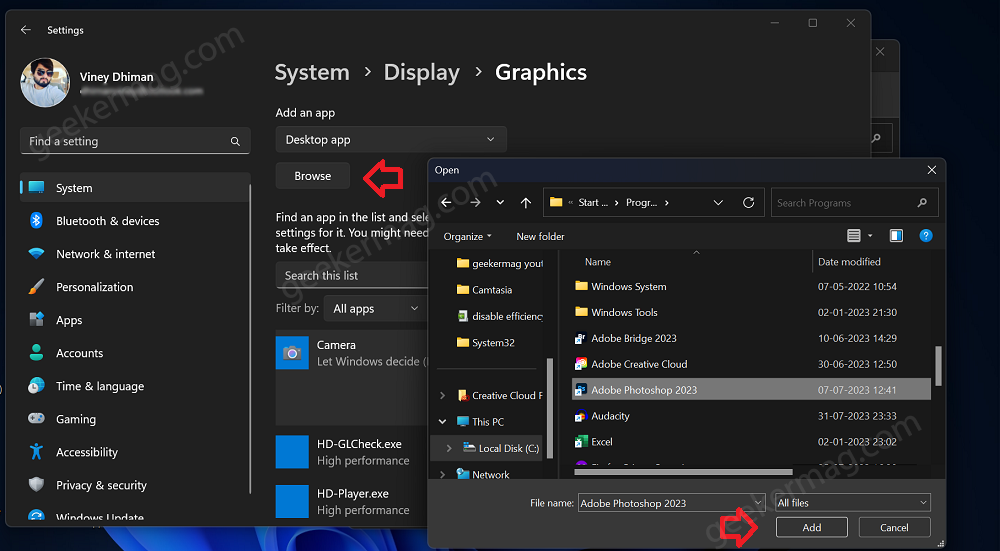
Under “Custom options for apps,” select Desktop app, then click “Browse” and locate the game’s executable file (usually ending in .exe) from your game’s installation folder, click “Add.”
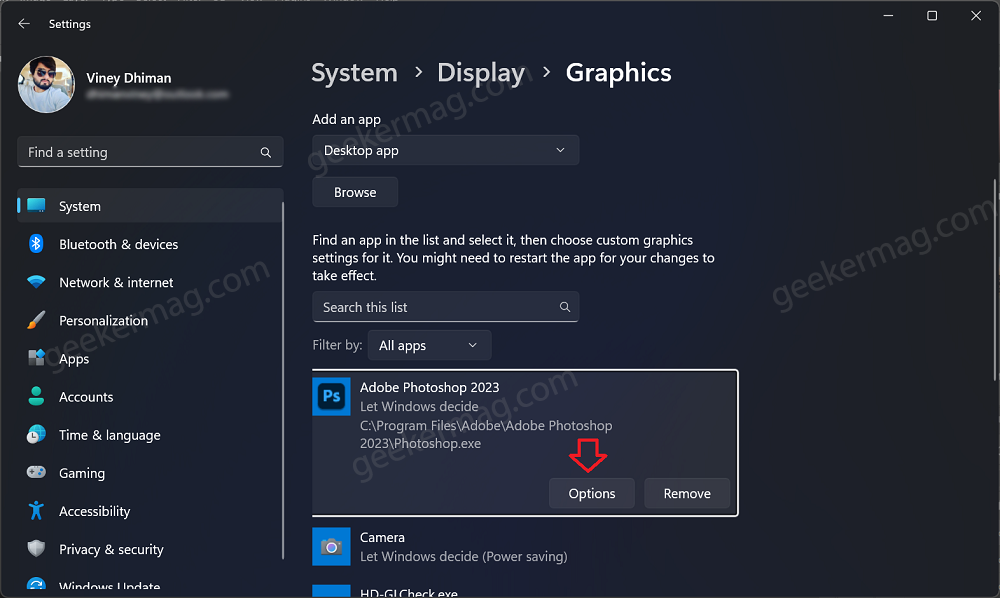
The particular game will appear on the same page, click on the Options button.
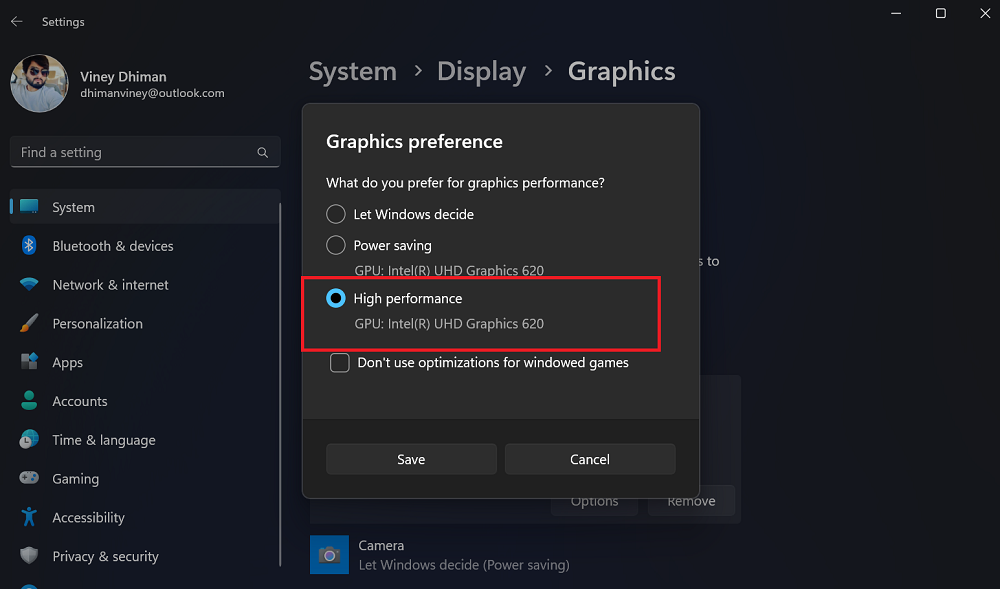
In the “Graphics Preferences” window, select “High performance” as the preferred GPU, then click “Save.“
After that, restart your computer to apply the changes.
Tweak In-Game Graphics Settings:
Each game has its graphics settings that can be adjusted to optimize performance based on your hardware capabilities.
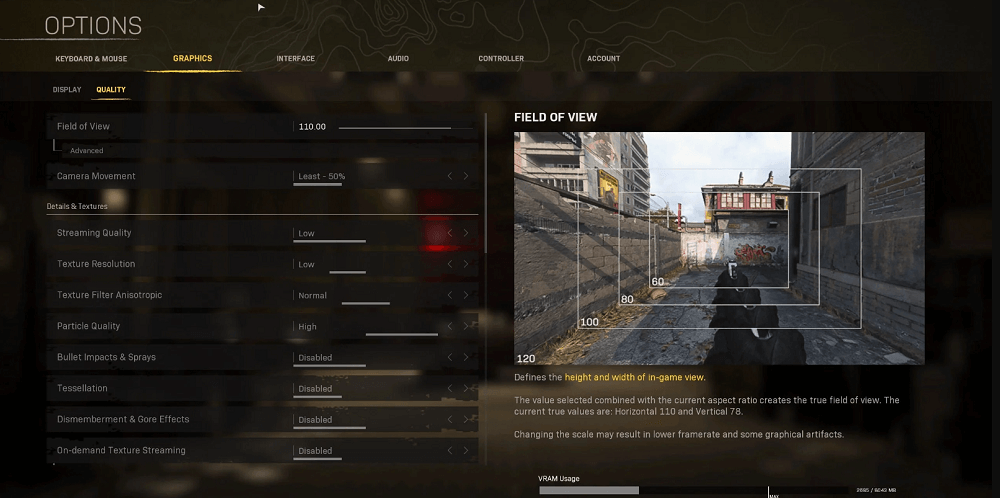
Lowering the in-game graphics settings, such as anti-aliasing, shadow quality, and texture quality, can result in smoother gameplay. Strike a balance between visuals and performance to get the best experience.
Disable Record What Happened
Windows 11 offered a nifty feature named the “Record what happened” feature. The feature when enabled captures game moments with a shortcut. However, leaving it enabled consumes background resources, impacting performance.
Due to this reason, it is ideal to disable this feature if you’re expecting a better gaming experience. Here’s how you can do that:
Launch the Settings app by pressing WIN + I key combination.
In the Settings app go to Gaming > Captures.
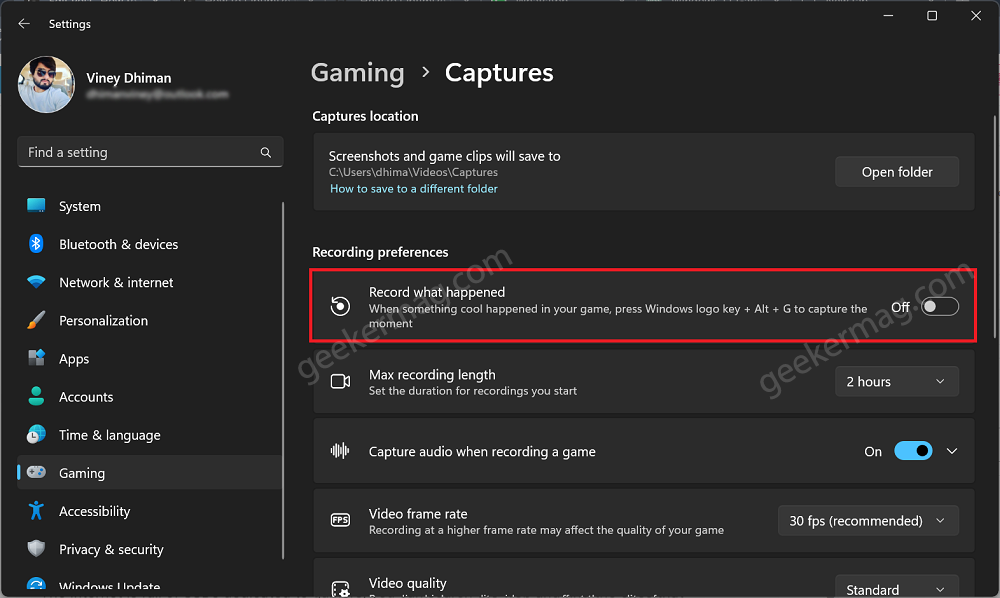
On this page, under Recording preferences, you turn off Record what happened.
Install an SSD for Faster Loading Times:
If you don’t have one already, consider upgrading to a Solid State Drive (SSD). SSDs offer significantly faster read and write speeds compared to traditional Hard Disk Drives (HDDs).
Installing your games on an SSD can reduce loading times, and texture pop-ins, and improve overall gaming performance.
The Internet is full of SSDs dedicated to gamers, you can search the web and find the ones that match your requirements and budget.
In case, you own a gaming laptop, then check this blog post Best SSD for Gaming Laptop 2023 (256 GB to 2TB)
Monitor and Manage System Temperatures:
Overheating can lead to performance drops and even system crashes. Regularly monitor your system’s temperatures using third-party software and clean the dust from your PC to ensure optimal performance during gaming sessions.
It can be done quickly via BIOS Settings, but it’s a complicated method. Better use one of the third-party apps available on the web to check CPU temperature Core Temp or Speccy.
Use Game Boosting Software:
Several third-party game-boosting software is available that can optimize your PC for gaming by disabling unnecessary processes, clearing RAM, and managing system resources efficiently. Popular options include Razer Cortex, MSI Afterburner, and Game Fire.
Or follow the instructions suggested by one of the users on this Reddit thread. It suggests using Optimizer, Nvidia Clean Install, and Display Driver Uninstall and set the right Windows 11 Settings for Gaming
By implementing the methods above in the article, you can optimize Windows 11 for Gaming Performance. Each solution contributes to maximizing your gaming potential and ensuring an enjoyable gaming experience on your PC. Happy gaming!
If you know any other method, then don’t hesitate to share with us in the comments.


