Looking for a way how to disable fast startup in Windows 10? Here your search ends. In this post, you will find out step by step-by-step tutorial on how to do that.
Windows 10 the latest version of Windows launched by Microsoft comes with lots of features to improve the performance of the system. One of them is Fast Startup.
In case, the Windows 10 PC takes lots of time to boot up, then you can take the help of this feature to speed things along. Now you might be wondering how the Fast Startup feature achieves that thing. Right?
How Fast Startup Work in Windows 10
When you turn off your Windows 10 PC, the system creates an image of drivers and a loaded kernel in the file named hiberfile (C:\hiberfil.sys). The next time the system startup up after the shutdown, it just reloads the same hiberfile and makes your system boot faster. Even much faster than hibernating
The Fast Startup feature is a combination of the elements of hibernate and cold shutdown features. It works similarly to the hybrid sleep mode feature available in the earlier version of Windows.
Why Disable Fast Startup in Windows 10?
No doubt Fast Startup is a useful feature, but sometimes condition comes when users want to disable it. Some of the popular circumstances are:
- To perform a normal shutdown, which is not possible if the Fast Startup feature is enabled.
- To avoid interference with encrypted disk images. A lot of use of encryption applications like TrueCrypt reported the same.
- The system does not support hibernation and also lacks Fast Startup functionality. So it is a good idea to experiment with whether the system is working fine or not.
- When Fast Startup is enabled the system locks down the Windows hard disk. Due to this reason, users won’t be able to gain access to it from the operating system. The scenario can become worse if the system is configured for dual boot.
- Depending on the configuration of the system, the user will not be able to gain access to the UEFI/BIOS setting when turning off the system with the Fast Startup feature enabled.
In case, you’re not facing any issues discussed above; then you can keep the Fast Startup enabled. There is nothing wrong with it.
How to Disable Fast Startup in Windows 10
Also, the things are not working according to your expectations; then you can also disable fast startup in Windows 10 just by making a few clicks. Here is how you can do that:
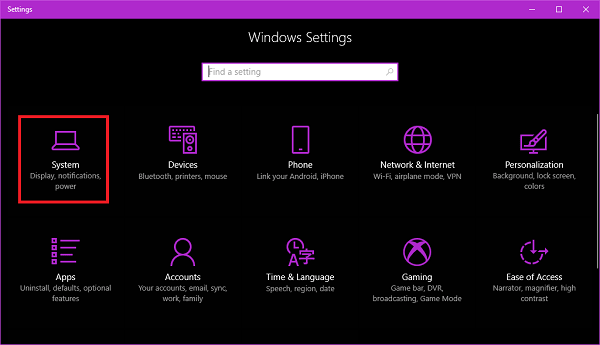
1. Launch Windows 10 Settings app. For that, click on the Settings icon available on the taskbar.

2. Click on the System -> Power & Sleep.
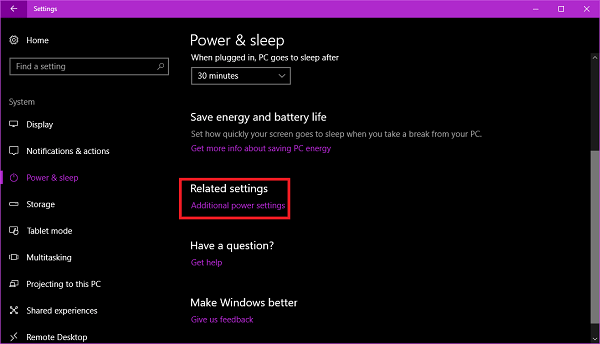
3. On the right pane, click on the link that reads “Additional Power settings” listed under related settings section.
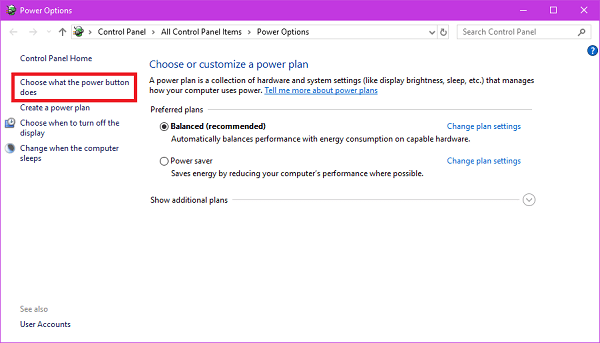
4. This will launch the Power option window of the Control Panel. Here you need to click on the link “Choose what power button does.”
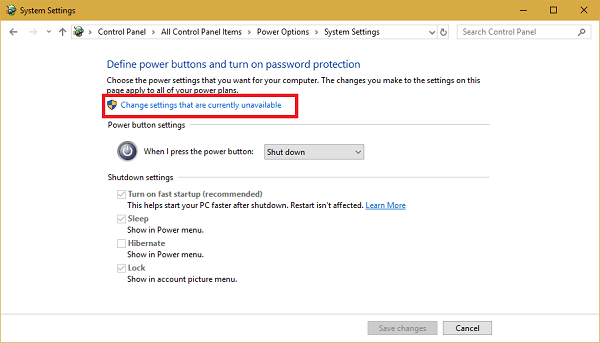
4. In the following window, you need to click on the link which reads “Change settings that are currently unavailable“.
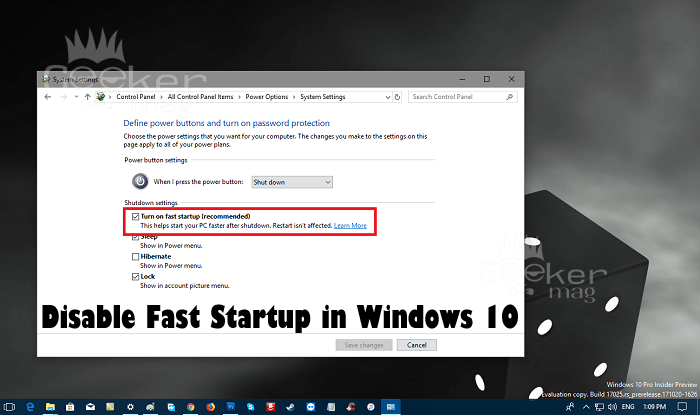
After that navigate to the Shutdown settings section. Here you need to untick the box for “Turn on fast startup (recommended).”
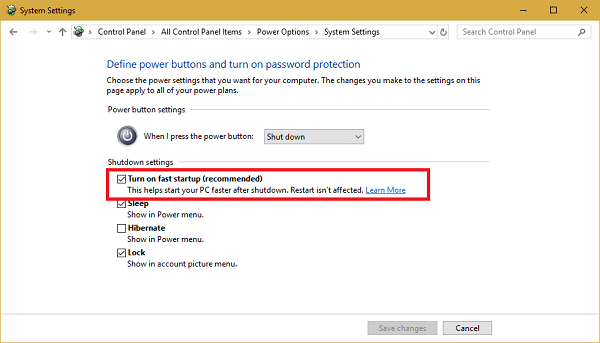
5. Click on the Save changes button and reboot the system.
Now you have successfully disabled the Fast Startup.
At any point, you want to enable the fast startup in Windows 10; then just tick mark the option which reads “Turn on fast startup (Recommended).”
Bonus: There are lots of users who suggested that they able to fix the Bad Pool Header Windows 10 Error and KMode Exception Not Handled in Windows 10 just by disabling Fast Startup in Windows 10.
That’s it, folks; I hope you find this tutorial on how to disable fast startup in Windows 10. Let me know your thoughts in the comments.

