Regularly updating Windows 11 and Windows 10 is recommended to keep your system free of bugs and enjoy new features from Microsoft. While most updates install without any problems, some may throw an error during installation. Windows Update Error 0x800f0922 is one out of them.

Windows update error code 0x800f0922 is a common error that occurs when you try to install a Windows update on PCs running Windows 11 and Windows 10. The error can be caused by a variety of factors, including:
- Windows Update service not running in the background
- Corrupted system files
- Low disk space
- Corrupted Software Distribution folder
- Incorrect date and time
- A problem with your internet connection
- A conflict with your antivirus software
- A problem with the Windows Update servers
- Deleted Microsoft Edge using third-party workarounds
Fix – Windows Update Error 0x800f0922 on Windows 11/10
If you landed on this blog post, then its highly possible that you’re seeing the same Windows error code, when installing windows updates on your PC, right?
While the error code 0x800f0922 may seem daunting, it is actually quite easy to fix. Here are some solutions for the Windows 11/10 update error 0x800f0922:
Reboot your PC:
This may seem like a simple step, but it can often fix minor errors that are preventing Windows updates from installing.
Check Internet Connectivity:
Ensure that your computer is connected to the internet and has a stable connection. A poor or intermittent connection can interfere with Windows updates.
Problem with the Windows Update servers:
If there is a problem with the Windows Update servers, it can prevent you from downloading the update. You can try checking the Windows Update status website to see if there are any known problems with the servers.
Use Windows Troubleshoot Feature
Windows includes a troubleshooter that can identify and resolve common problems with updates. Here’s how you can use it:
Click on the Search icon and type Troubleshoot, when Other Troubleshoot settings option appear in search results, click to open it.
On this page, you will find list of all the Troubleshooters, scroll down, find and click on the Run button Next to Windows Update.
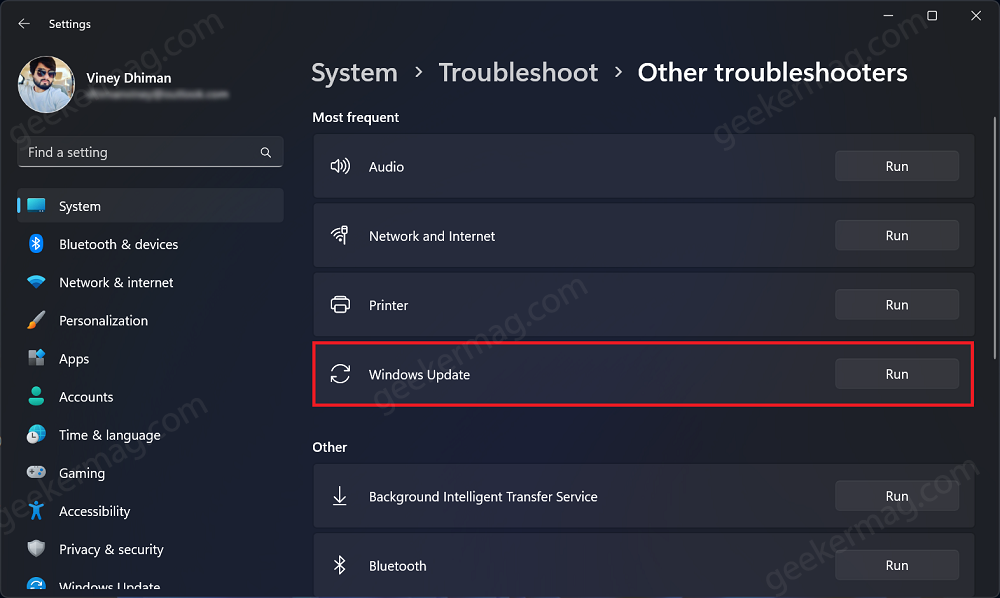
Read and follow the instructions suggested by Windows Update troubleshooter to fix the issue.
Check Date and Time Settings:
Incorrect date and time settings can sometimes cause update issues. Ensure that your computer’s date and time settings are correct:
Right-click on the Date and Time on the right side of the Taskbar and select Adjust date/time option from the menu that opens.
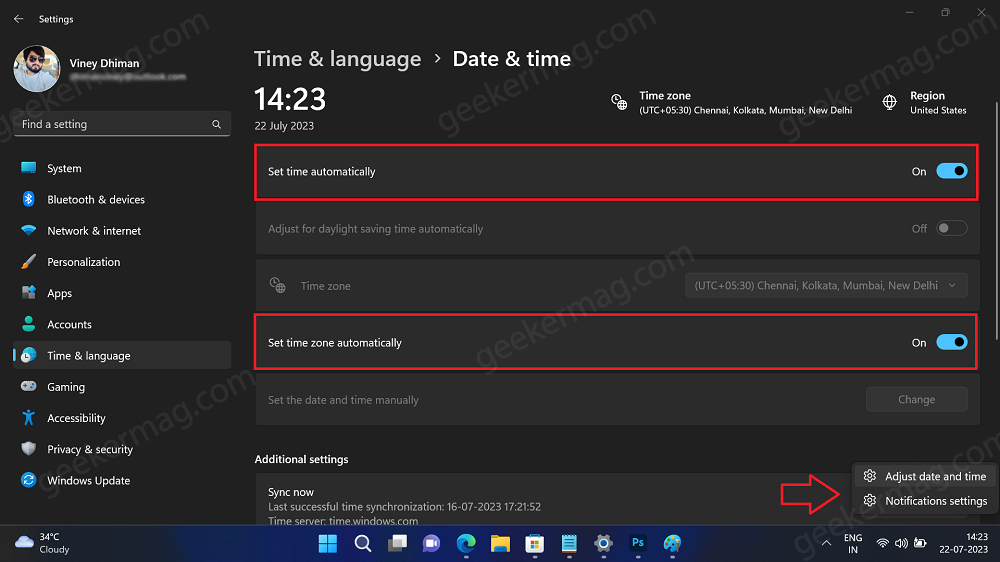
In the new window, toggle on Set time automatically and Set time zone automatically.
Disable Third-party Antivirus:
Sometimes, third-party antivirus software can interfere with Windows updates. Temporarily disable any third-party antivirus or security software you have installed and try running the update again.
Use DISM to Repair Windows Image
DISM is a nifty command-line tool that comes preinstalled in Windows OS and that can be repair the Windows image. Here’s how to use it:
Launch Command Prompt with Admin rights. For that, Click on the Search icon and type, CMD, When Command Prompt appears, in search results, click on the Run as administrator.
When UAC dialog box, appear, click Yes to continue.
In the Command prompt window, you need to execute following command:
DISM /online /cleanup-image /restorehealthWait for the process to complete (it may take several minutes). If it fails, try next method.
Use System File Checker (SFC):
SFC is another command-line tool that can scan and repair corrupted system files. Follow the instructions discussed below:
Launch Command Prompt with Admin rights as discussed in previous method.
In the Command prompt window, you need to execute following command:
sfc /scannowWait for the process to complete.
Check Disk for Errors:
Disk errors can also cause update problems. Use the built-in Check Disk utility to scan and fix errors on your system drive:
Open Command Prompt with admin rights. In the Command Windows, you need to execute following command:
chkdsk C: /fYou may need to restart your computer for the utility to run.
Low disk space:
If you don’t have enough free space on your hard drive, it can prevent you from installing the Windows update. Make sure that you have at least 10 GB of free space on your hard drive before you try to install the update.
To check storage space, launch Settings app by pressing WIN + I key combinations.
Navigate to System > Storage. On the top of the page, you will see how much storage space is consumed.
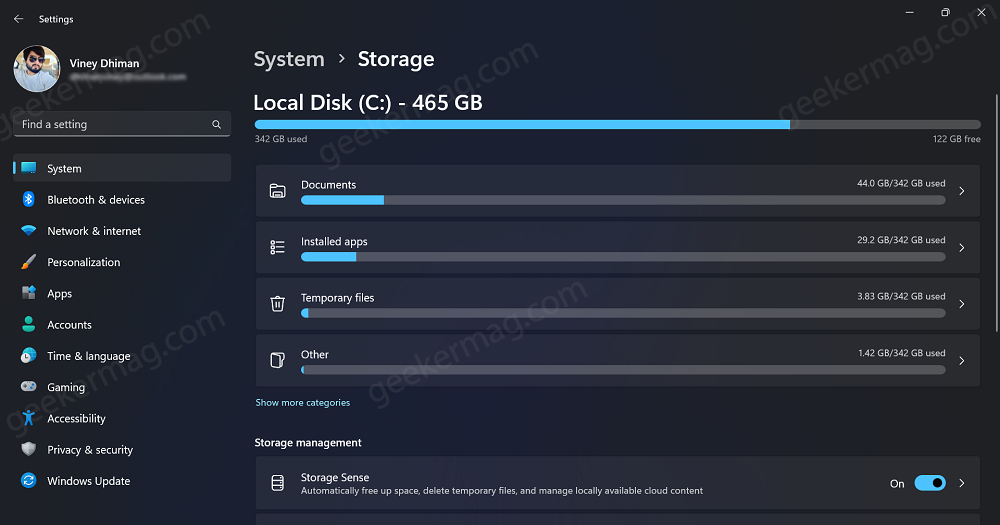
In case, you’re running low on space, click Temporary files option to delete unwanted files, or take a look at other folder which includes Document, apps and delete the unwanted files as well to reclaim some space.
You might be interesting in reading: How to Free Up Storage Space after Upgrading to Windows 11, or Delete Windows Upgrade Folder in Windows 10 to reclaim space.
Reset Windows Update Components:
Most of the time, resetting Windows Update Components can fix issues related to Windows Update. Therefore, you should also try this solution:
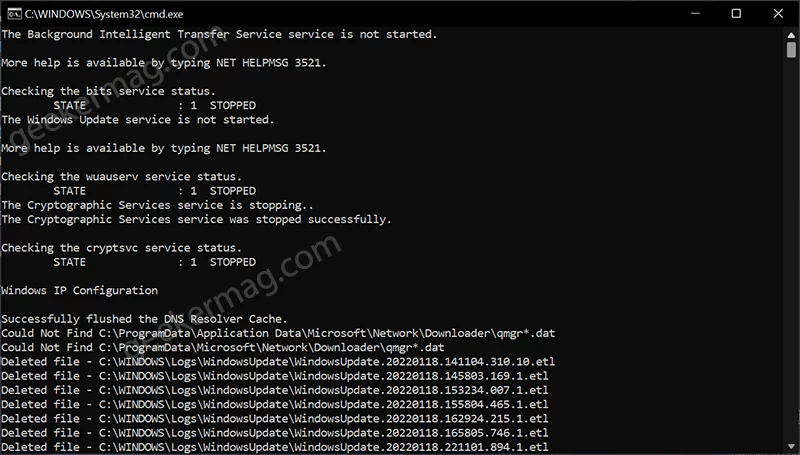
We have already written step by step instructions on how to do that, so check this blog post: How to Reset Windows Update Components in Windows 11. The same method works in Windows 10 as well.
Update BIOS
Recently, KB5012170 fails with error code 0x800f0922 due to the UEFI firmware version installed on the Windows 11 PC. So it is possible you’re unable to install the update due to same issue.
Please check this blog post (How to Fix Windows 11 KB5012170 Update fails to install, Gives 0x800f0922) that explains the situation and applies the suggested workaround to fix the issue.
Perform a Clean Boot:
A clean boot starts Windows with minimal drivers and startup programs, which can help identify if any third-party software is causing the issue. Here’s how to do it:
Click on the Search icon and type msconfig, when System Configuration app appers in search results, click to open it.
In the General tab, choose Selective startup and uncheck the box for Load startup items.
Switch to Services tab, check the box Hide all Microsoft services, and then hit the Disable all.
Click OK and then Restart.
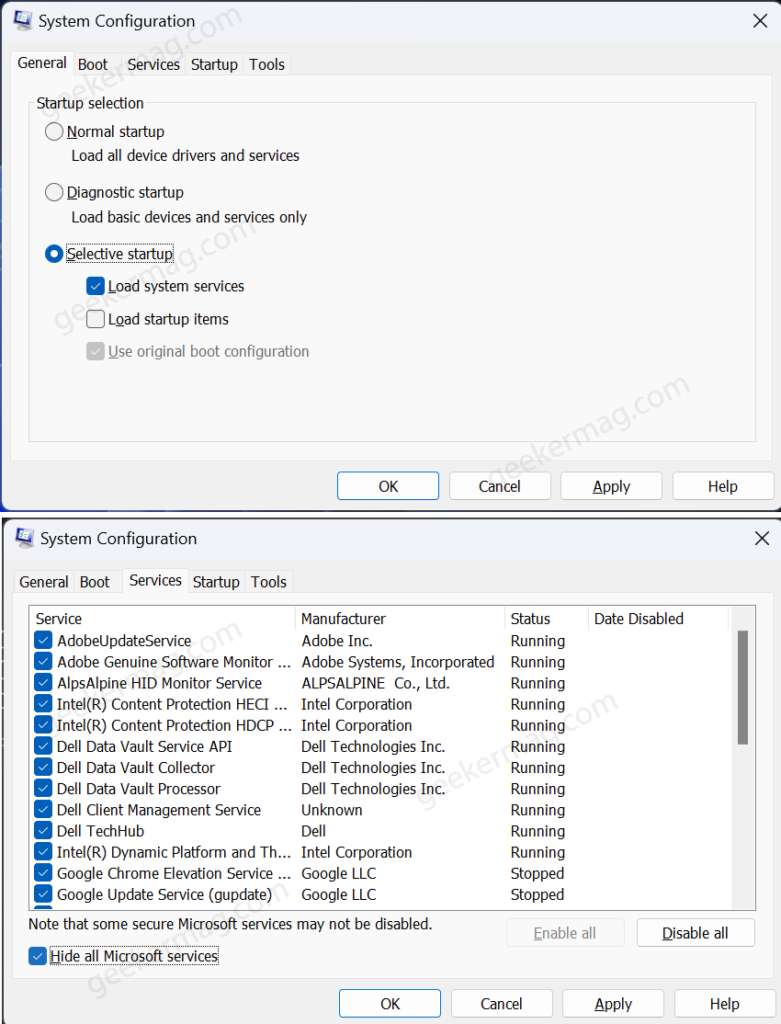
Or, you can follow step by step instructions discussed here for Windows 11 and Windows 10 to load Windows in clean boot state.
After the clean boot, try running the Windows update again.
Deleted Microsoft Edge unofficially?
Earlier, some users failed to install cumulative update KB5003173 for Windows 10, encountering error code 0x800f0922. The primary reason behind this issue was that a majority of the users had deleted Microsoft Edge from their PCs using unofficial workarounds and tools.
So, if you have done the same, this could be the reason why you’re unable to install Windows updates on your PC with 0x800f0922 error code.
Please check this blog post (How to Fix Windows 10 Update KB5003173 fails to install with Error 0x800f0922) that explains the situation and applies the suggested workaround to fix the issue.
If nothing works
If none of the above steps have successfully resolved Error 0x800f0922 on your Windows 11 system, you may need to consider more advanced solutions which includes performing a reset of Windows 11 without deleting your personal data and performing a repair installation using an ISO image.
Before proceeding with these solutions, it’s essential to create a backup of your important files to avoid data loss.
Check these blog posts for step by step and instructions: Reset Windows 11 without deleting data, or Repair Install Windows 11 using ISO image
Have you tried any of these solutions? If so, did they work for you? I hope this blog post has been helpful. If you have any other questions, please feel free to leave a comment below.


