Some users may prefer to disable this telemetry feature due to privacy concerns or to fix high disk usage on their PCs. In this blog post, we will provide a detailed and well-researched guide on how you can permanently turn off Microsoft Compatibility Telemetry.
Before we being, you must understand What is Microsoft Compatibility Telemetry and what it does?
Microsoft Compatibility Telemetry feature is part of the Windows Customer Experience Improvement Program (CEIP) in Windows operating systems that collects and sends data about your computer’s hardware, software, and usage to Microsoft.
This information helps Microsoft understand how software and hardware components interact with their operating system, enabling them to provide better support and make improvements in future updates.
It is essential to note that Microsoft has implemented various privacy safeguards in Windows 11 and Windows 10 to ensure that the telemetry data collected is anonymized and encrypted.
How Can I Permanently Turn OFF Microsoft Compatibility Telemetry in Windows 11/10
Still, some users may still prefer to disable this feature, and if you landed on this blog post, then definitely you’re one of them for sure.
So without further delays, let’s start with possible ways how to disable Microsoft Compatibility Telemetry on your PC.
Using Settings app
Open the Settings app in Windows 11 by pressing WIN + I key combination.
In the Settings app, you need to go to Privacy & Security.
On the right side, scroll down to the Windows Permission section, Under it, locate and click on the Diagnostic and feedback option.
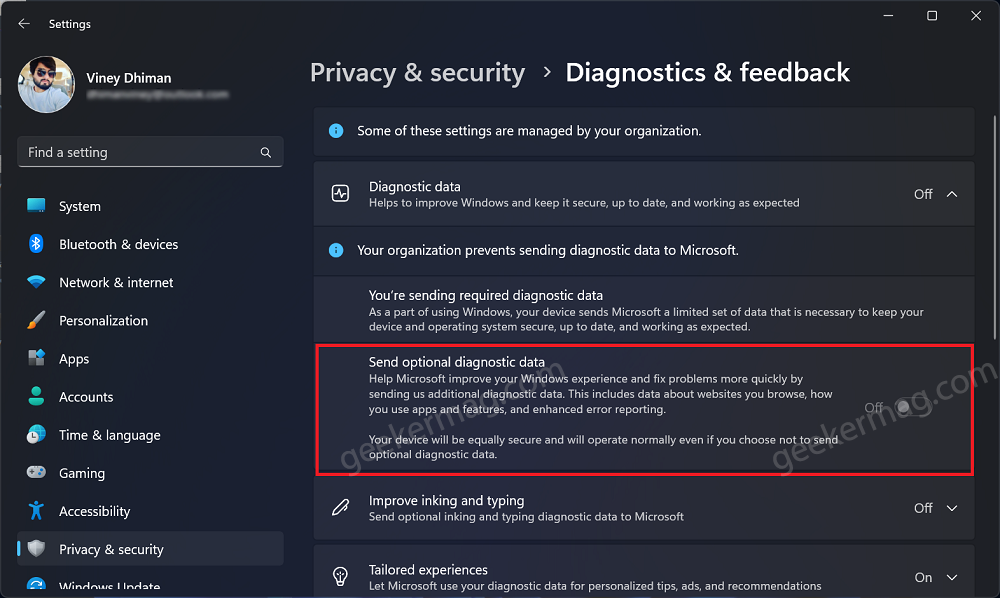
On this page, you need to toggle OFF “Send optional diagnostic data.”
In case, you want to delete diagnostic data that Microsoft has collected so far, then scroll down and locate the Delete Diagnostic data option.
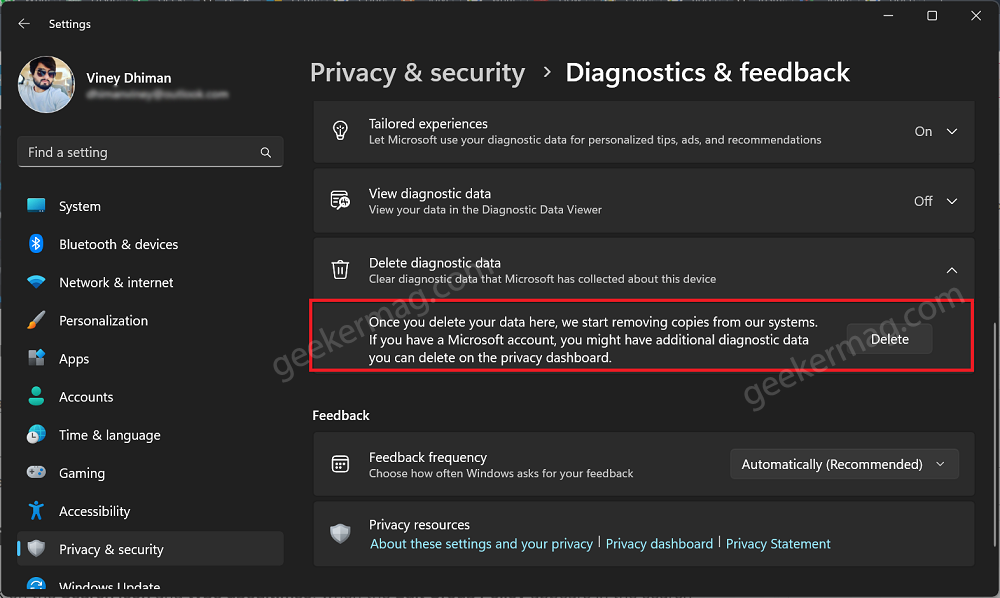
Here, click on the Delete button to cleated captured data.
Using Group Policy Editor (Not for Home Edition)
Click on the Search icon and type gpedit.msc, when the Edit Group Policy appears in the search results, click to open it.
In the left pane, navigate to “Computer Configuration” > “Administrative Templates” > “Windows Components” > “Data Collection and Preview Builds.”
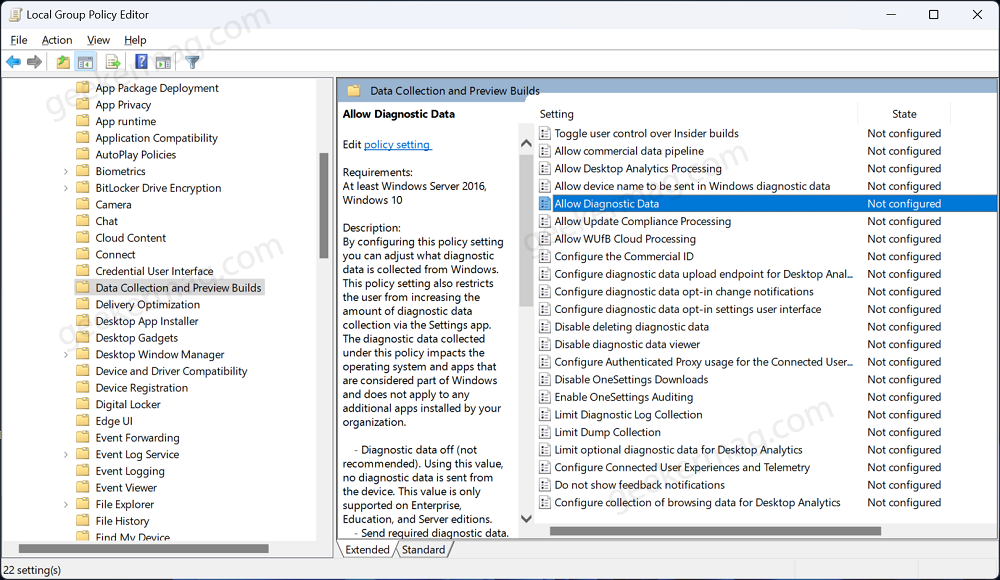
On the right pane, locate and double-click on “Allow Diagnostic Data” (earlier known as Allow Telemetry) in the right pane.

In the window that appears, select “Disabled“, then click “Apply” and then “OK” to save your changes.
You might want to read about How to Install Group Policy Editor in Windows 11 Home and Windows 10.
Using Registry Editor (Works in All Editions)
Note: This method will work on all editions of Windows 11. Also, Before making any changes to the Windows Registry, it is crucial to create a backup.
Click on the Search icon and type regedit, when the Registry Editor appears in search results, click to open it.
In the Registry Editor, navigate to the following path:HKEY_LOCAL_MACHINE\SOFTWARE\Policies\Microsoft\Windows\DataCollection
If the “DataCollection” key is not present, create it manually. Right-click on the “Windows” key, select “New” > “Key,” and name it “DataCollection.”
With the “DataCollection” key selected, right-click on the right pane, choose “New” > “DWORD (32-bit) Value,” and name it “AllowTelemetry.”
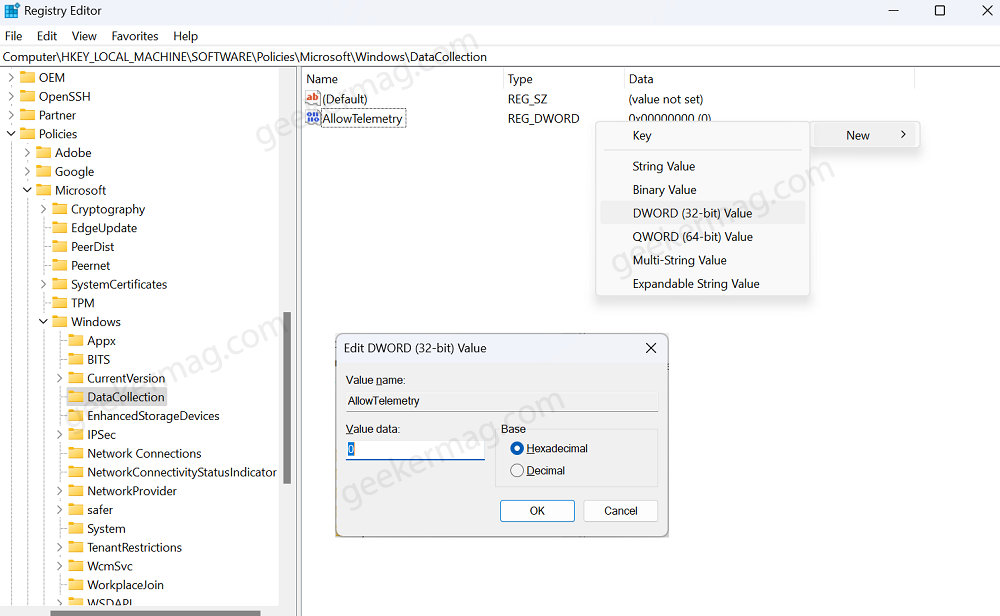
Double-click on “AllowTelemetry” and set its Value data to “0”. Click “OK” to save your changes.
Close the Registry Editor and restart your computer to apply the changes.
Alternatively, Open Command Prompt with admin right on your Windows 11 and Windows 10. For that, click on the Search icon and type cmd, when it appears in the search results, click on Run as administrator. When the UAC dialog box appears, click Yes to continue.
In the Command window, you need to execute this command: reg add "HKLM\SOFTWARE\Policies\Microsoft\Windows\DataCollection" /v AllowTelemetry /t REG_DWORD /d 0 /f
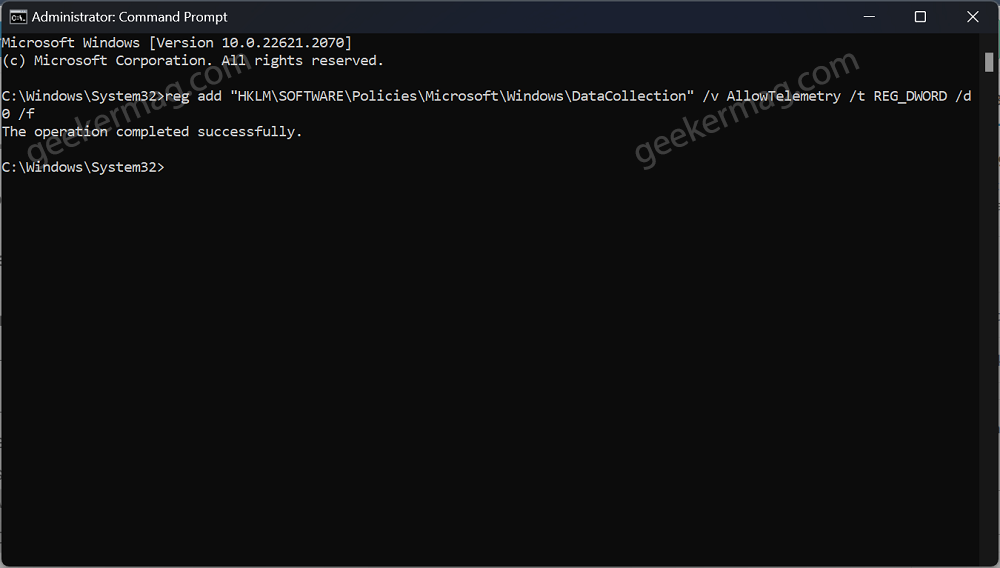
Once you get the message “The operation completed successfully“, close the Command Prompt.
Using Task Scheduler
If you want to disable Microsoft Compatibility Telemetry without using the Group Policy Editor or Registry Editor, you can do it through the Task Scheduler. Here’s how:
Click on the “Search” icon and type “Task Scheduler“, when the same app appears in the search results, click to open it.
In the Task Scheduler window, navigate to the following path on the left-hand side: Task Scheduler Library -> Microsoft -> Windows -> Application Experience
On the right-hand side, you’ll see a task named “Microsoft Compatibility Appraiser“, right-click on it and select Disable.”

When a confirmation window will appear, click “Yes” to confirm and disable the task.
Close the Task Scheduler window.
By disabling the “Microsoft Compatibility Appraiser” task, you prevent Windows from periodically sending telemetry data related to application usage and compatibility to Microsoft. This method ensures that no further telemetry data is collected from your computer.
Using Third-Party Tools
Several third-party tools are available that claim to disable Microsoft Compatibility Telemetry. However, caution should be exercised when using such tools, as they may modify critical system settings and potentially lead to unintended consequences. Always research the tool, read user reviews, and download from reputable sources.
Microsoft Compatibility Telemetry plays a vital role in improving Windows’ stability and performance. However, if you have privacy concerns or if you’re experiencing high system resource usage issues, you can follow the methods outlined in this guide to permanently turn off Microsoft Compatibility Telemetry.


