The following blog post has possible solutions on How to Fix Windows Spotlight’s “Switch To Next Picture” Option is Grayed Out in Windows 11.

When you set Windows Spotlight as a desktop background in Windows 11, a Camera icon starts appearing on the desktop. If you right-click on it, a menu appears with options, and one of them is “Switch to next picture“. With the help of this option, users can automatically switch to the next picture, if they don’t like the current one.
According to various reports from the user’s Windows Spotlight “Switch to Next Picture” option is grayed out for them in Windows 11. If you landed on this page, then you’re facing the same issue, right?
Fix – Windows Spotlight ‘Switch To Next Picture’ Option Greyed Out
Note – You can apply the same solutions to fix – Windows Spotlight ‘Switch To Next Picture’ Option Greyed Out in Windows 10.
Unfortunately, there’s no exact reason why the Switch to Next Picture option is Grayed out, but the good thing is there are possible solutions that you can apply to troubleshoot and fix the issue.
Restart your PC
Most of the time this issue is fixed just by doing a quick restart. So without any delay perform a quick restart and check if this fixes the issue or not.
Restart Windows Spotlight
Open the Settings app by pressing WIN + I key combinations. On the left sidebar, select Personalization, and then under it select Background.
Click on the drop-down menu next to Personalize your background and then select Picture.

This will switch your desktop wallpaper to a picture and apply the background depending on what theme you have selected.
After that, restart your computer, and again head over to background settings, select Windows Spotlight and check if this fixes the issue or not.
Delete Windows Spotlight Assets
Head over to Background settings and switch to Pictures as discussed in the above step.
Press the WIN + R key combination to open the Run dialog, and copy-paste this: %USERPROFILE%/AppData\Local\Packages\Microsoft.Windows.ContentDeliveryManager_cw5n1h2txyewy\LocalState\Assets, click OK.
The Assets folder will open.

Select all the files inside this folder by pressing CTRL + A, and then hit the Delete button.
After that, restart your computer.
Again head over to Background settings and select Windows Spotlight and check if this fixes the issue.
Reset Windows Spotlight Settings
Head over to Background settings and switch to Pictures as discussed in the above step.
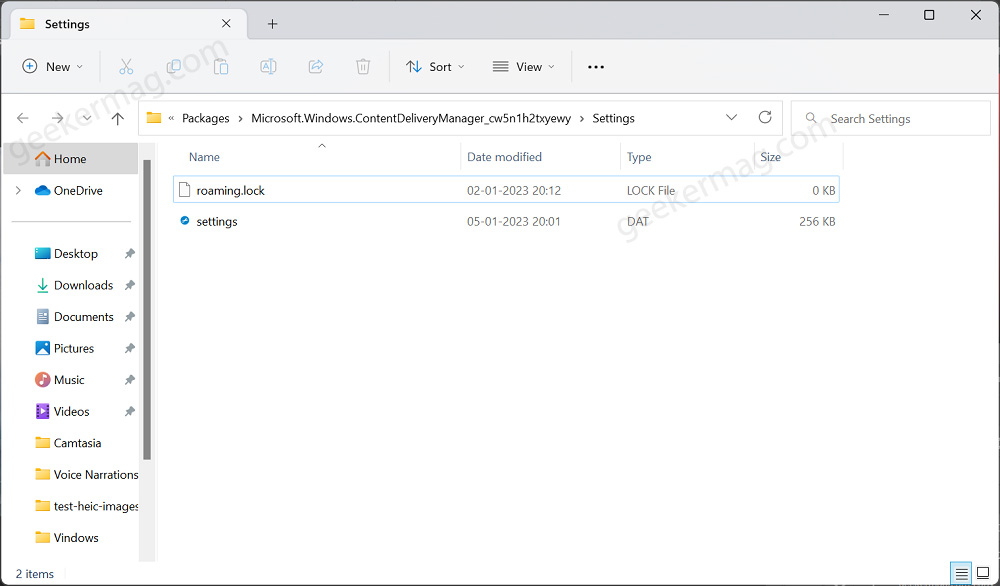
Press the WIN + R key combination to open the Run dialog, and copy-paste this: %USERPROFILE%/AppData\Local\Packages\Microsoft.Windows.ContentDeliveryManager_cw5n1h2txyewy\Settings
Here, you will see two files roaming.lock and settings.dat. Change their name to roaming.old and settings.old.dat.

Close everything and restart your computer.
Now, head back to the Background settings and select Windows Spotlight.
And, check if the ‘Switch to next picture’ option is still greyed out or not. If it is then move to the next step.
Repair, Reset, or Reinstall
If nothing helps in fixing the issue, then a final solution that we recommend to every user is to either Repair Install Windows 11, or if it fails, then Reset Windows 11, and if that also fails, then reinstall Windows 11.
So these are possible solutions that you can apply to fix Windows Spotlight “Switch to Next Picture” grayed out in Windows 11.


