Microsoft Teams is a great software client that allows users to text others, conduct audio/video meetings, take remote control, etc. Microsoft Teams shot up in popularity especially during the beginning of the pandemic, where most of the world was forced to work from home.
Users often complain about issues with the Microsoft Teams desktop client, such as being unable to access shared files, blank pages being loaded, and so on. If you too are facing such issues, then the best solution is to clear the Cache of Microsoft Teams.
Clear Microsoft Teams Cache on Windows 11/10
Below are the different methods to easily clear Microsoft Teams cache on machines running the Windows 11 and Windows 10 operating system.
Before you proceed, it is highly recommended to close all instances of Microsoft Team apps from your device.
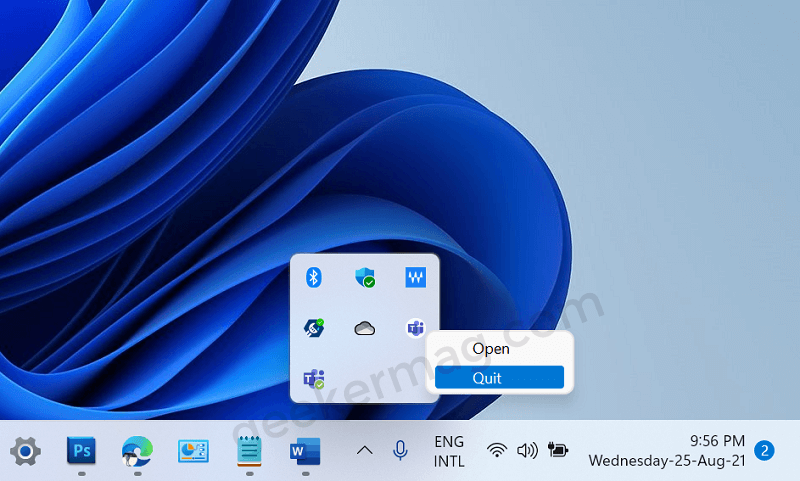
First of all, quit the Team app from Taskbar of Windows 11 and Windows 10. For that, click on the upward arrow on the taskbar, then right-click on the Team app, select Quit.

Second, launch Task Manager, locate the Microsoft Teams app, right-click on it and select End Task.
Now you’re all set to clear the cache of Microsoft Team app cache, let’s start with the first method:
Using Command Prompt
Launch Elevated Command Prompt Windows.
For that, type Command Prompt in search windows, and when the same app appears in search results, click on the Run as administrator option.

When the UAC dialog box appears, click Yes to continue.
In Windows Command Prompt window you need to copy-paste this command: rmdir /q /s %appdata%\Microsoft\Teams and hit enter.
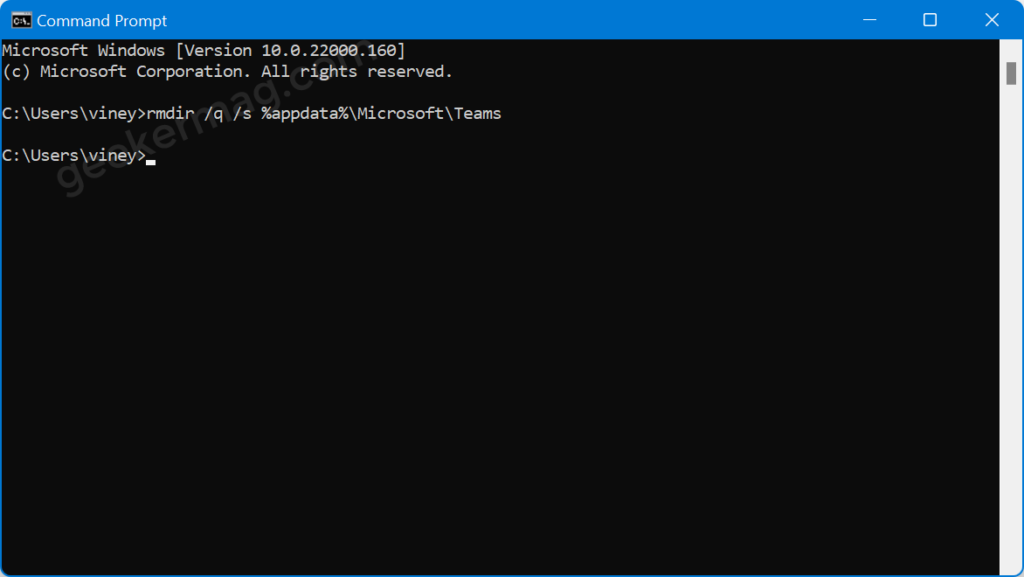
If there are no error messages displayed and the Command Prompt window asks for the next command input, it means that the above command was executed successfully on your system.
Now reboot your computer to apply the changes.
Once you have restarted the PC and launched the Microsoft Teams app again, the fresh cache folder will be created.
Clear Cache Manually
Below is how you can manually clear Microsoft Teams cache on Windows 10 and Windows 11 operating systems.
Launch Run dialog box by pressing WIN + R key combination.
Next, you need to copy-paste: %appdata%/Microsoft/ and click OK. This will take you to this path: C:\Users\viney\AppData\Roaming\Microsoft
If you don’t want to use the Run dialog, then you can launch File Explorer and head over to the above path.
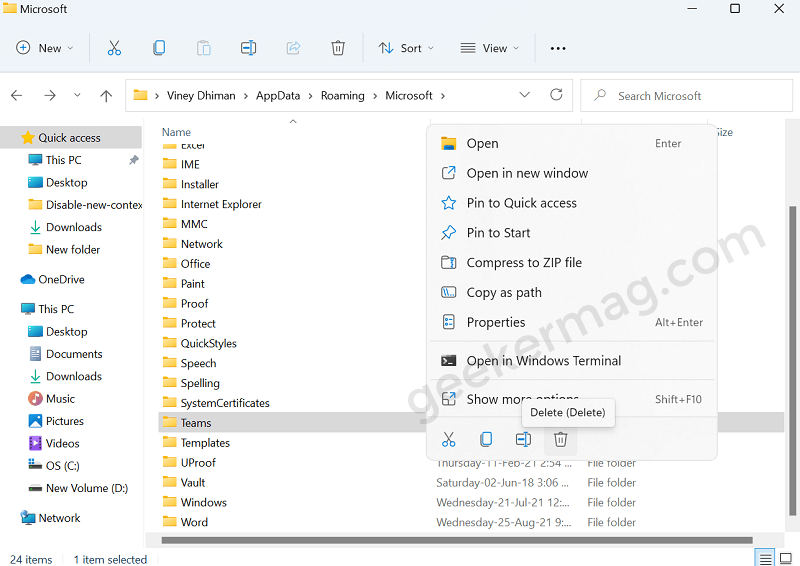
Inside the above path folder, find another folder named ‘Teams‘. Right-click on it and select Delete.
Reboot your computer and launch the Microsoft App.
As discussed above, the new cache folder will be created for the Microsoft teams app on your computer.
Both the above methods will help you to easily clear Microsoft Teams cache on Windows 11 and Windows 10 and help in fixing most of the bugs and issue you’re facing with the app.
However, if the issue still exists, feel free to brief your issue in the comments below and we will definitely help you out.

