Windows 11 is the next generation of Windows OS from Microsoft all set to release. Lots of users have already upgraded to Windows 11 (under the insider program) while the remaining will upgrade soon.
It is highly possible that after upgrading to Windows 11, you might experience issues where audio or sound is not working properly. It was common behavior that the majority of users experienced after upgrading to Windows 10 was available for the public.
Troubleshoot Sound Problems in Windows 11
To help you out, we decided to cover this blog post featuring all the possible solutions on how to fix it.
Use Audio Troubleshooter
One of the initial solutions that every affected user must try is running an Audio troubleshooter that automatically fixes the issue. Here’s how you can do that:
Click on the Search icon available on the taskbar and type Troubleshoot other problems.
When the same settings appear in search results, click to open it.
Here, look for Playing Audio and then click on the Run button available in the same section.
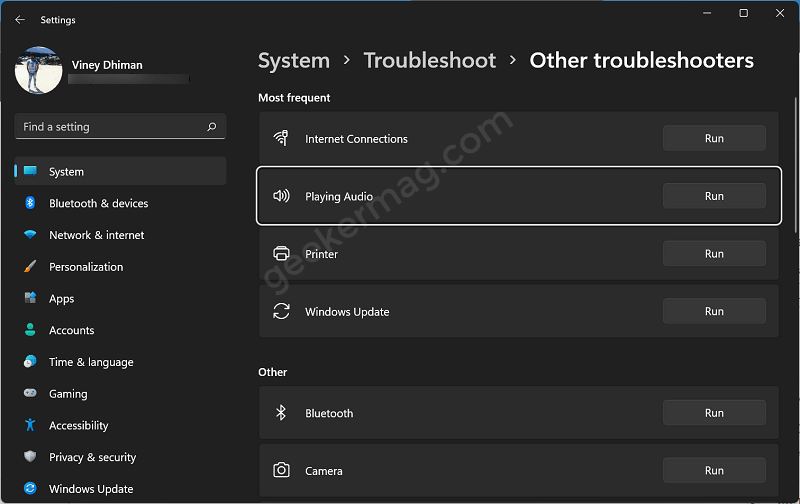
The troubleshooter will open up, and start looking for a problem, and when it finds out applied the solution to fix it.
Check if Audio Device is connected or not
Sometimes audio device is not connected to the device and due to this reason, users are facing the issue. So it is important to check if Audio device is connected or not. Here’s how you can do that:
Click on the Search icon and type Sound Settings, when the same setting appears in search results click to open it.

Here, under the Output section, look for the Output device. In my case, it’s Speakers/Headphones.
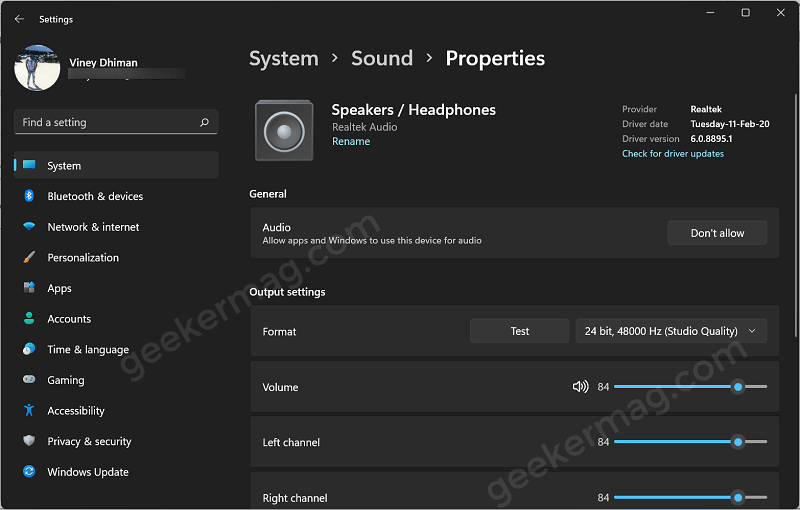
Now there are few possibilities:
- If the Output device list is empty, try to reinstall the audio driver. To do that, head over to same section listed in this post below.
- In case, you’re using multiple Output devices, then make sure to select one from which you expected sound or audio.
- Make sure this option “Allow apps and Windows to use this device for audio” for your audio device is set to Allow.
- Confirm Volume, Left and Right channel options are configured correctly.
- You can also try diabling audio enhancement options
Uninstall and Reinstall Audio Drivers
Uninstall and Reinstall driver is a live saviors solution that fixes almost all the issues related to ay components of Windows and so do for Audio devices. So it’s worth trying.
Here’s how you can do that:
Click on the Start button and select Device Manager.
Locate “Sound, Video, and Game controllers” from the list and expand by clicking the arrow next to it.

Right-click on the Problematic Audio device and select Uninstall. When a dialog box appears, click Uninstall button. Make sure the box for this “Attempt to remove driver” option is checked.
After that reboot your device.
Your device will automatically install the generic driver saved on the computer. Alternatively, you can head over to Settings > Windows Update > Check for updates to look if the latest version of the audio driver is available.
Now, check if this fixes the issue.
Change Audio enhancements and Hardware acceleration
Some issues related to sound or audio are also fixed by tweaking audio enhancement and hardware acceleration settings. Here’s how you can do that:
Click on the Search icon and type mmsys.cpl, when the same item appearing search results click to open it. This will launch the Sound properties window.
Here, select your default audio device and then select Properties.
In the Properties window, switch to the Advanced tab. Here, try to change the frequency from 24 bit to 16 bit and then click the Test button to check if this fixes the issue.
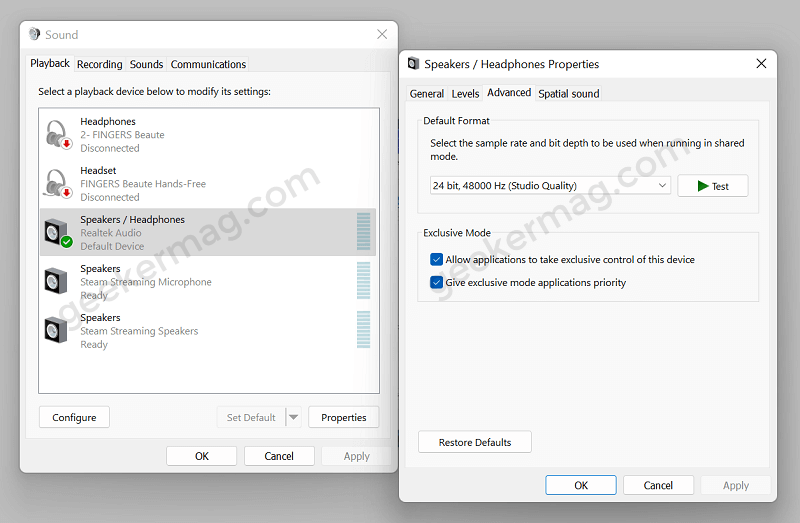
If this fails to fix, then on the same windows, you will find Hardware acceleration setting, under this uncheck the box for “Ällow hardware acceleration of audio for this device“, then click OK.
The same option is not available for me.
Similarly, you will also find the Signal enhancement section, where you need to uncheck the box for the “Enable Audio enhancements” and click OK.
Follow all the solution suggested above one by one and check if this fixes the audio issue on your Windows 11 PC.
Restart Audio Services
Windows Services play a vital role in properly working the various functionalities in Windows 11 and so do Audio devices. In case, your device is facing an audio issue, then try to restart the audio service and check if this fixes the issue.
Here’s how you can do that:
Click on the Search icon and then type service.msc, when same appear in search results, click to open it.
In Services Window, you need to locate the following services:
- Windows Audio
- Windows Audio endpoint Builder
- Remote Procedure Call.
Back to back, right-click on each and select Restart.

Once you have restarted all the services, reboot your device. This should fix the issue.
If your device sound issue isn’t fixed by any solution discussed above, then the last solution is to perform an in-place upgrade of Windows 11.

