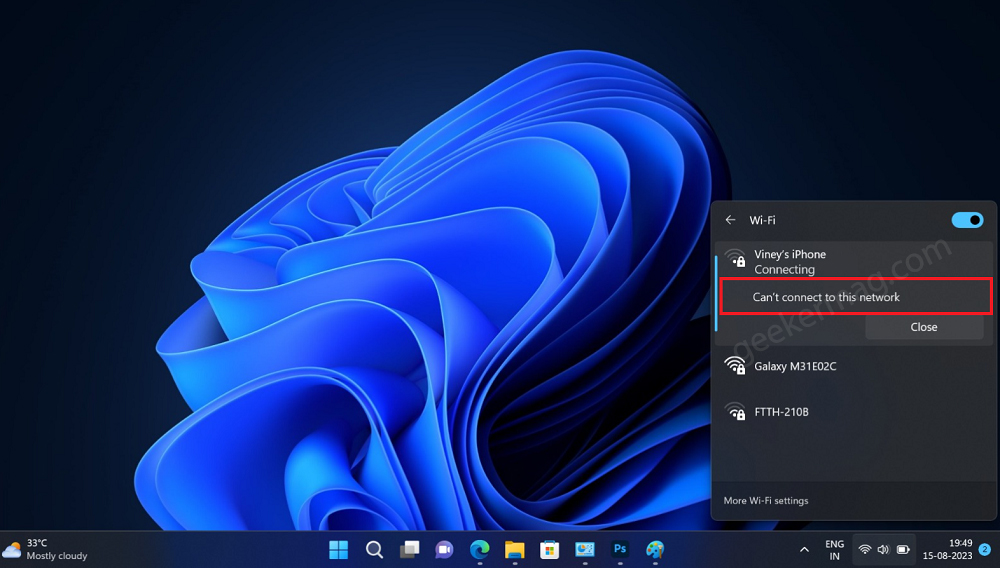
We all rely on the Internet for even the most basic everyday tasks. Personally, even a short interruption in my Wi-Fi connection is enough to negatively impact my daily schedule and ruin my productivity. One such network issue is “Wi-Fi Can’t connect to this network” on Windows 11.

The error message isn’t new and exist since the days of Windows 7 and after upgrading to Windows 11 from Windows 10, multiple users reported it. Now it become a common network issue in Windows 11.
Usually, this error message appears when the system is unable to connect to a particular wireless network due to various issues related to the Network drivers and adapters, system conflicts, and user settings.
How to fix Wi-Fi “Can’t connect to this network” issue
To help you fix this annoying issue, we’ve created a comprehensive list of troubleshooting steps. Do note that these methods should work almost the same for both Windows 11.
By the end of this guide, you should be able to get rid of the Wi-Fi “Can’t connect to this network” error.
Connect to the network using a different device
Let’s first ensure that our Wi-Fi network is working properly by connecting using a different device. If the other device fails to connect to the network, this means that your Wi-Fi is at fault. If the device connects without any issues, you can move ahead with the next steps.
Make sure that Airplane mode is disabled
Like mobile devices, the Airplane mode on your Windows PC also blocks off all Wi-Fi connections. If it’s enabled on your system, you won’t be able to use the internet.
You can disable it by clicking on Quick Settings in the bottom-right corner of the screen.

Find the option for Airplane Mode and toggle it off.
Reboot your computer and router/modem
Rebooting your PC and your router/modem can easily get rid of common bugs and issues. As a quick troubleshooting step, it is recommended that you restart both devices and check if the issue gets resolved.
You can reboot your router/modem by unplugging the power cable or pressing the power button. Keep it shut down for about 30-60 seconds before powering it back on.
Forget the Wi-Fi network
If you’re having trouble when connecting to Wi-Fi, you can forget that particular network and reconnect on your Windows PC. This clears all the previously saved data about the network and allows you to have a fresh start by re-entering the SSID and password.
Go to Settings and find Network and Internet.
Select Wi-Fi and then go to Manage known networks.
Here, you can forget your previously added Wi-Fi networks.

Once the network has been forgotten, you can go to the Quick Settings panel on the bottom-left corner of the screen, expand the Wi-Fi settings and reconnect to the network.

Troubleshooting your Network Driver
If you’re constantly getting the “Can’t connect to this network” error, there could be a problem with the system’s network driver. To fix such problems, you can try updating, rolling back, or uninstalling your network driver.
To update the driver, go to the Windows Start icon and right-click on it.
In the pop-up menu, click on Device Manager.
Under Network Adapters, look for your Wi-Fi adapter.

Right-click on the Wi-Fi adapter and click Update Driver.
Select Search Automatically for Drivers. This will allow Windows to automatically search and install the latest available drivers for your Wi-Fi adapter.
If it shows that you already have the latest drivers, you can try manually downloading those drivers from the manufacturer’s official website. You can also try other driver updater software to do that job for you. Here’s our detailed guide about Updating drivers on Windows 11 PCs.
If this doesn’t work, try uninstalling the network driver. Right-click on the Wi-Fi adapter in the Device Manager.
Then select Uninstall Driver and click Uninstall.

Restart your PC and it should automatically install the latest drivers.
If the problem was caused after a recent driver update, rolling back the driver can help fix the issue. Right-click on the network driver, click on Properties, and go to the Driver tab.
Now select the Roll Back Driver option. Click OK to apply the changes.

Update your Windows PC
Windows consistently receives updates that include various improvements and bug fixes. Updating your system to the latest version could help it run better.
Go to Settings and click on Windows Update in the left side panel.

Click on Check for updates and install the latest version if available.
Run the Network Adapter troubleshooter
Windows 11 has a built-in troubleshooting tool for various system functions. You can use the tool to identify and repair problems with your PC.
Go to Settings and find the Troubleshoot option in the System Settings tab.

Scroll down and select Other troubleshooters.
Look for the Network Adapter troubleshooter and click Run.

Choose Wi-Fi and hit Next. Now wait for the troubleshooter to complete the scan.
If a problem is identified, perform the steps recommended by the PC to fix issues with your Wi-Fi adapter.
Disable VPN
A previously set-up VPN may sometimes conflict with your Wi-Fi network. Disabling it can help fix such problems.
Go to Settings and select the Network & Internet tab on the left side panel.
Click on VPN and remove all the previously added VPNs.

To remove a particular VPN, click on the down arrow beside the network and press the Remove button.
Reset network settings
Resetting your network settings can help bring things back to the default state.
Go to Settings and click on the Network & Internet tab.
Scroll down and open Advanced network settings.
Under More Settings, click on the Network Reset option.

Now press the ‘Reset now‘ button. Click Yes and this will restart your system.

Disable and re-enable the Wireless Network Adapter
A quick reset can sometimes solve various issues with your Wireless Network Adapter. You can follow our detailed guide about various ways you can Reset Network Settings on Windows 11.

Disable IPv6
IPv6 is the successor to the IPv4 communications protocol that offers better internet speeds and more efficient routing. However, some may face incompatibilities when this protocol is turned on.
To disable it, go to Settings and click on the Network & Internet tab on the left side panel.
Open Advanced Network Settings and scroll down to the Related Settings section.
Click More network adapter options. This will open the Control Panel for advanced controls.

Right-click on your Wi-Fi adapter and select Properties.
In the ‘This connection uses the following items” list, disable Internet Protocol version 6 (IPv6).

Click OK to apply the changes. Try reconnecting to the Wi-Fi network again.
Try using an Ethernet cable
While this is not a permanent solution to the problem, you can use an Ethernet cable to access the internet and perform important tasks. An Ethernet cable allows a wired connection between your router/modem and your system. It generally also offers higher internet speeds and reliability.
Other advanced troubleshooting steps
If none of these methods have worked so far, you are limited to only a few more advanced steps. In situations like these, it is recommended that you try an In-Place upgrade on your Windows 11 system.
If that doesn’t work, Resetting Windows 11 to factory settings can help. You can do that without losing your personal data.

You can also try a clean installation of Windows from scratch. Make sure to back up your data before doing so.
YouTube Video – Fix: WiFi “Can’t connect to this network” on Windows 11
We hope these troubleshooting steps helped you fix the “Can’t connect to this network” on Windows 11. Please let us know if we missed any steps that could be helpful in the comments section.


